Latest news about Bitcoin and all cryptocurrencies. Your daily crypto news habit.
The Chainlink Fall 2021 Hackathon kicks off October 22. Sign up today.
If you want to learn how to develop Solana smart contracts and programs, then you’ve come to the right place.
Solana is an emerging high-performance, permissionless blockchain that offers fast, cheap, and scalable transactions and supports smart contracts being built with the Rust, C++, and C programming languages.
In this technical article, we’ll go through examples of writing, deploying, and interacting with smart contracts on the Solana Devnet cluster, as well as how to use Chainlink Price Feeds in your Solana smart contracts.
Solana’s Architecture and Programming Model
Solana is a high-performance blockchain capable of thousands of transactions per second and sub-second block times. It achieves this via a Byzantine Fault Tolerant (BFT) consensus mechanism that makes use of a new innovative cryptographic function called Proof of History.
Proof of History
Proof of History (PoH) establishes a cryptographically verifiable order of events (in this case transactions) over time via the use of a high-frequency verifiable delay function, or VDF. Essentially this means PoH is like a cryptographic clock that helps the network agree on time and ordering of events without having to wait to hear from other nodes. Much like how an ancient water clock can record the passage of time by observing rising water levels, Proof of History’s sequential outputs of constant hashed blockchain state give a verifiable order of events over time.
This helps the performance of the network by allowing the ordered events to then be processed in parallel, as opposed to a traditional blockchain scenario where a single process verifies and bundles up all the transactions to be included in the next block.
A simple analogy would be to imagine a large 100-piece puzzle. In a normal scenario it would take one or more people a certain amount of time to complete the puzzle. But imagine if beforehand the puzzle pieces were all stamped with a number corresponding to their position, from top left to bottom right of the puzzle, and laid out in a line in sequential order. Because the exact order of puzzle pieces and their position in the puzzle is known beforehand, the puzzle can be solved quicker by having multiple people focus on a section each. This is the effect that having a verifiable sequence of events over time has on the consensus mechanism; it allows the processing to be broken up into multiple parallel processes.
Smart Contract Architecture
Solana offers a different smart contract model to traditional EVM-based blockchains. In traditional EVM-based chains, contract code/logic and state are combined into a single contract deployed on-chain. With Solana, a smart contract (or program) is read-only or stateless and contains just program logic. Once deployed, smart contracts can be interacted with by external accounts. The accounts that interact with the programs store data related to program interaction. This creates a logical separation of state (accounts) and contract logic (programs). This is the crucial difference between Solana and EVM-based smart contracts. Accounts on Ethereum are not the same as accounts on Solana. Solana accounts can store data (including wallet information) as opposed to Ethereum accounts, which are references to people’s wallets.
In addition to this, Solana offers a CLI and JSON RPC API that can be used by decentralized applications to interact with the Solana blockchain. They can also use one of the existing SDKs, which allow clients to talk to the blockchain and Solana programs.
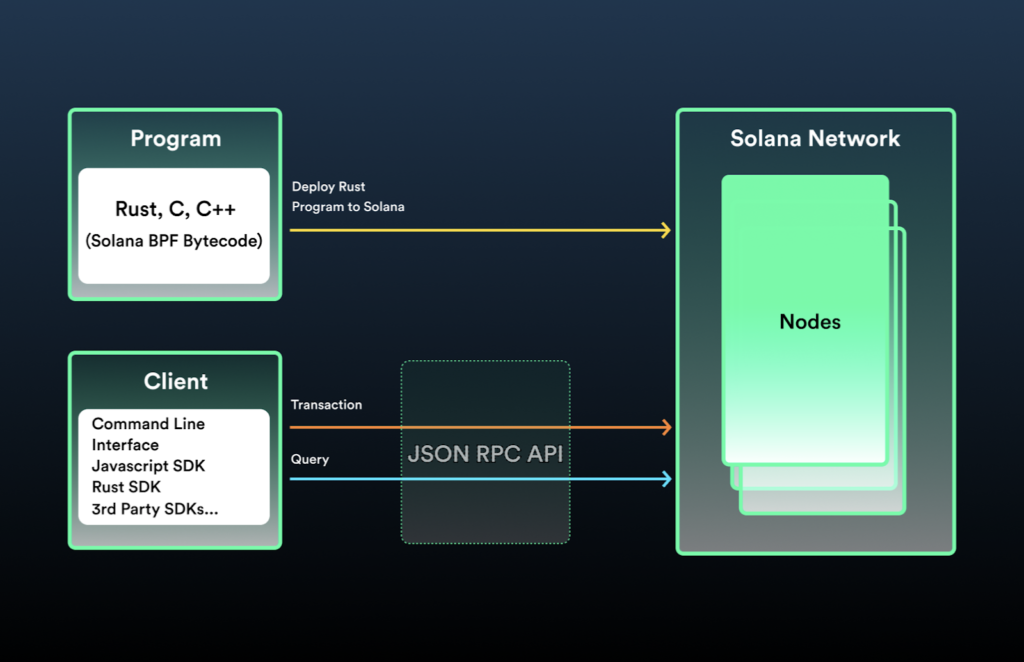 High-level representation of the Solana development workflow. Source: Solana documentation
Deploying Your First Solana Smart Contract
In this section, you’ll create and deploy your first ‘hello world’ Solana program, written in Rust.
Requirements
The following should be installed before proceeding:
- NodeJS v14 or greater & NPM
- The latest stable Rust build
- Solana CLI v1.7.11 or later
- Git
The HelloWorld Program
The HelloWorld program is a smart contract that prints output to the console and counts the number of times the program has been called for a given account, storing the number on-chain. Let’s break down the code into separate sections.
The first section defines some standard Solana program parameters and defines an entry point for the program (the ‘process_instruction’ function). In addition to this, it uses borsh for serializing and deserializing parameters being passed to and from the deployed program.
use borsh::{BorshDeserialize, BorshSerialize};
use solana_program::{
    account_info::{next_account_info, AccountInfo},
    entrypoint,
    entrypoint::ProgramResult,
    msg,
    program_error::ProgramError,
    pubkey::Pubkey,
};

/// Define the type of state stored in accounts
#[derive(BorshSerialize, BorshDeserialize, Debug)]
pub struct GreetingAccount {
    /// number of greetings
    pub counter: u32,
}

// Declare and export the program's entrypoint
entrypoint!(process_instruction);
The process_instruction function accepts the program_id, which is the public key where the program is deployed to, and accountInfo, which is the account to say hello to.
pub fn process_instruction(
    program_id: &Pubkey, // Public key of the account the hello world program was loaded into
    accounts: &[AccountInfo], // The account to say hello to
    _instruction_data: &[u8], // Ignored, all helloworld instructions are hellos
The ProgramResult is where the main logic of the program resides. In this case, it simply prints a message, then selects the accounts by looping through ‘accounts’. However, in our example there will only be one account.
    ) -> ProgramResult {
    msg!("Hello World Rust program entrypoint");

    // Iterating accounts is safer then indexing
    let accounts_iter = &mut accounts.iter();

    // Get the account to say hello to
    let account = next_account_info(accounts_iter)?;
Next, the program checks to see if the account has permission to modify the data for the specified account.
    // The account must be owned by the program in order to modify its data
    if account.owner != program_id {
        msg!("Greeted account does not have the correct program id");
        return Err(ProgramError::IncorrectProgramId);
    }
Finally, the function takes the existing account’s stored number, increases the value by one, writes the result back, and displays a message.
    // Increment and store the number of times the account has been greeted
    let mut greeting_account = GreetingAccount::try_from_slice(&account.data.borrow())?;
    greeting_account.counter += 1;
    greeting_account.serialize(&mut &mut account.data.borrow_mut()[..])?;

    msg!("Greeted {} time(s)!", greeting_account.counter);

    Ok(())
Deploying the Program
The first step is to clone the repository.
git clone https://github.com/solana-labs/example-helloworld
cd example-helloworld
Once this is done, you can then set your current environment to devnet. This is the test network for Solana developers writing and testing smart contracts.
solana config set --url https://api.devnet.solana.com
Next, you need to create a new keypair for your account. This is required to interact with deployed programs (smart contracts) on the Solana devnet. Take note: this is an insecure method for storing keys and should only be used for demo purposes. You will be prompted to enter in a passphrase for security reasons.
solana-keygen new --force
Now that you’ve created an account, you can use the airdrop program to obtain some SOL tokens. You will need some lamports (fractions of SOL tokens) to deploy your smart contract. This command requests SOL tokens into your newly generated account:
solana airdrop 5
You’re now ready to build the hello world program. You can build it by running the following command
npm run build:program-rust
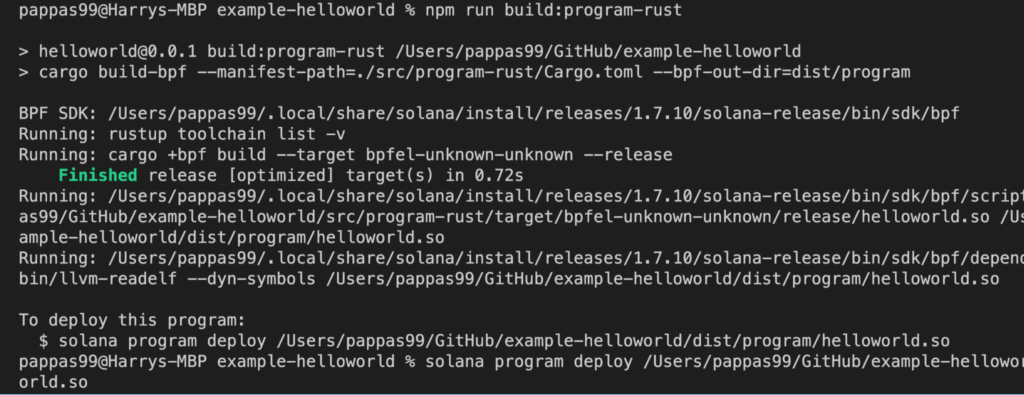 Compiling the program
Once the program has been built, you can then deploy it to devnet. The previous command’s output will give you the command that you need to run, but it should look something similar to the following:
solana program deploy dist/program/helloworld.so
The end result is that you have successfully deployed the hello world program to devnet with an assigned program Id. This can then be checked on the Solana Devnet explorer.
 Deploying the program
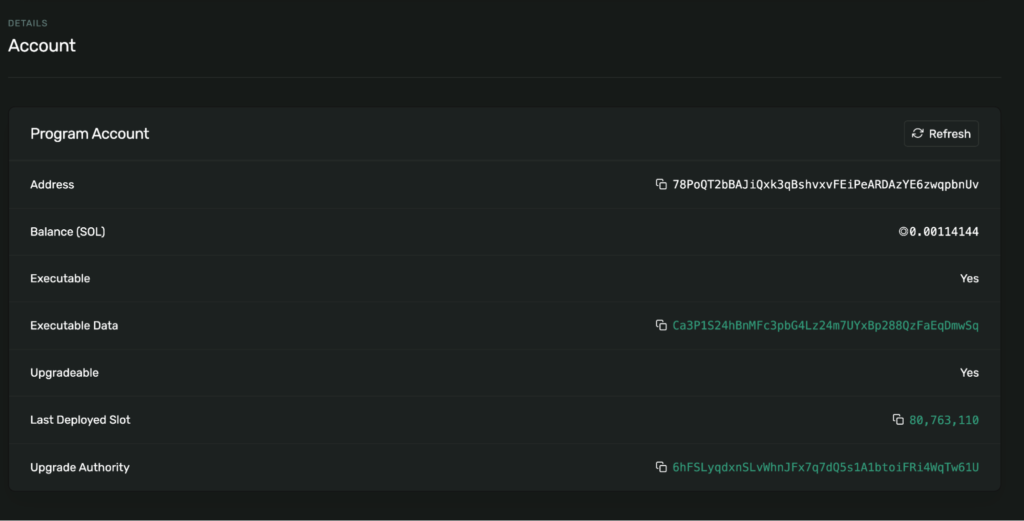 Viewing the deployed program on the Devnet explorer
Interacting With the Deployed Program
To interact with the deployed program, the hello-world repository contains a simple client. This client is written in Typescript using the Solana web3.js SDK and the Solana web3 API.
The Client
The client entry point is the main.ts file, which performs a number of tasks in a specific order, most of which are contained within the hello_world.ts file.
First, the client establishes a connection with the cluster by calling the ‘establishConnection’ function
export async function establishConnection(): Promise {
  const rpcUrl = await getRpcUrl();
  connection = new Connection(rpcUrl, 'confirmed');
  const version = await connection.getVersion();
  console.log('Connection to cluster established:', rpcUrl, version);
}
It then calls the ‘establishPayer’ function to ensure there is an account available to pay for transactions, and creates one if required.
export async function establishPayer(): Promise {
  let fees = 0;
  if (!payer) {
    const {feeCalculator} = await connection.getRecentBlockhash();

    // Calculate the cost to fund the greeter account
    fees += await connection.getMinimumBalanceForRentExemption(GREETING_SIZE);

    // Calculate the cost of sending transactions
    fees += feeCalculator.lamportsPerSignature * 100; // wag

    payer = await getPayer();
  }
The client then calls the ‘checkProgram’ function, which loads the keypair of the deployed program from ./dist/program/helloworld-keypair.json and uses the public key for the keypair to fetch the program account. If the program doesn’t exist, the client stops with an error. If the program does exist, it will create a new account with the program assigned as its owner to store the program state, which in this case is the number of times the program has been executed.
 export async function checkProgram(): Promise {
  // Read program id from keypair file
  try {
    const programKeypair = await createKeypairFromFile(PROGRAM_KEYPAIR_PATH);
    programId = programKeypair.publicKey;
  } catch (err) {
    const errMsg = (err as Error).message;
    throw new Error(
      `Failed to read program keypair at '${PROGRAM_KEYPAIR_PATH}' due to error: ${errMsg}. Program may need to be deployed with \`solana program deploy dist/program/helloworld.so\``,
    );
  }

  // Check if the program has been deployed
  const programInfo = await connection.getAccountInfo(programId);
  if (programInfo === null) {
    if (fs.existsSync(PROGRAM_SO_PATH)) {
      throw new Error(
        'Program needs to be deployed with `solana program deploy dist/program/helloworld.so`',
      );
    } else {
      throw new Error('Program needs to be built and deployed');
    }
  } else if (!programInfo.executable) {
    throw new Error(`Program is not executable`);
  }
  console.log(`Using program ${programId.toBase58()}`);

  // Derive the address (public key) of a greeting account from the program so that it's easy to find later.
  const GREETING_SEED = 'hello';
  greetedPubkey = await PublicKey.createWithSeed(
    payer.publicKey,
    GREETING_SEED,
    programId,
  );
The client then builds up and sends a ‘hello’ transaction to the program by calling the ‘sayHello’ function. The transaction contains an instruction that holds the public key of the helloworld program account to call and the account to which the client wishes to say hello to. Each time the client performs this transaction to an account, the program increments a count in the destination account’s data storage.
  export async function sayHello(): Promise {
  console.log('Saying hello to', greetedPubkey.toBase58());
  const instruction = new TransactionInstruction({
    keys: [{pubkey: greetedPubkey, isSigner: false, isWritable: true}],
    programId,
    data: Buffer.alloc(0), // All instructions are hellos
  });
  await sendAndConfirmTransaction(
    connection,
    new Transaction().add(instruction),
    [payer],
  );
}
Finally, the client queries the account’s data to retrieve the current number of times the account has had the sayHello transaction called, by calling ‘reportGreetings’
 export async function reportGreetings(): Promise {
  const accountInfo = await connection.getAccountInfo(greetedPubkey);
  if (accountInfo === null) {
    throw 'Error: cannot find the greeted account';
  }
  const greeting = borsh.deserialize(
    GreetingSchema,
    GreetingAccount,
    accountInfo.data,
  );
  console.log(
    greetedPubkey.toBase58(),
    'has been greeted',
    greeting.counter,
    'time(s)',
  );
Running the Client
Before you can run the client to read data from your deployed program, you need to install the client dependencies.
npm install
Once this is done, you can start the client.
npm run start
You should see output showing your program successfully being executed, and it should display the number of times the account has been greeted. Subsequent runs should increase this number.
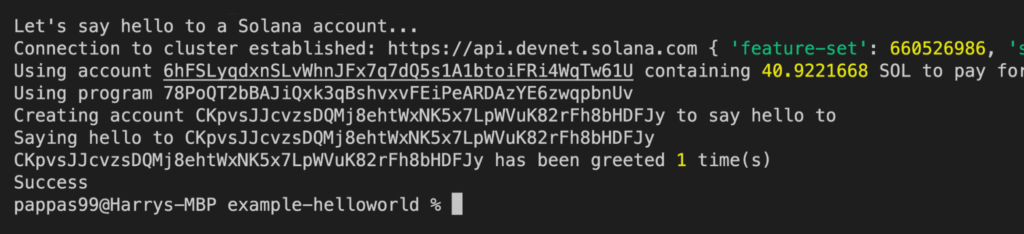 Starting the Hello World client to interact with the deployed program
Congratulations, you’ve deployed and interacted with a Solana smart contract on the devnet network! Now we’ll dive into another example Solana program and client, except this time we’ll make use of Chainlink Price Feeds.
Chainlink Price Feeds on Solana
The ecosystem of DeFi apps on Solana is growing at an accelerating rate. In order to power basic DeFi mechanisms and execute key on-chain functions, such as issuing loans at fair market prices or liquidating undercollateralized positions, these dApps need access to highly reliable and high-quality market data.
Solana recently integrated Chainlink Price Feeds on their devnet network, offering developers highly decentralized, high-quality, sub-second-updating price reference data for building hybrid smart contracts.
When combined with Solana’s ability to support up to 65,000 transactions per second and its extremely low transaction fees, Chainlink Price Feeds have the potential to empower DeFi protocol infrastructure that can compete with traditional financial systems in terms of trade execution and risk management quality.
In this next code example, we’ll deploy and interact with a Solana program that makes use of Chainlink Price Feeds on the Solana devnet.
Requirements
- NodeJS v14 or greater & NPM
- The latest stable RUST build
- Solana CLI v1.7.11 or later
- Git
The Chainlink Solana Demo Program
The Chainlink Solana Demo program is a smart contract that simply connects to a Chainlink Price Feed account on devnet, and retrieves and stores the latest price of the specified price pair.
Chainlink Price Feeds on Solana all utilize a single program, with each individual price feed a separate account that submits price updates using the program.
The first section consists of normal includes and declaring using borsh for serializing and deserializing parameters being passed to and from the deployed program. In addition to this, some structs are set up for storing price feed answers and decimal data.
use borsh::{BorshDeserialize, BorshSerialize};
use solana_program::{
    account_info::{next_account_info, AccountInfo},
    entrypoint,
    entrypoint::ProgramResult,
    msg,
    pubkey::Pubkey,
};

struct Decimal {
    pub value: u128,
    pub decimals: u32,
}

/// Define the type of state stored in accounts
#[derive(BorshSerialize, BorshDeserialize, Debug)]
pub struct PriceFeedAccount {
    /// number of greetings
    pub answer: u128,
}

impl Decimal {
    pub fn new(value: u128, decimals: u32) -> Self {
        Decimal { value, decimals }
    }
}
Next, the program declares the entry point for the program to be the ‘process_instructions’ function.
// Declare and export the program's entrypoint
entrypoint!(process_instruction);
Finally, the ‘process_instruction’ function is the part of the program that contains the main logic for the smart contract. It receives the transaction with the specified feed address and handles the steps to retrieve and store the price data on-chain. The function also calls get_price() from the chainlink-solana package, which gets imported from GitHub via the Cargo.toml file. The function finishes by storing the price against the specified account.
pub fn process_instruction(
    _program_id: &Pubkey, // Ignored
    accounts: &[AccountInfo], // Public key of the account to read price data from
    _instruction_data: &[u8], // Ignored
) -> ProgramResult {
    msg!("Chainlink Solana Demo program entrypoint");

    let accounts_iter = &mut accounts.iter();
    // This is the account of our our account
    let my_account = next_account_info(accounts_iter)?;
    // This is the account of the price feed data
    let feed_account = next_account_info(accounts_iter)?;

    const DECIMALS: u32 = 9;

    let price = chainlink::get_price(&chainlink::id(), feed_account)?;

    if let Some(price) = price {
        let decimal = Decimal::new(price, DECIMALS);
        msg!("Price is {}", decimal);
    } else {
        msg!("No current price");
    }

     // Store the price ourselves
     let mut price_data_account = PriceFeedAccount::try_from_slice(&my_account.data.borrow())?;
     price_data_account.answer = price.unwrap_or(0);
     price_data_account.serialize(&mut &mut my_account.data.borrow_mut()[..])?;
Deploying the Program
The first step is to clone the repository.
git clone https://github.com/smartcontractkit/chainlink-solana-demo
cd chainlink-solana-demo
Once this is done, you can then set your current environment to devnet. This is the test network for Solana developers writing and testing smart contracts.
solana config set --url https://api.devnet.solana.com
Next, you need to create a new keypair for your account. This is required to interact with deployed programs (smart contracts) on the Solana devnet. Again, this is an insecure method for storing keys, and should only be used for demo purposes. You will be prompted to enter a passphrase for security reasons.
mkdir solana-wallet
solana-keygen new --outfile solana-wallet/keypair.json
Now that you’ve created an account, you can use the airdrop program to obtain some SOL tokens. You will need some lamports (fractions of SOL tokens) to deploy your program. This command requests SOL tokens for your newly generated account.
solana airdrop 5 $(solana-keygen pubkey solana-wallet/keypair.json)
If this doesn’t work, you can see your public key with the following command, and then use it to request SOL tokens from the solfaucet.
solana-keygen pubkey ./solana-wallet/keypair.json
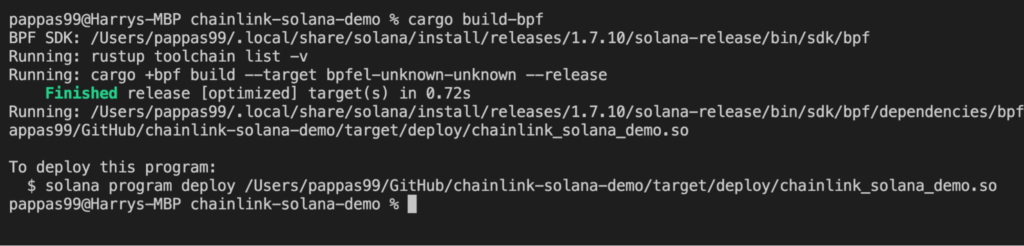
You’re now ready to build the Chainlink Solana Demo program using Solana BPF.
cargo build-bpf
Once the program has been built, you can then deploy it to devnet. The previous command’s output will give you the command that you need to run, but it should look something similar to the following. Take note of the –keypair flag appended at the end.
solana program deploy target/deploy/chainlink_solana_demo.so --keypair solana-wallet/keypair.json
 Compiling the Chainlink Solana demo
The end result is that you have successfully deployed the hello world program to devnet with an assigned program Id. This can then be checked on the Solana Devnet explorer.
 Deploying the Chainlink Solana Demo
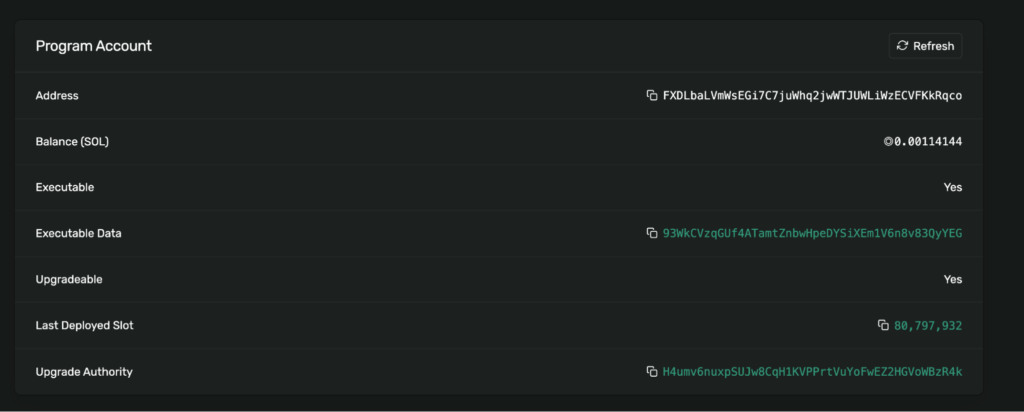 Viewing the deployed Chainlink Solana demo on the Devnet explorer
Interacting With the Deployed Program
To interact with the deployed program, the Chainlink Solana Demo repository contains a client written in Typescript using the Solana web3.js SDK and the Solana web3 API.
The Client
The client entry point is the main.ts file, which performs a number of tasks in a specific order, most of which are contained within the hello_world.ts file.
First, the client establishes a connection with the cluster by calling the ‘establishConnection’ function.
export async function establishConnection(): Promise {
  const rpcUrl = await getRpcUrl()
  connection = new Connection(rpcUrl, 'confirmed')
  const version = await connection.getVersion()
  console.log('Connection to cluster established:', rpcUrl, version)
}
It then calls the ‘establishPayer’ function to ensure there is an account available to pay for transactions, and creates one if required.
export async function establishPayer(): Promise {
  let fees = 0
  if (!payer) {
    const { feeCalculator } = await connection.getRecentBlockhash()

    // Calculate the cost to fund the greeter account
    fees += await connection.getMinimumBalanceForRentExemption(AGGREGATOR_SIZE)

    // Calculate the cost of sending transactions
    fees += feeCalculator.lamportsPerSignature * 100 // wag

    try {
      // Get payer from cli config
      payer = await getPayer()
    } catch (err) {
      // Fund a new payer via airdrop
      payer = await newAccountWithLamports(connection, fees)
    }
  }
The client then calls the ‘checkProgram’ function, which loads the keypair of the deployed program from ./deploy/chainlink-solana-demo-keypair.json and uses the public key for the keypair to fetch the program account. If the program doesn’t exist, the client stops with an error. If the program does exist, it will create a new account with the program assigned as its owner to store the program state.
export async function checkProgram(): Promise {
  // Read program id from keypair file
  try {
    const programKeypair = await createKeypairFromFile(PROGRAM_KEYPAIR_PATH);
    programId = programKeypair.publicKey;
  } catch (err) {
    const errMsg = (err as Error).message;
    throw new Error(
      `Failed to read program keypair at '${PROGRAM_KEYPAIR_PATH}' due to error: ${errMsg}. Program may need to be deployed with \`solana program deploy dist/program/helloworld.so\``,
    );
  }

  // Check if the program has been deployed
  const programInfo = await connection.getAccountInfo(programId);
  if (programInfo === null) {
    if (fs.existsSync(PROGRAM_SO_PATH)) {
      throw new Error(
        'Program needs to be deployed with `solana program deploy dist/program/chainlink_solana_demo.so`',
      );
    } else {
      throw new Error('Program needs to be built and deployed');
    }
  } else if (!programInfo.executable) {
    throw new Error(`Program is not executable`);
  }
  console.log(`Using program ${programId.toBase58()}`);

  // Derive the address (public key) of a greeting account from the program so that it's easy to find later.
  const GREETING_SEED = 'hello';
  greetedPubkey = await PublicKey.createWithSeed(
    payer.publicKey,
    GREETING_SEED,
    programId,
  );
The client then builds up and sends a transaction to the program by calling the ‘getPrice’ function. The transaction contains a price feed account as a parameter. In this case, you’re sending the SOL/USD feed account listed in the Chainlink Solana Devnet feeds page. Once it sends the instruction, it waits for the transaction to confirm.
export async function getPrice(): Promise {
  console.log('Getting data from ', readingPubkey.toBase58())
  const priceFeedAccount = "FmAmfoyPXiA8Vhhe6MZTr3U6rZfEZ1ctEHay1ysqCqcf"
  const AggregatorPublicKey = new PublicKey(priceFeedAccount)
  const instruction = new TransactionInstruction({
    keys: [{ pubkey: readingPubkey, isSigner: false, isWritable: true },
    { pubkey: AggregatorPublicKey, isSigner: false, isWritable: false }],
    programId,
    data: Buffer.alloc(0), // All instructions are hellos
  })
  await sendAndConfirmTransaction(
    connection,
    new Transaction().add(instruction),
    [payer],
  )
}
Finally, the client queries the account’s data to retrieve the stored price obtained from the SOL/USD price feed.
export async function reportPrice(): Promise {
  const accountInfo = await connection.getAccountInfo(readingPubkey)
  if (accountInfo === null) {
    throw new Error('Error: cannot find the aggregator account')
  }
  const latestPrice = borsh.deserialize(
    AggregatorSchema,
    AggregatorAccount,
    accountInfo.data,
  )
  console.log("Current price of SOL/USD is: ", latestPrice.answer.toString())
}
Running the Client
Before you can run the client to read data from your deployed program, you need to install the client dependencies.
cd client
yarn
Once this is done, you can start the client.
yarn start
You should see output showing your program successfully being executed, and it should display the stored current SOL/USD price.
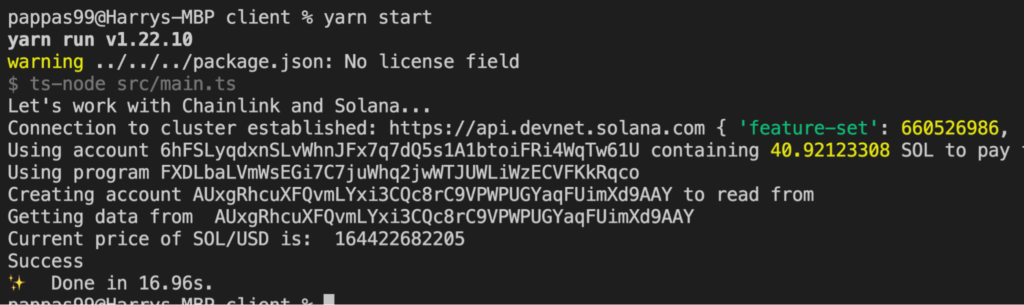 Running the Chainlink Solana demo client to interact with the deployed program
Summary
Solana offers a high-speed, low-cost, scalable blockchain for building smart contracts and decentralized applications. By leveraging Solana smart contracts and Chainlink Price Feeds, developers can create fast, scalable DeFi applications, taking advantage of the high-quality data offered by Chainlink Price Feeds and the sub-second updates available on the Solana blockchain.
To explore more Chainlink technical tutorials, check out the engineering video tutorials playlist on the official Chainlink YouTube, and visit the Chainlink documentation at docs.chain.link. To discuss an integration, reach out to an expert.
The Chainlink Fall 2021 Hackathon kicks off October 22, 2021. Whether you’re a developer, creator, artist, blockchain expert, or completely new to the space, this hackathon is the perfect place to kickstart your smart contract development journey and learn from industry-leading mentors. Secure your spot today to compete for over $300k in prizes.
Sign up today
The post How to Build and Deploy a Solana Smart Contract appeared first on Chainlink Blog.
Publication date
Disclaimer
The views and opinions expressed in this article are solely those of the authors and do not reflect the views of Bitcoin Insider. Every investment and trading move involves risk - this is especially true for cryptocurrencies given their volatility. We strongly advise our readers to conduct their own research when making a decision.