Latest news about Bitcoin and all cryptocurrencies. Your daily crypto news habit.
How to begin using your Ledger wallet to manage your ICP tokens and Network Nervous System neurons.
Ledger is one of the world’s most popular hardware wallets for safely storing crypto assets. A Ledger wallet combined with the Ledger Live app gives users complete control over their crypto, ensuring ownership over their assets while providing maximum security. With the newly launched Ledger Internet Computer (ICP) app, Ledger wallet compatibility with the Internet Computer and its ICP utility token gives community token holders another safe and secure option for managing and staking their tokens and Network Nervous System neurons.
Introducing the Ledger Internet Computer (ICP) App for Nano Wallets
The NNS front-end dapp provides integration with Ledger Nano S/X wallets. Through the NNS dapp, you can use your Ledger wallet to manage your ICP tokens and your neurons.
💡 The NNS dapp has available public documentation here. Please consult it for information about accounts, ICP tokens, neurons, and staking. The remainder of this document will exclusively be around the flows that are specific to the Ledger hardware wallet.
- Getting Started
- Verifying Your Address + Principal
- Funds Management
— Sending ICP - Neuron Management
— Staking
— Increase Dissolve Delay
— Adding/Removing Hotkeys
— Disbursing
— Spawning
— Listing Your Neurons - Request Status
Getting Started
If you are new to Ledger hardware wallets, have a look at https://www.ledger.com/start for documentation on how you can set up your wallet. Setting up your wallet involves initializing it with a PIN and a seed phrase, as well as installing Ledger Live to be able to install apps.
Once your wallet is set up, you can then install the Internet Computer (ICP) app by searching for it in the “App Catalog” in Ledger Live.
Supported browsers currently include Chrome (desktop) v89+, Edge v89+, and Opera v76+.
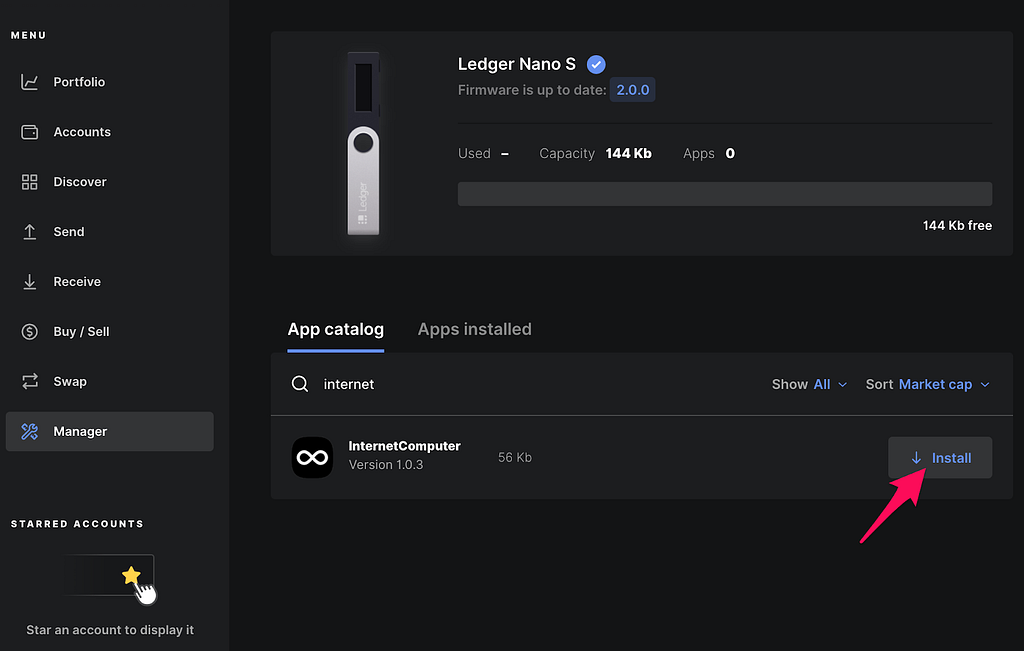
Once the installation is complete, you’ll be ready to use your Ledger wallet with the NNS front-end dapp.
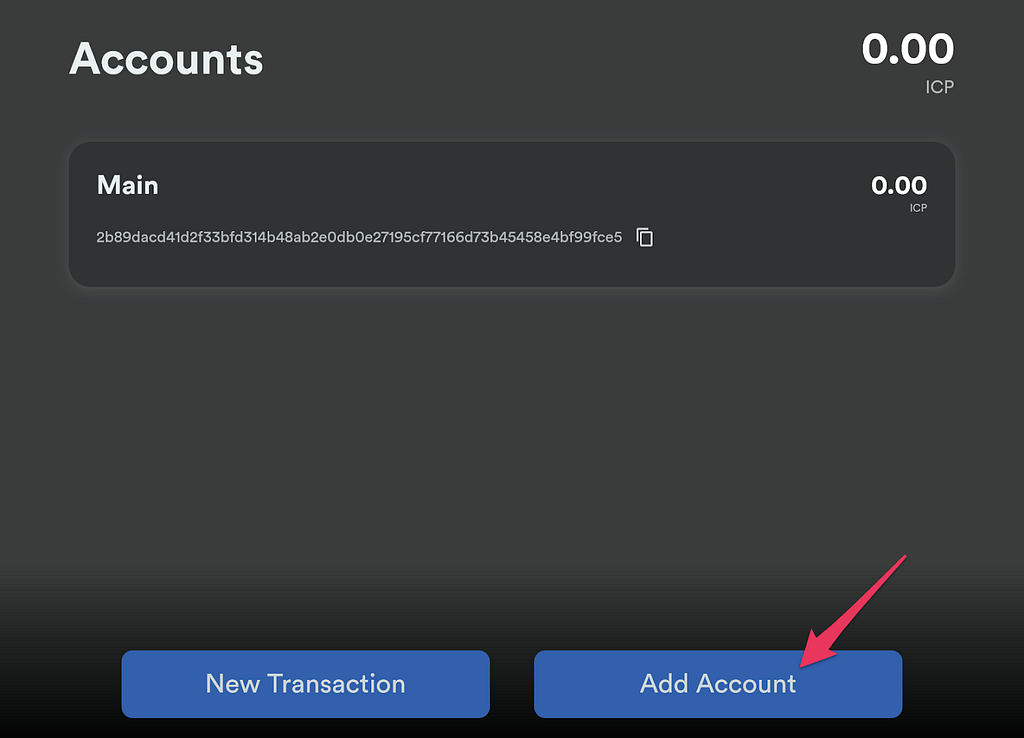
Go to the NNS dapp, create an account if you need to, then follow these to attach your device to the NNS dapp.
- Click on “Add Account”.
2. Click on “Attach Hardware Wallet”.
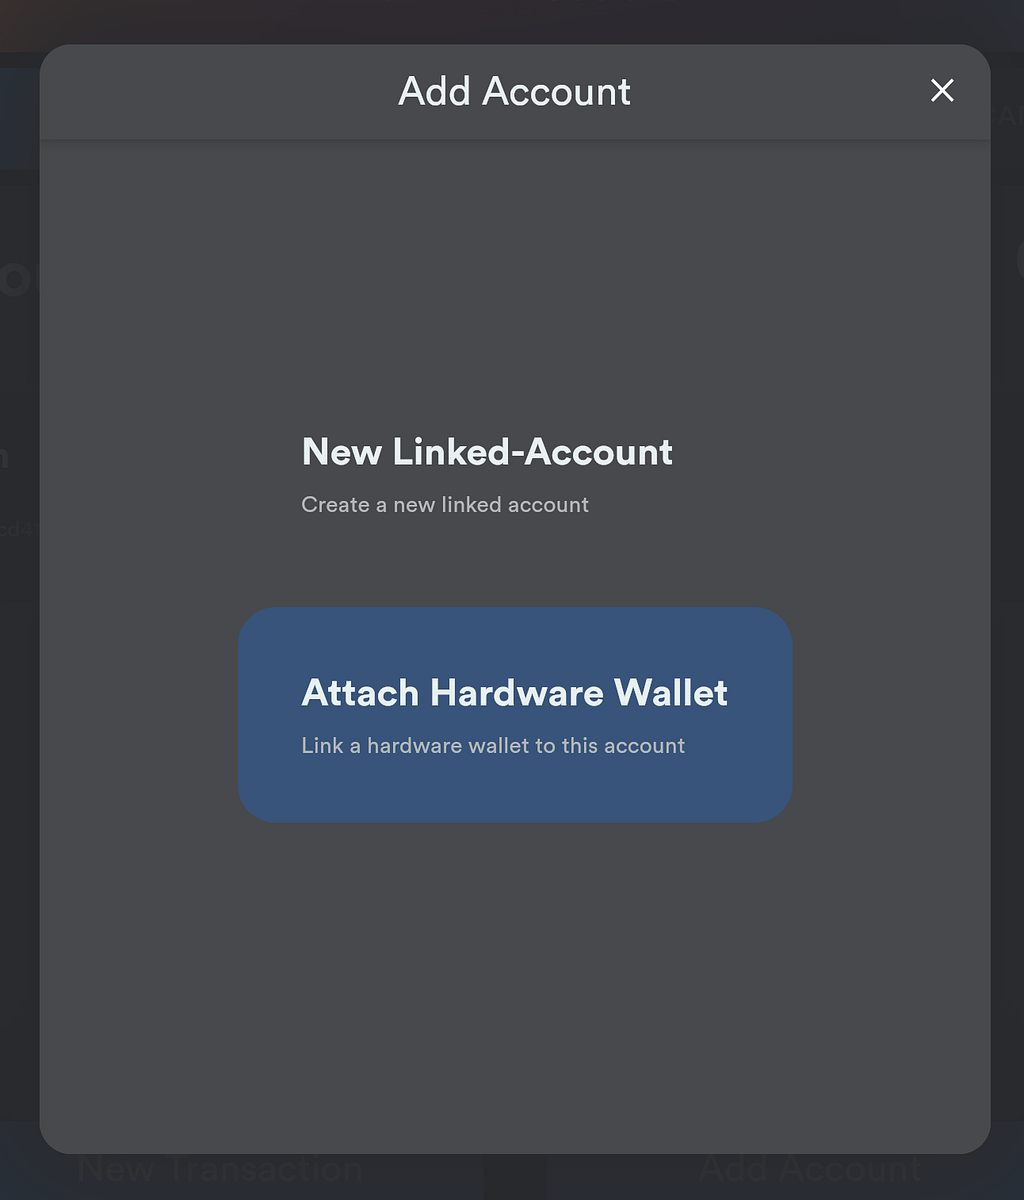
3. Give a name to your hardware wallet. Then click on “Connect to Wallet”.
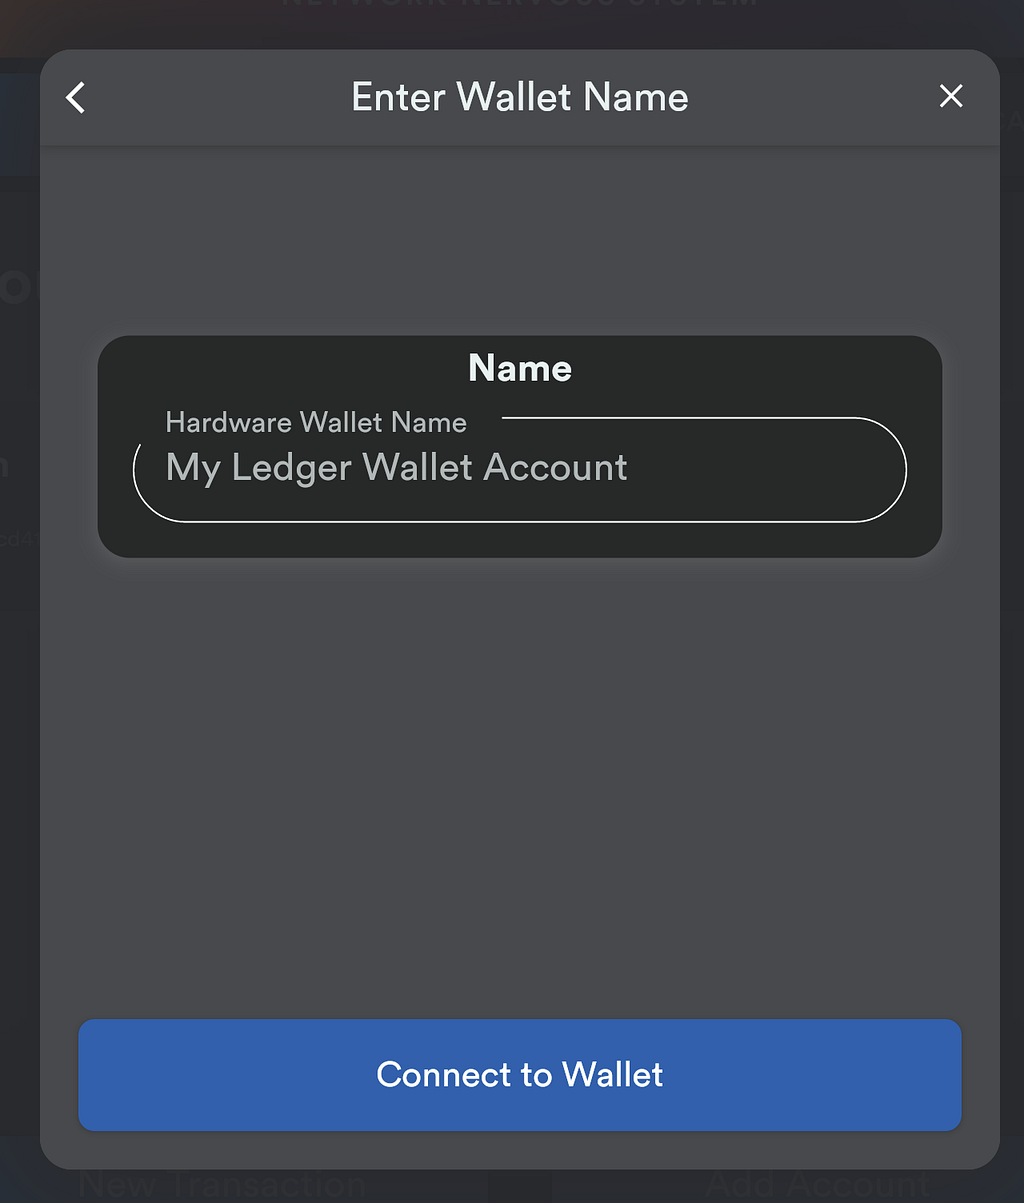
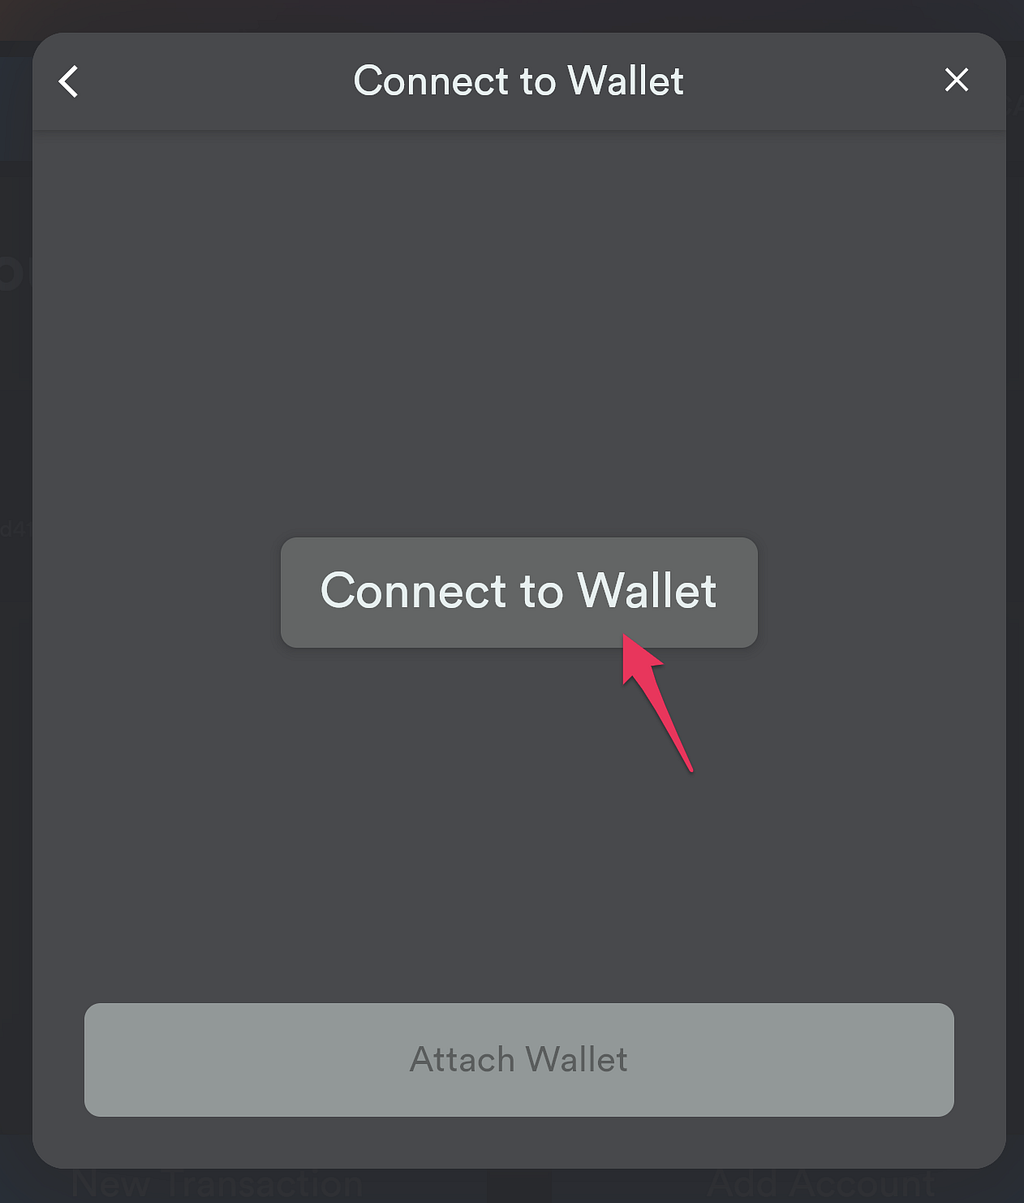
💡 IMPORTANT: Your Ledger wallet needs to be connected to your computer, unlocked, and the Ledger Internet Computer (ICP) app should be open on the wallet.

4. Verify your hardware wallet information, and click “Attach Wallet”.
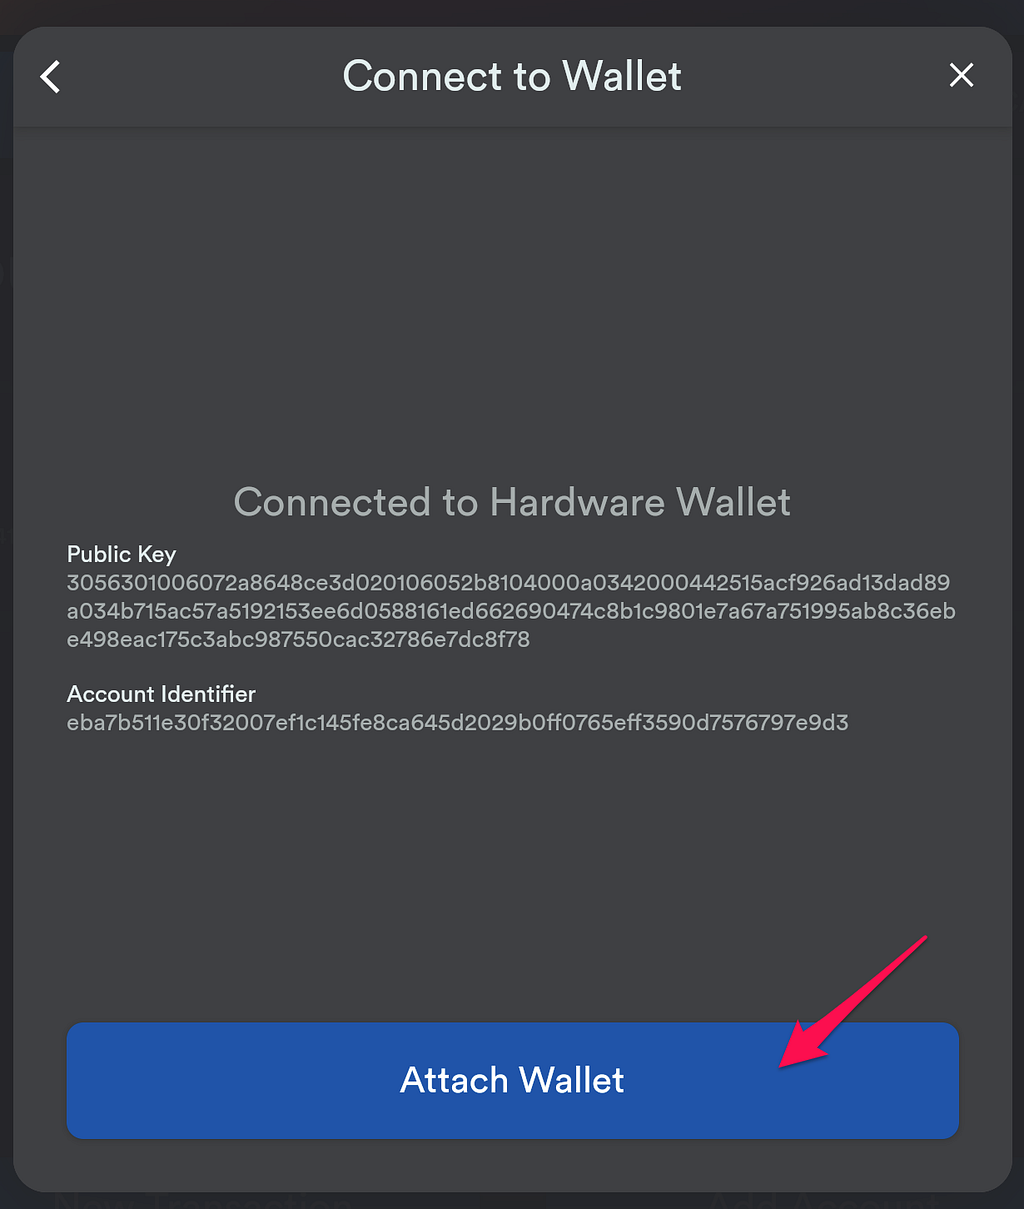
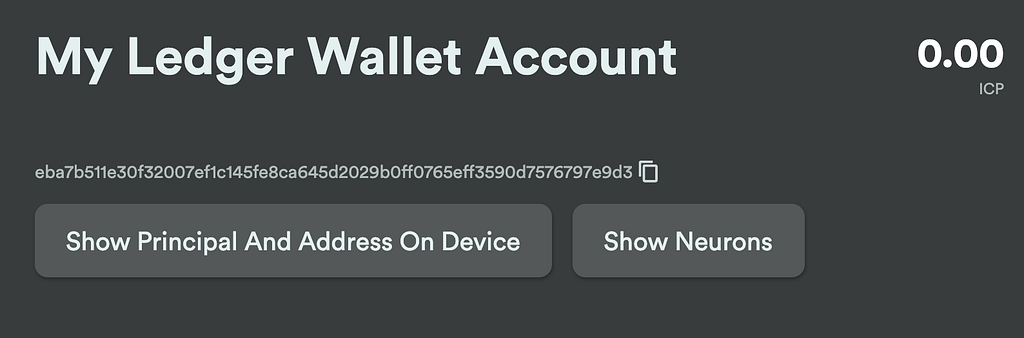
5. You’re done! You’ll be redirected to the hardware wallet’s account page.
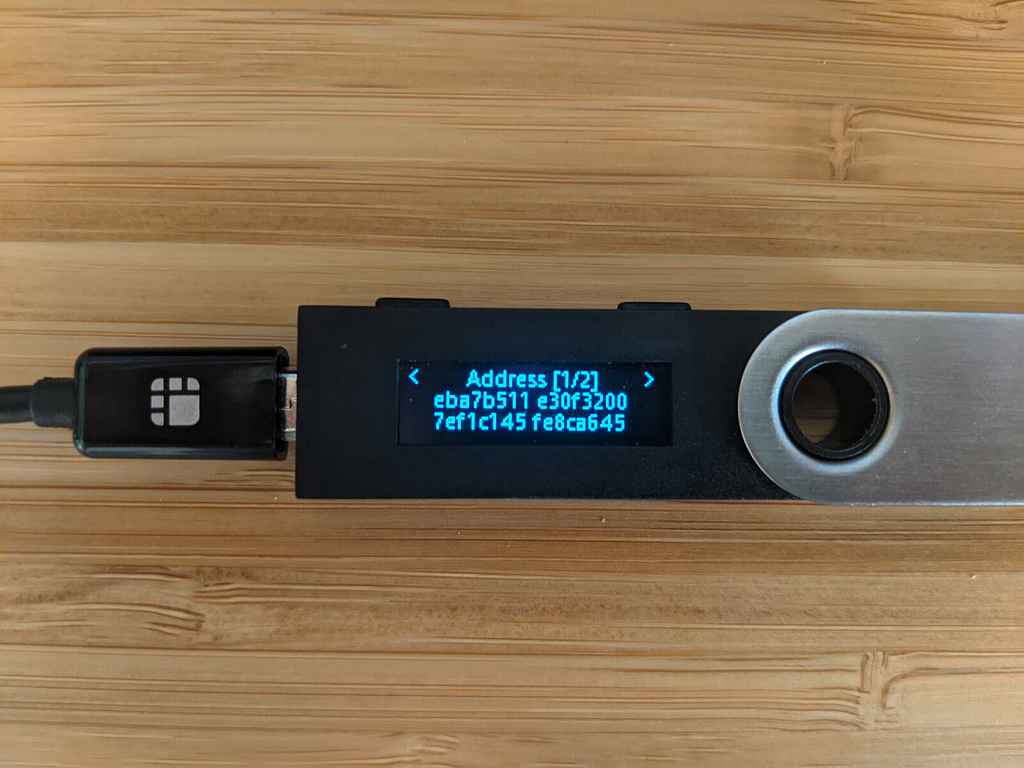
Verifying Your Address + Principal
To verify that the account address you’re seeing in the NNS dapp is the same as the account address of the wallet, you can choose to show the account address and principal on the wallet itself.
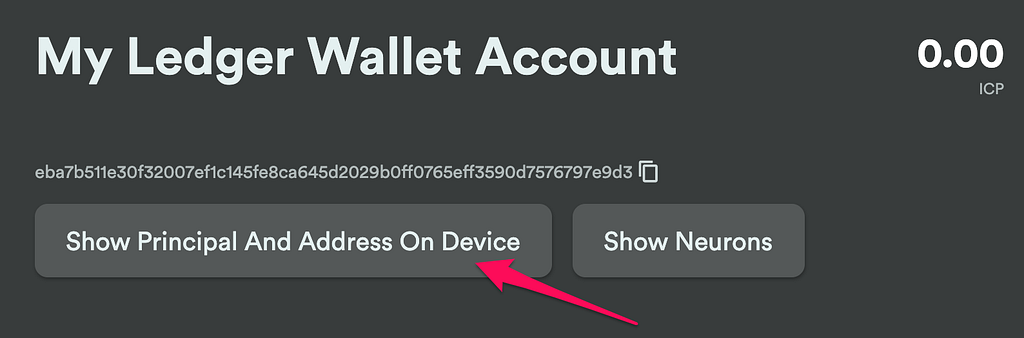
You’ll see your principal and address appear on the Ledger device.
Funds Management
Sending ICP
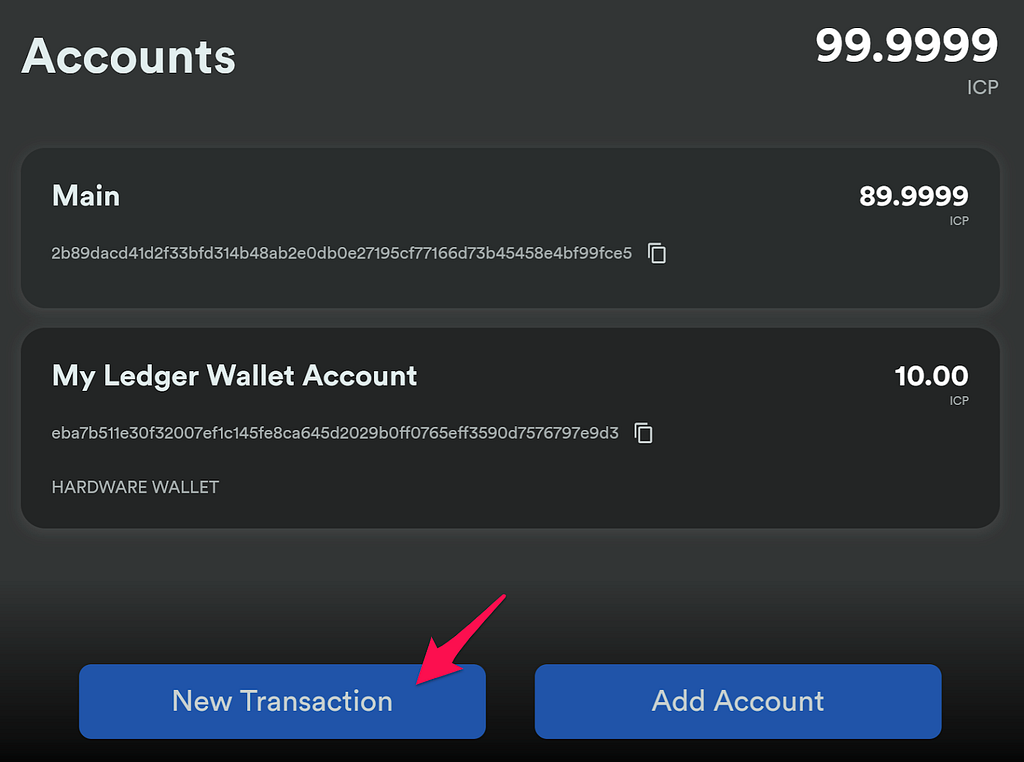

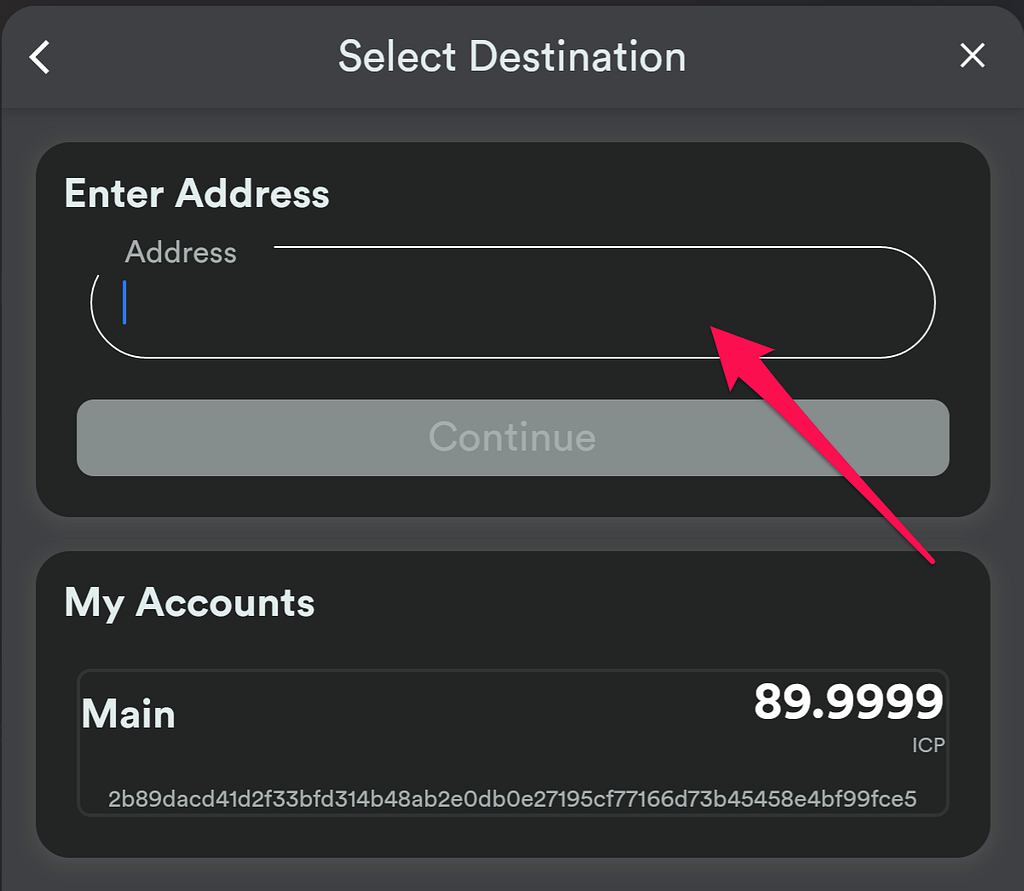
Enter the destination address, or select any of your existing accounts.
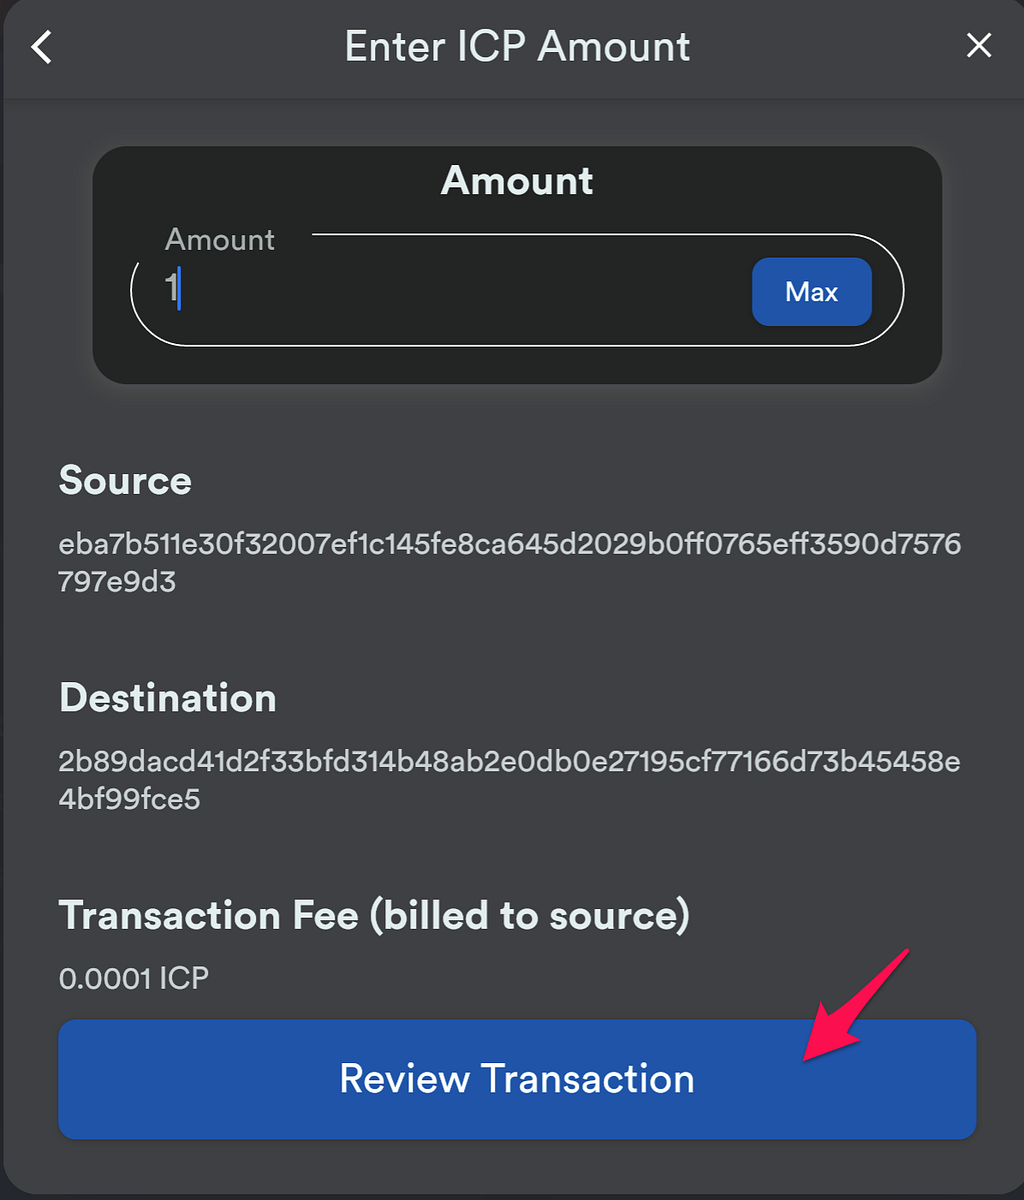
💡 IMPORTANT: Your Ledger wallet needs to be connected to your computer, unlocked, and the Ledger Internet Computer (ICP) app should be open on the wallet.
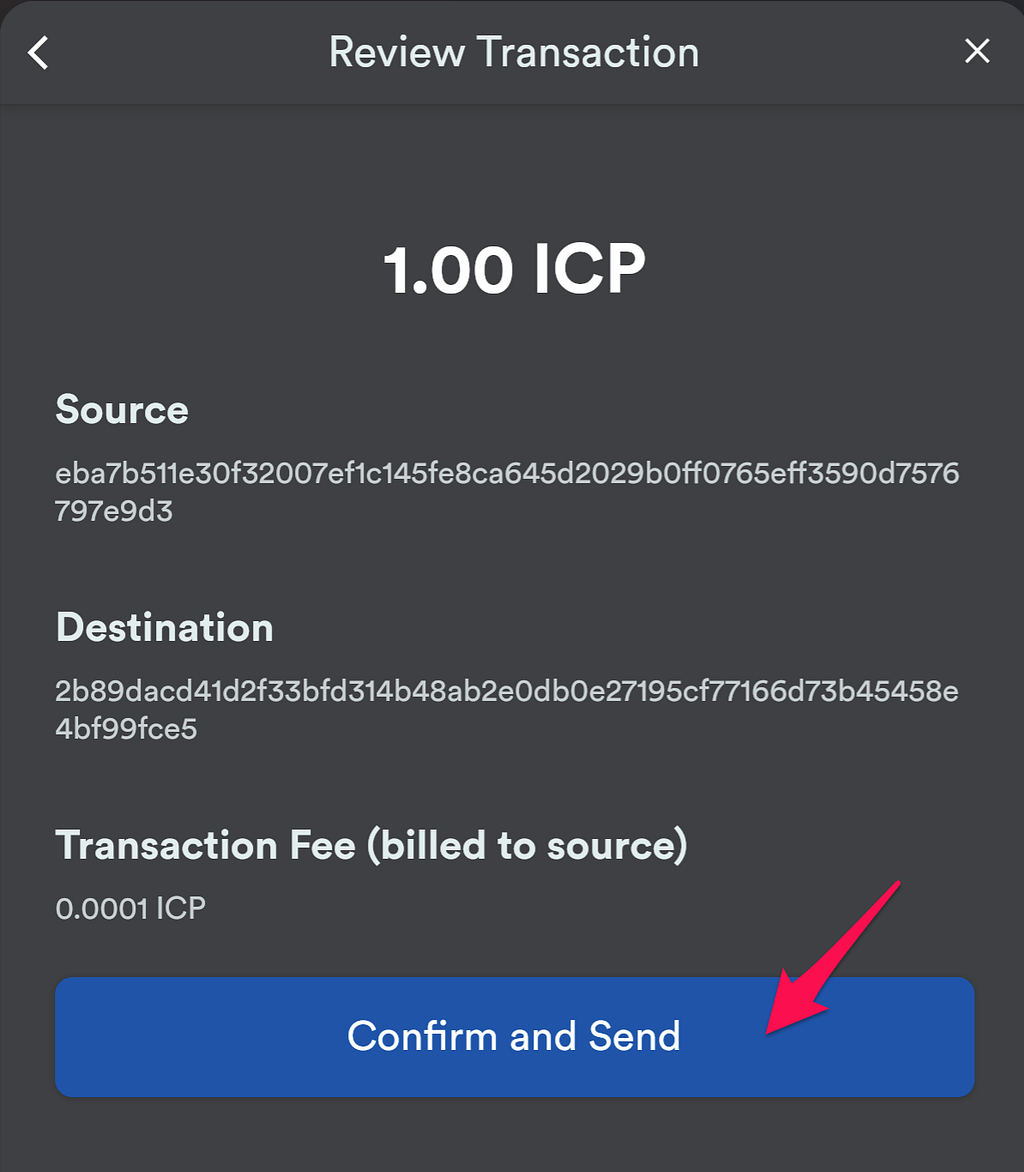
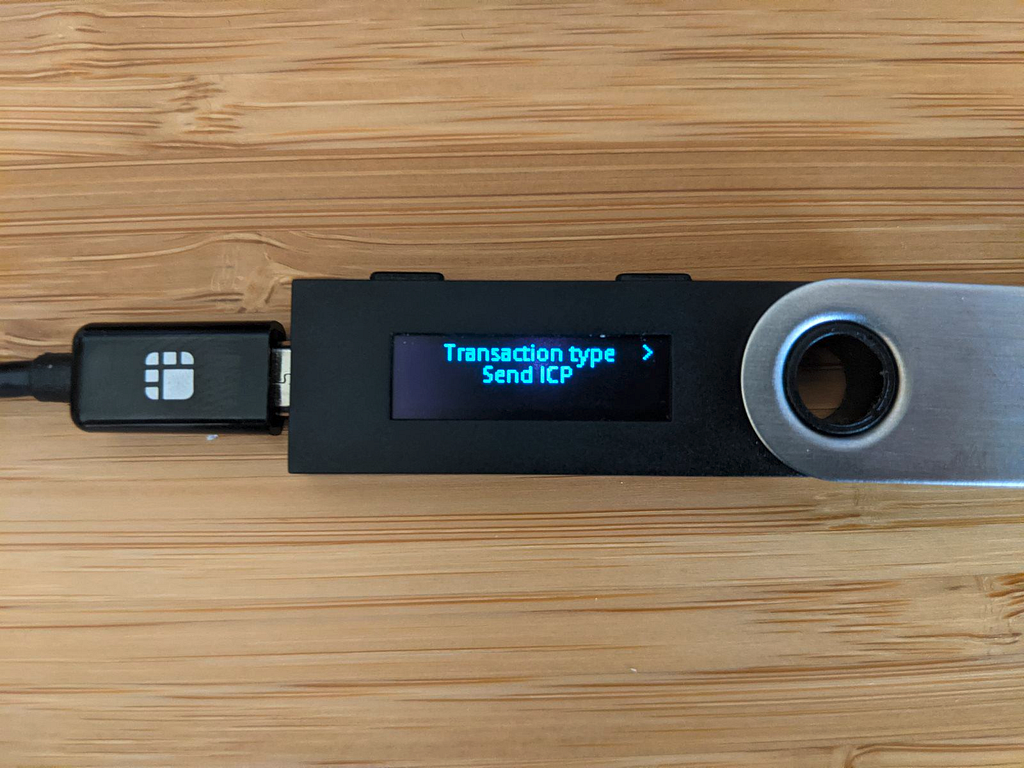
2. You can now verify the transaction on your Ledger device.
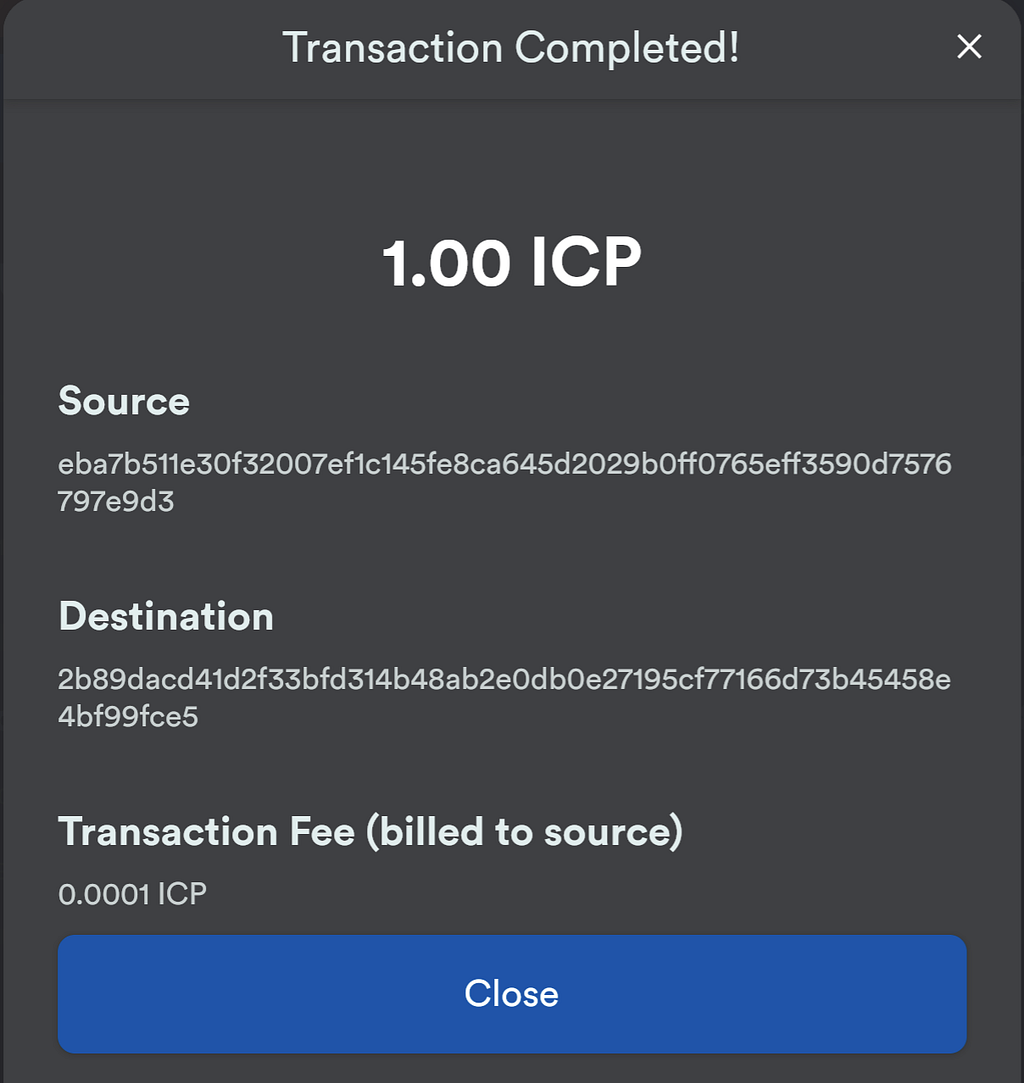
3. Once the transaction is verified, you’ll see a confirmation in the dapp.
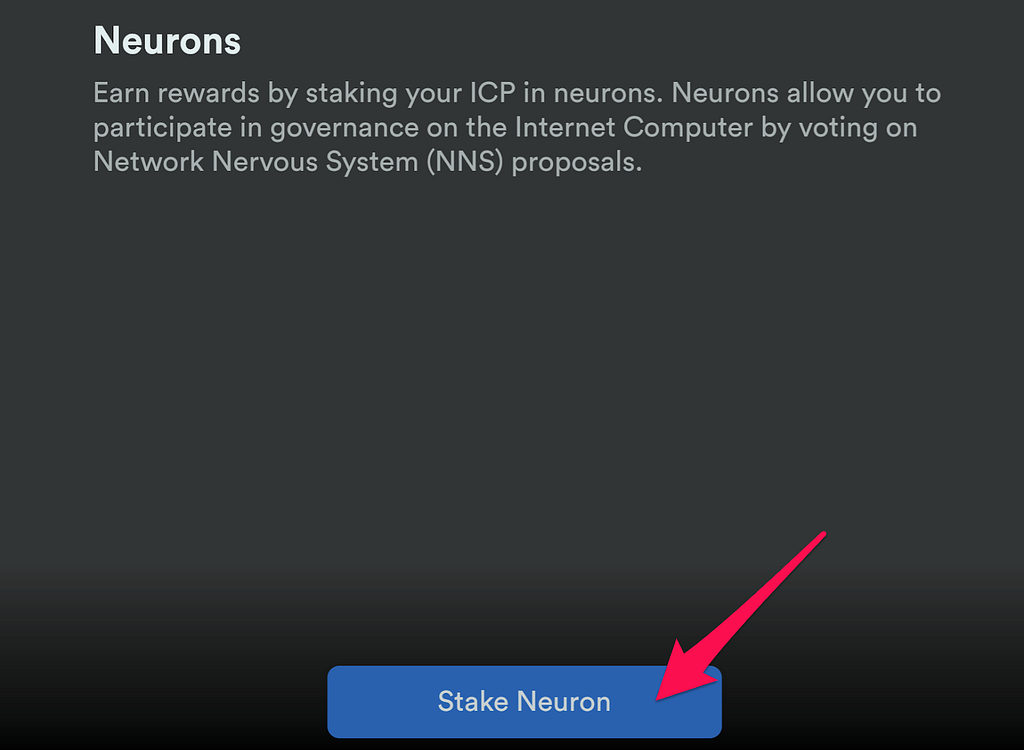
Neuron Management
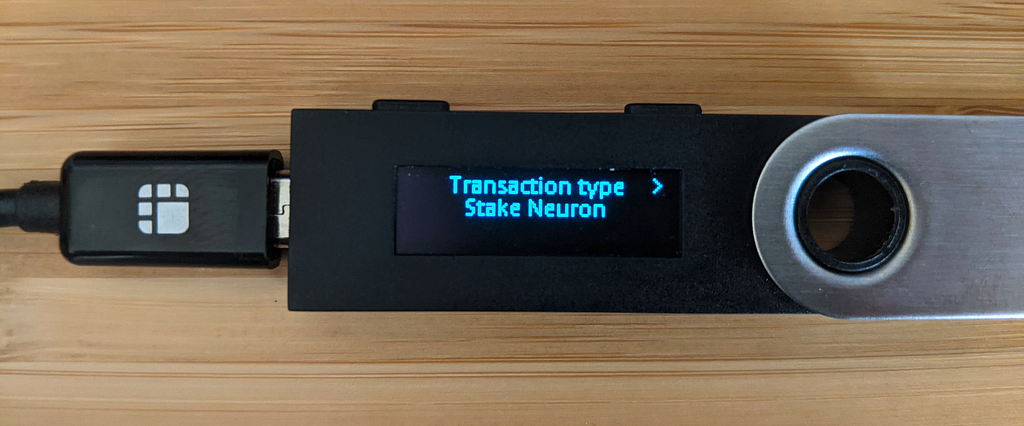
Staking
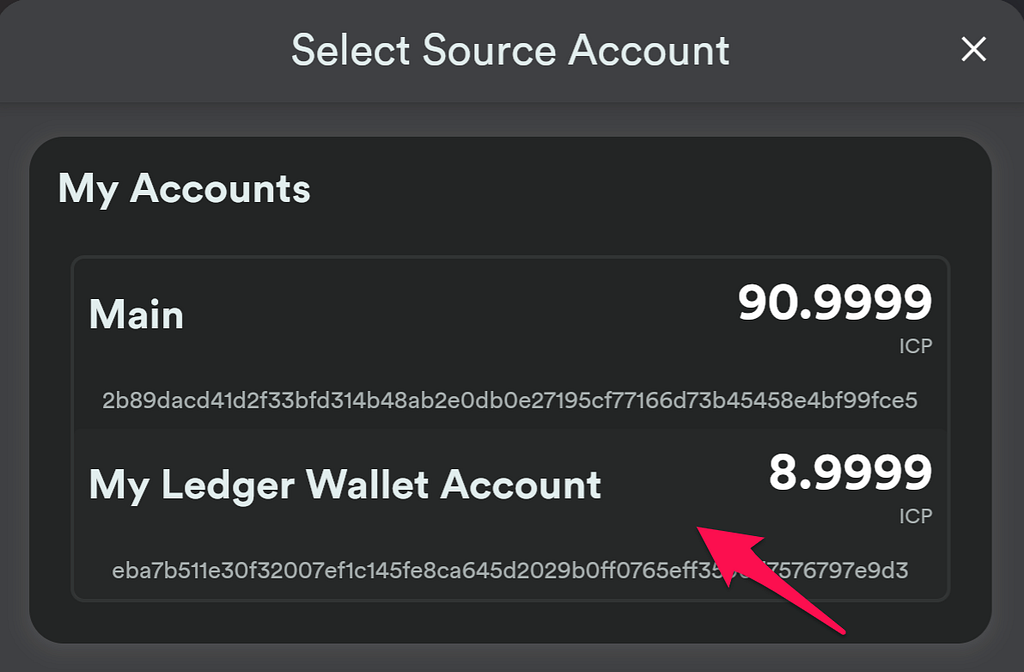
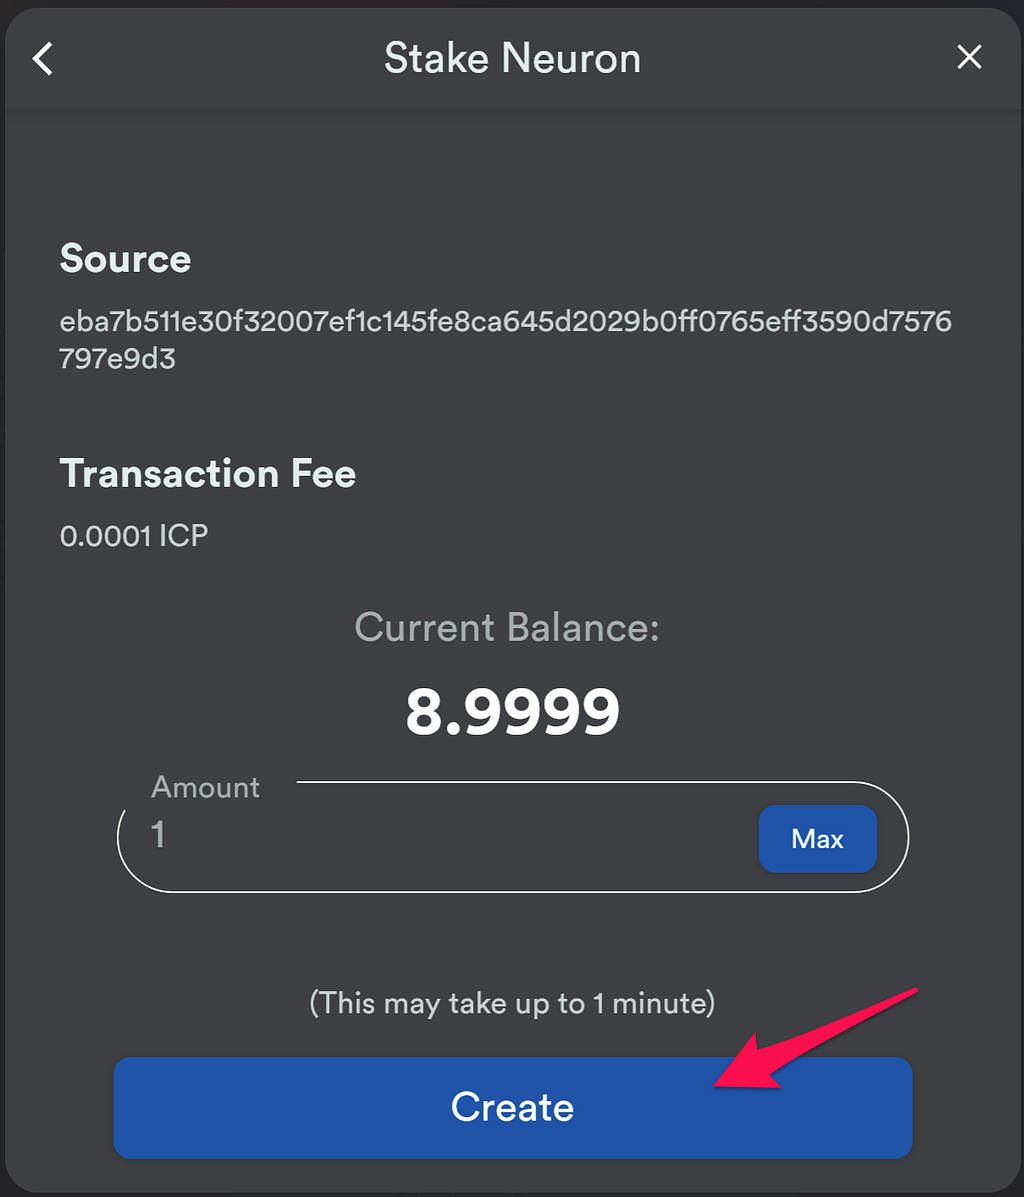
💡 IMPORTANT: Your Ledger wallet needs to be connected to your computer, unlocked, and the Ledger Internet Computer (ICP) app should be open on the wallet.
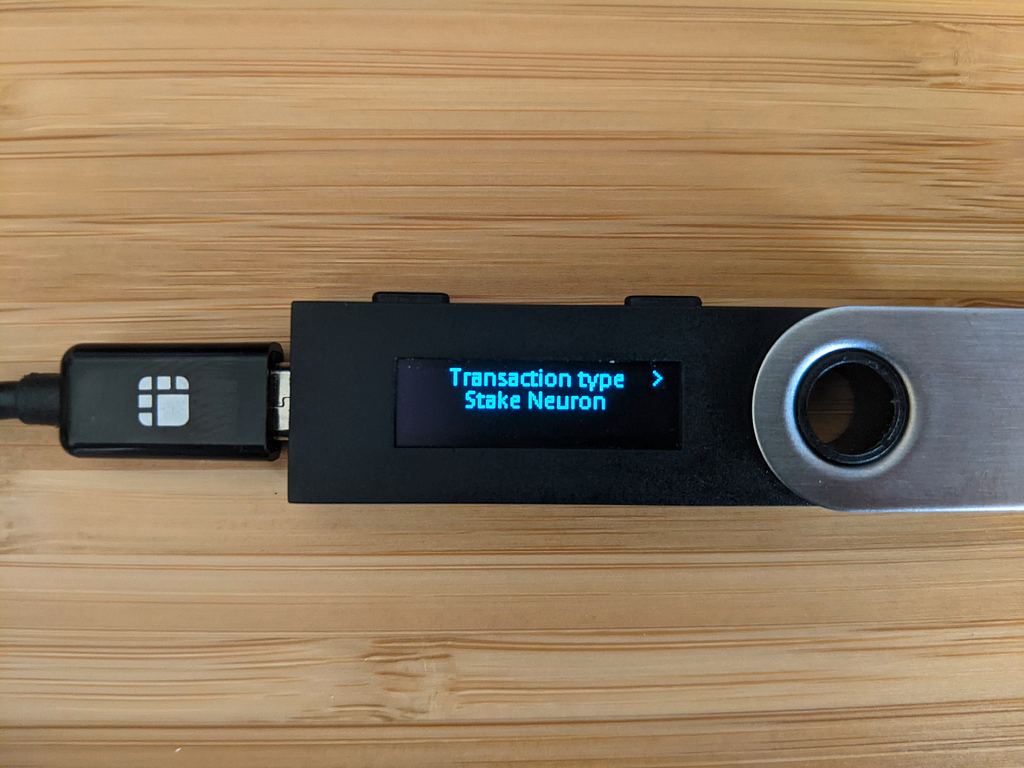
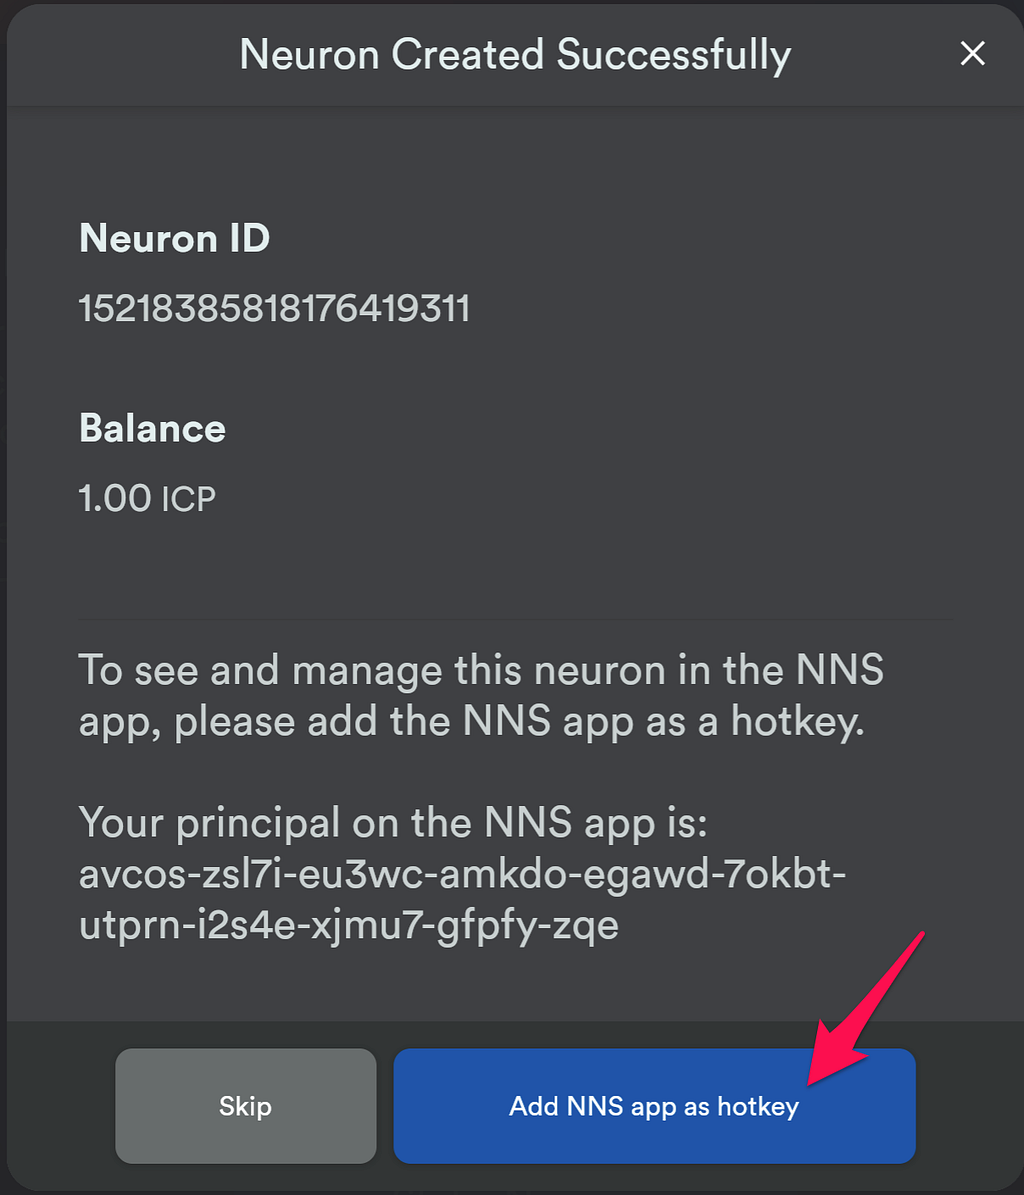
Once this transaction is approved, the neuron will have successfully been created.
Note that, at this point, even though the neuron has been created, the NNS dapp still doesn’t have permission to read it and display it in the UI. Doing so requires you to add the NNS dapp as a hotkey, which can be done in the step below. If you choose to skip this step, you can later add the NNS dapp as a hotkey by going through the “Listing Neurons” flow.
Once this transaction is approved, you’ll be able to see your neuron on the neurons tab.
Increase Dissolve Delay
When you stake a neuron, you’ll be prompted to set a dissolve delay. You can also adjust the dissolve delay from the neuron’s page.
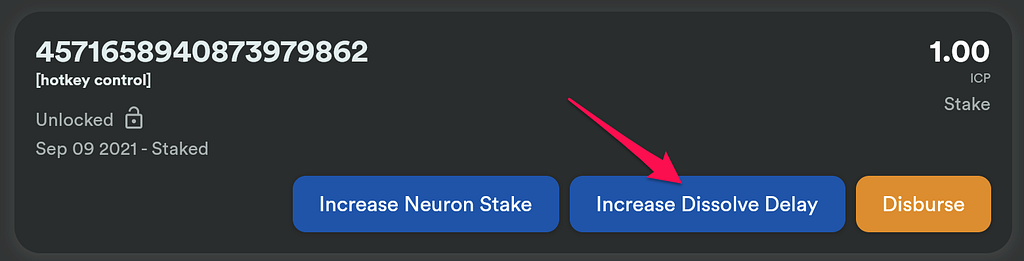
Set your desired delay, then click “Update Delay”.
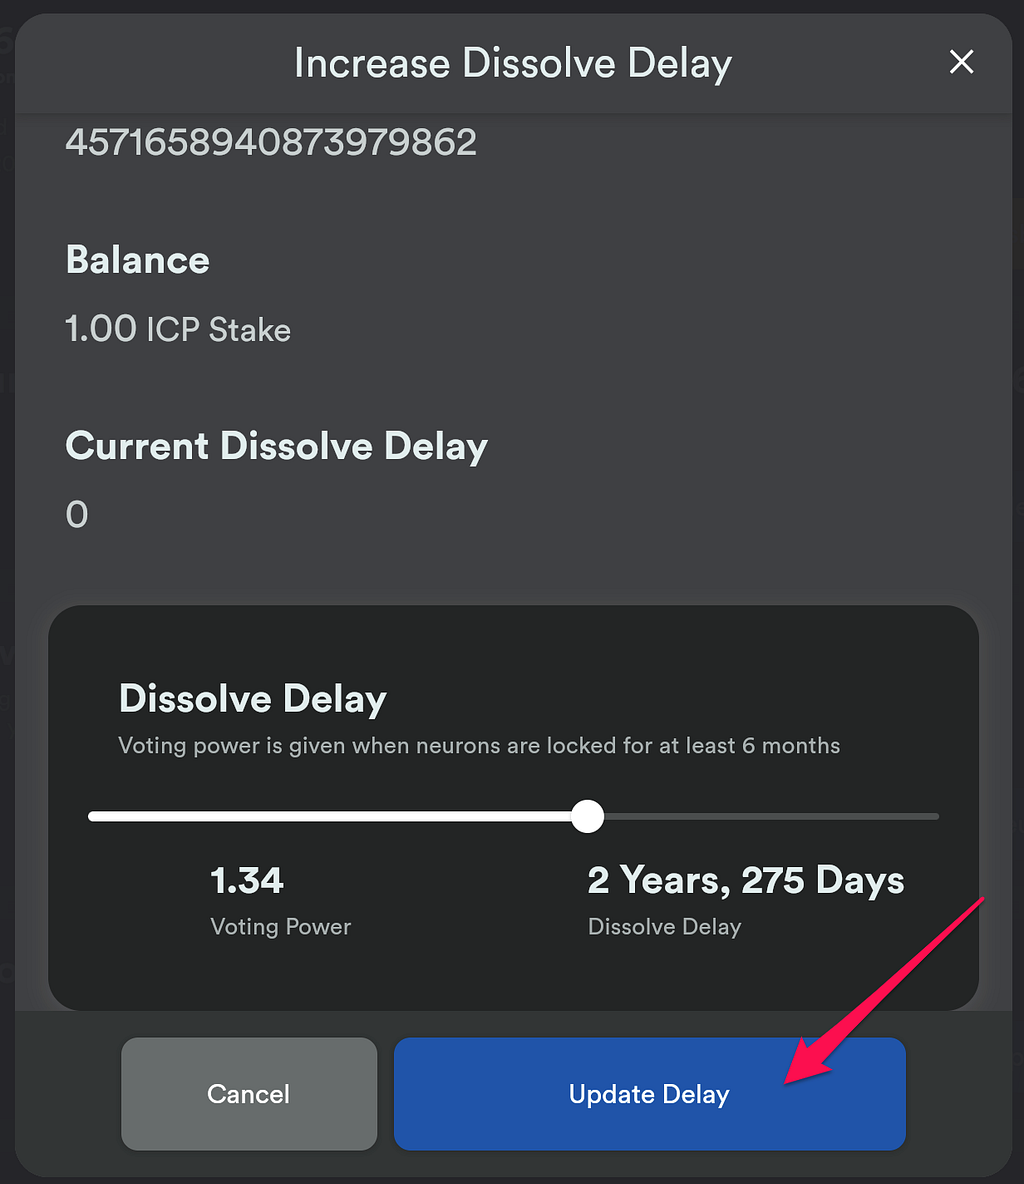
💡 IMPORTANT: Your Ledger wallet needs to be connected to your computer, unlocked, and the Ledger Internet Computer (ICP) app should be open on the wallet.
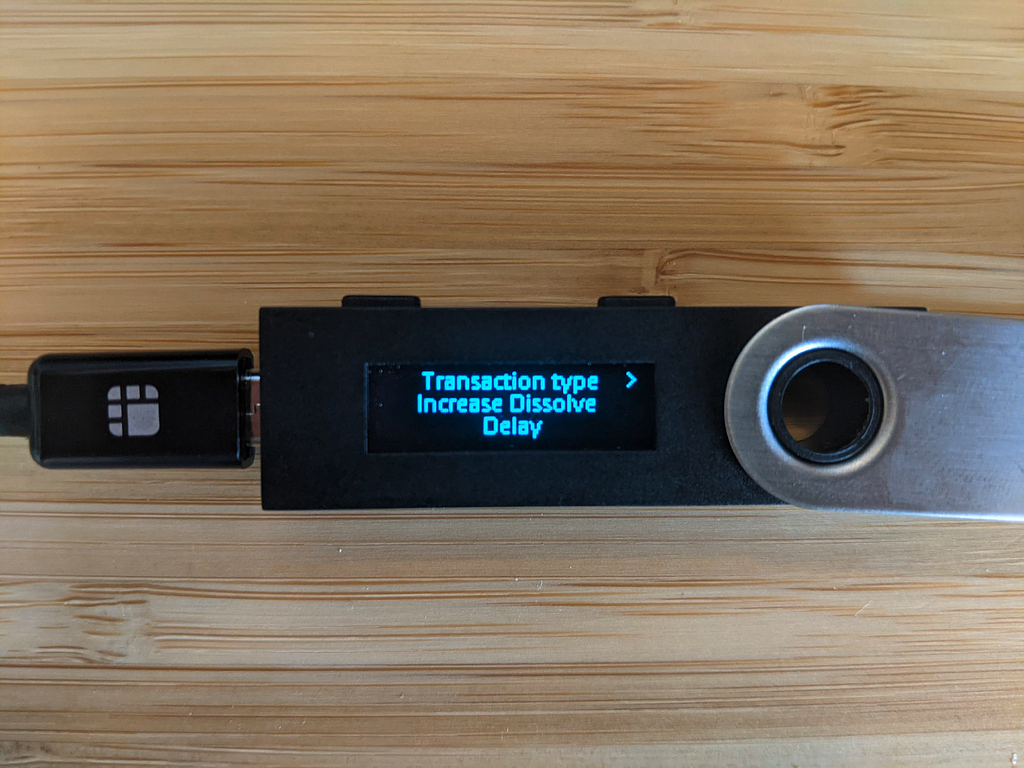
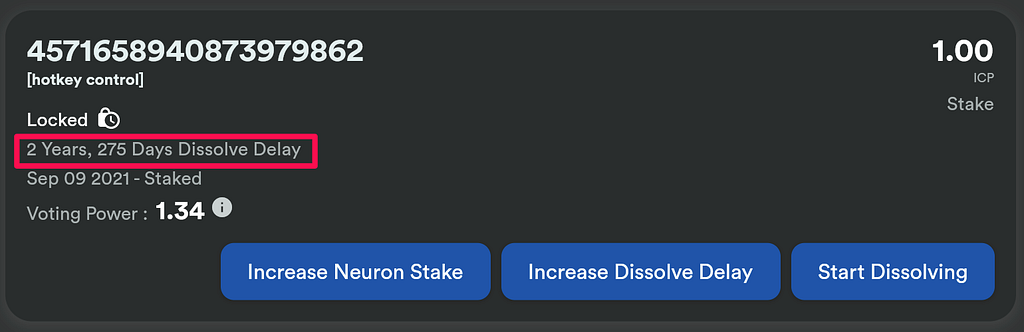
Once the transaction is approved, you’ll see the dissolve delay updated on the Neuron’s page.
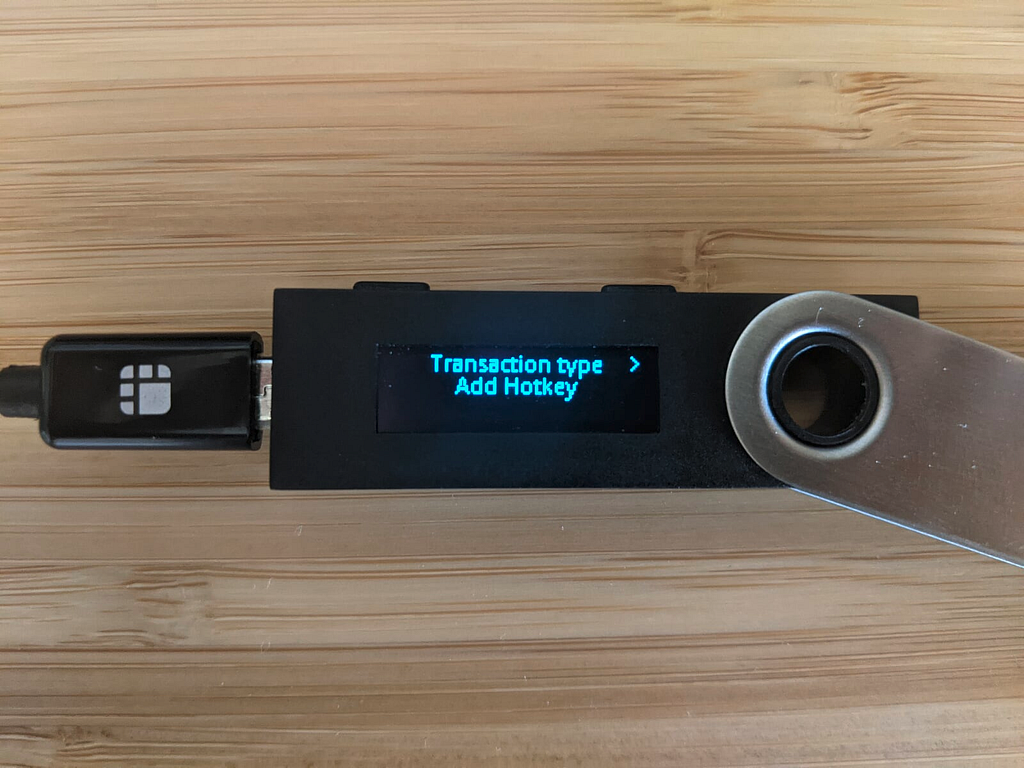
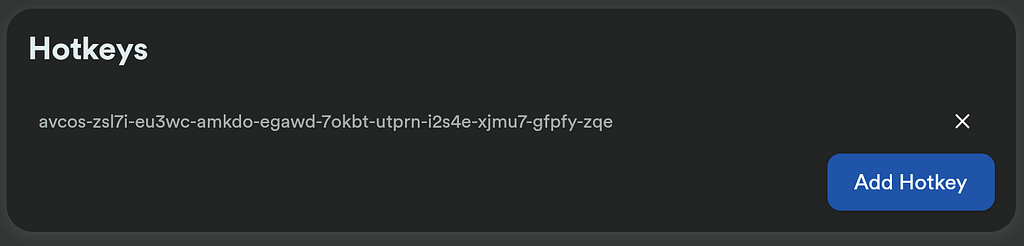
Adding Hotkeys
Hotkeys can be added to a neuron by clicking on the “Add Hotkey” button on the neuron’s page.
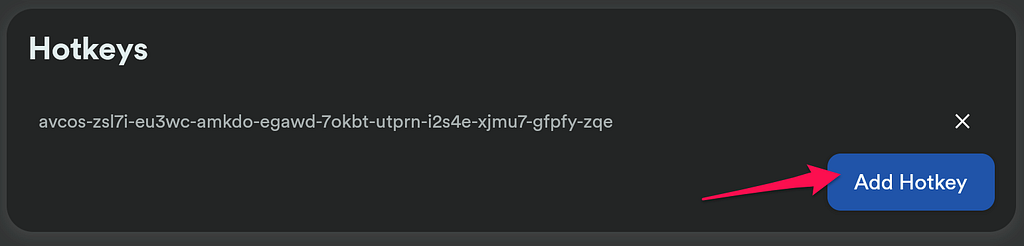
Enter the hotkey’s principal, and click on “Confirm”.
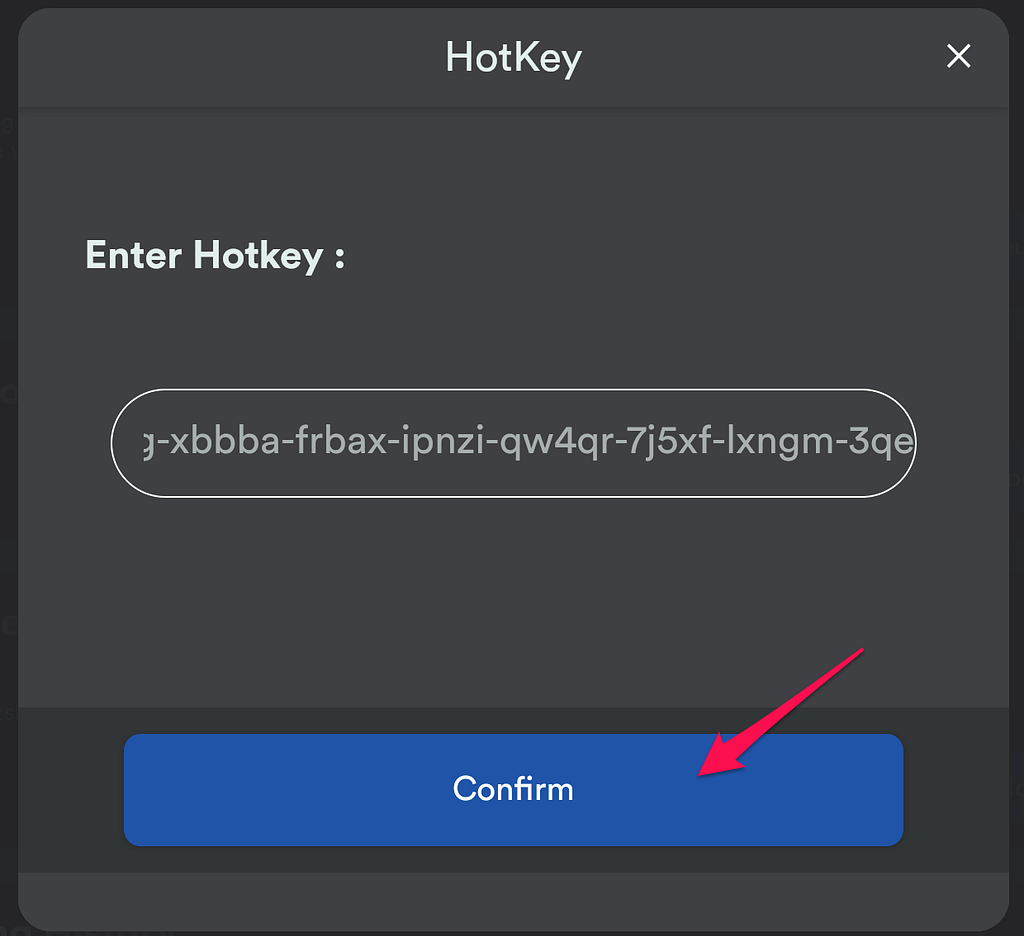
💡 IMPORTANT: Your Ledger wallet needs to be connected to your computer, unlocked, and the Ledger Internet Computer (ICP) app should be open on the wallet.

Once the transaction is approved, the hotkey will be added to the neuron.
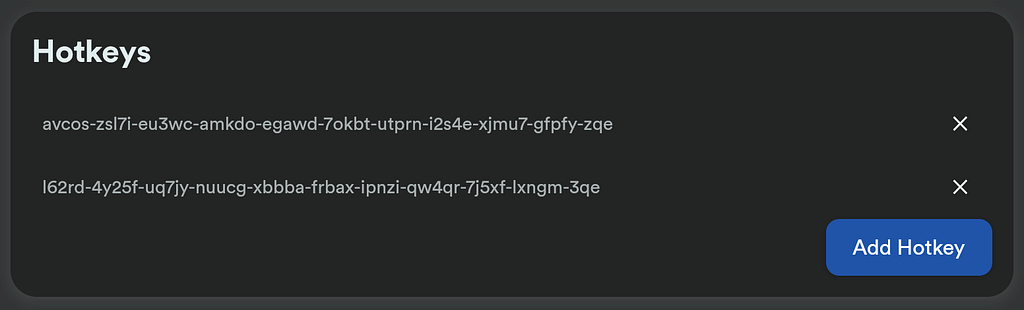
Removing Hotkeys
Hotkeys of a neuron can be removed by clicking on the “x” on the right.
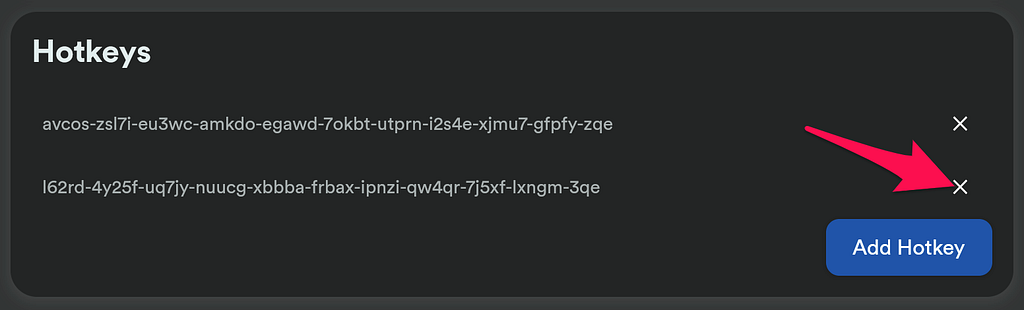
💡 IMPORTANT: Your Ledger wallet needs to be connected to your computer, unlocked, and the Ledger ICP app should be open on the wallet.
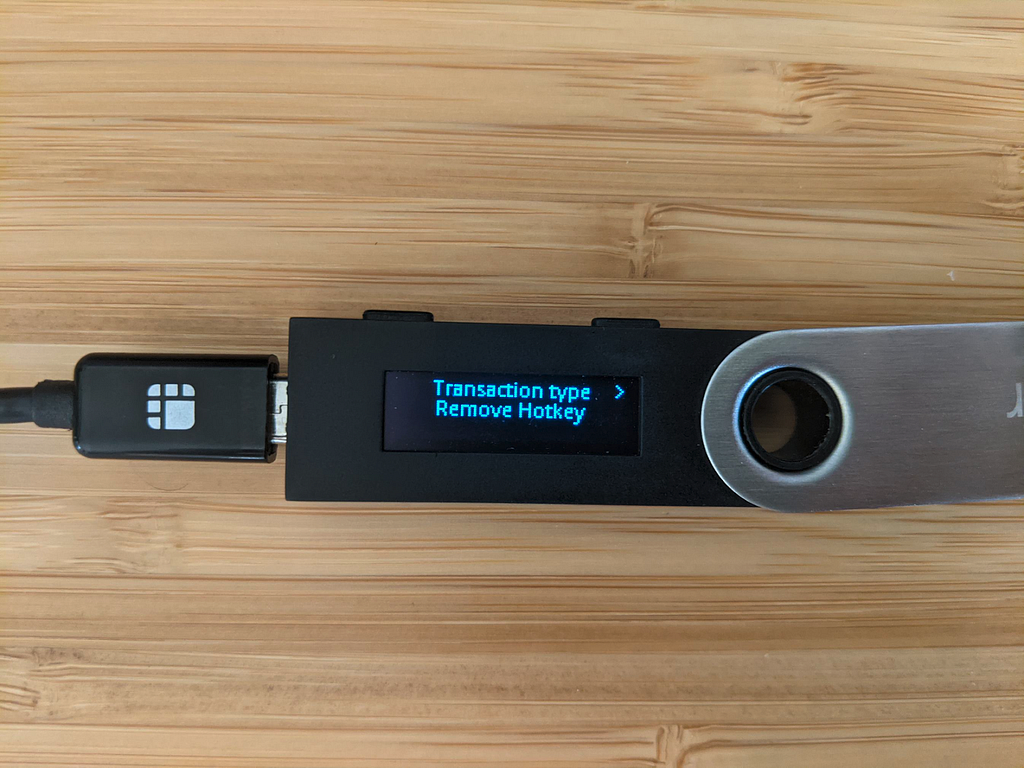
Once the transaction is approved, the hotkey will be removed.
💡 NOTE: If you remove the hotkey of the NNS dapp, the neuron will no longer be visible on the Neurons tab. To add it back, you can do so using the “Listing Neurons” flow.
Disbursing
If your neuron is not dissolving, you’ll be able to disburse its funds into another account.
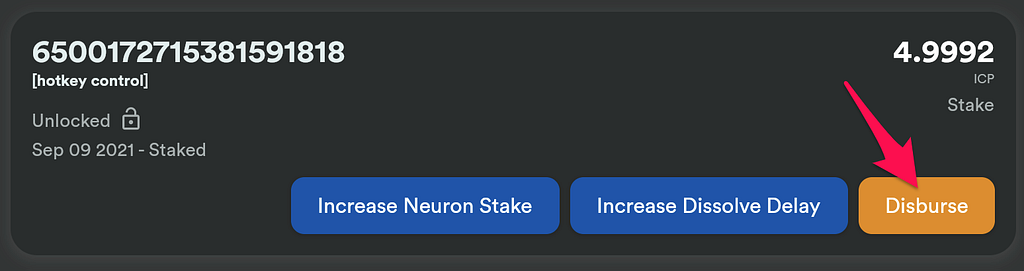
Enter the destination address, or select an account and click “Continue”.

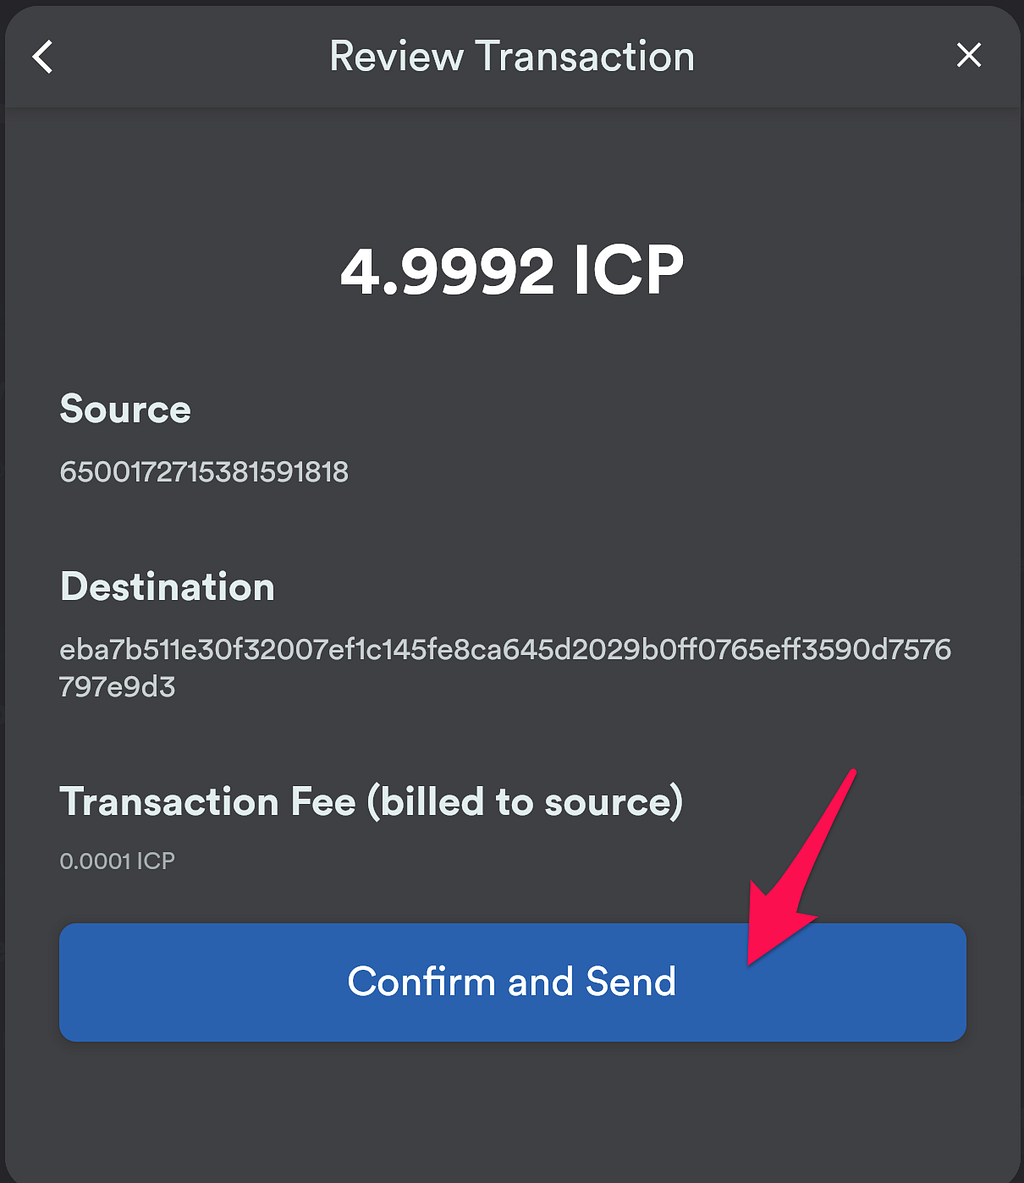
💡 IMPORTANT: Your Ledger wallet needs to be connected to your computer, unlocked, and the Ledger Internet Computer (ICP) app should be open on the wallet.

Once the transaction is approved, the funds of the neuron will be available at the destination address.
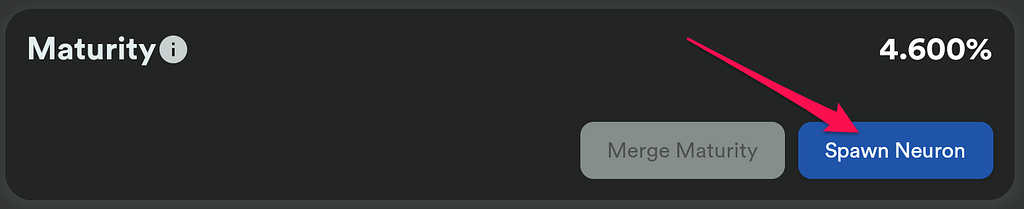
Spawning
If you have enough maturity, the “Spawn” button on the neuron’s page will be clickable.
💡 IMPORTANT: Your Ledger wallet needs to be connected to your computer, unlocked, and the Ledger Internet Computer (ICP) app should be open on the wallet.
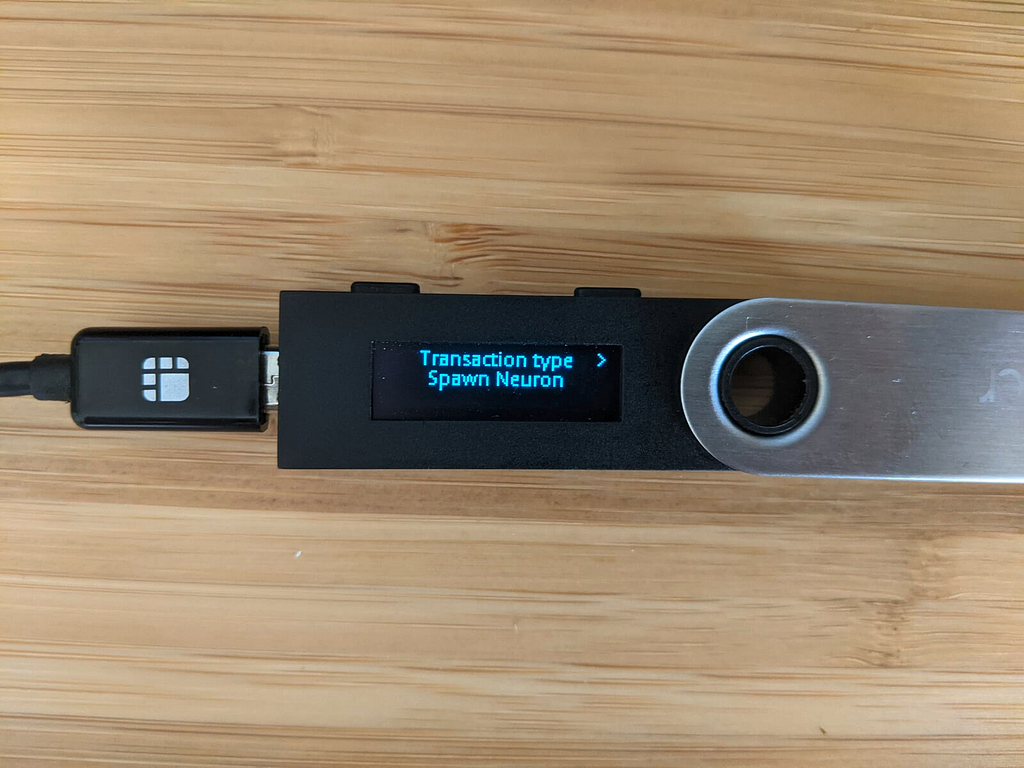
Approving the above transactions will create a new neuron with the ICP corresponding to your maturity. The neuron will be visible on the Neurons tab.
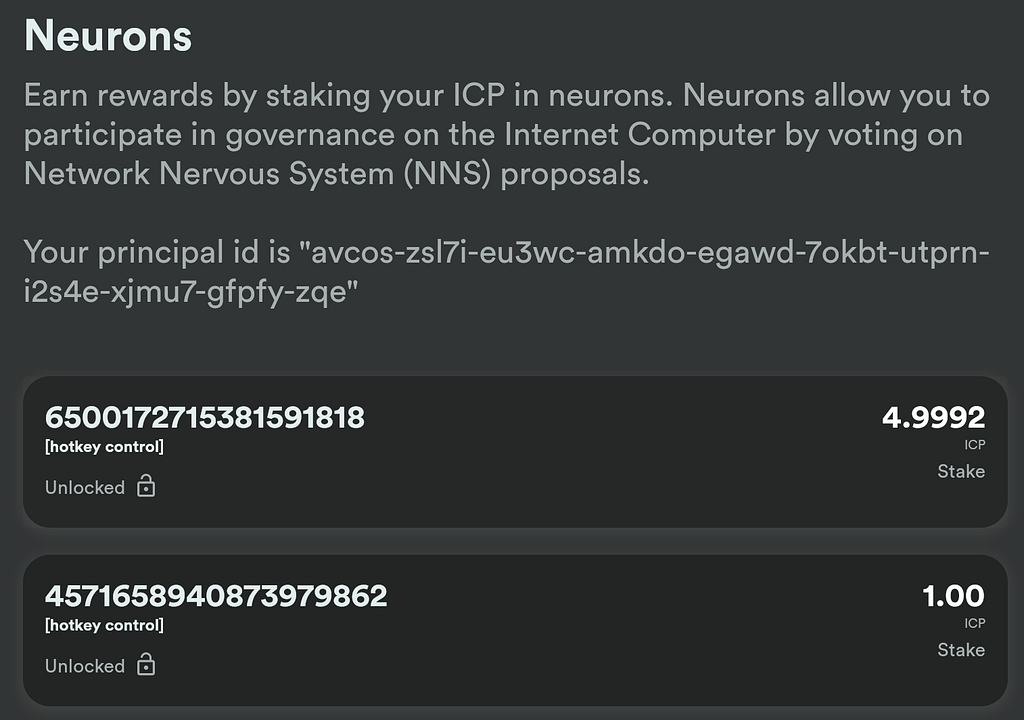
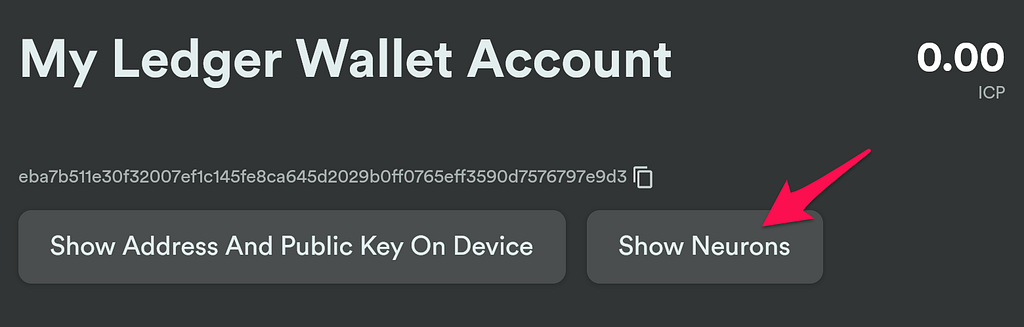
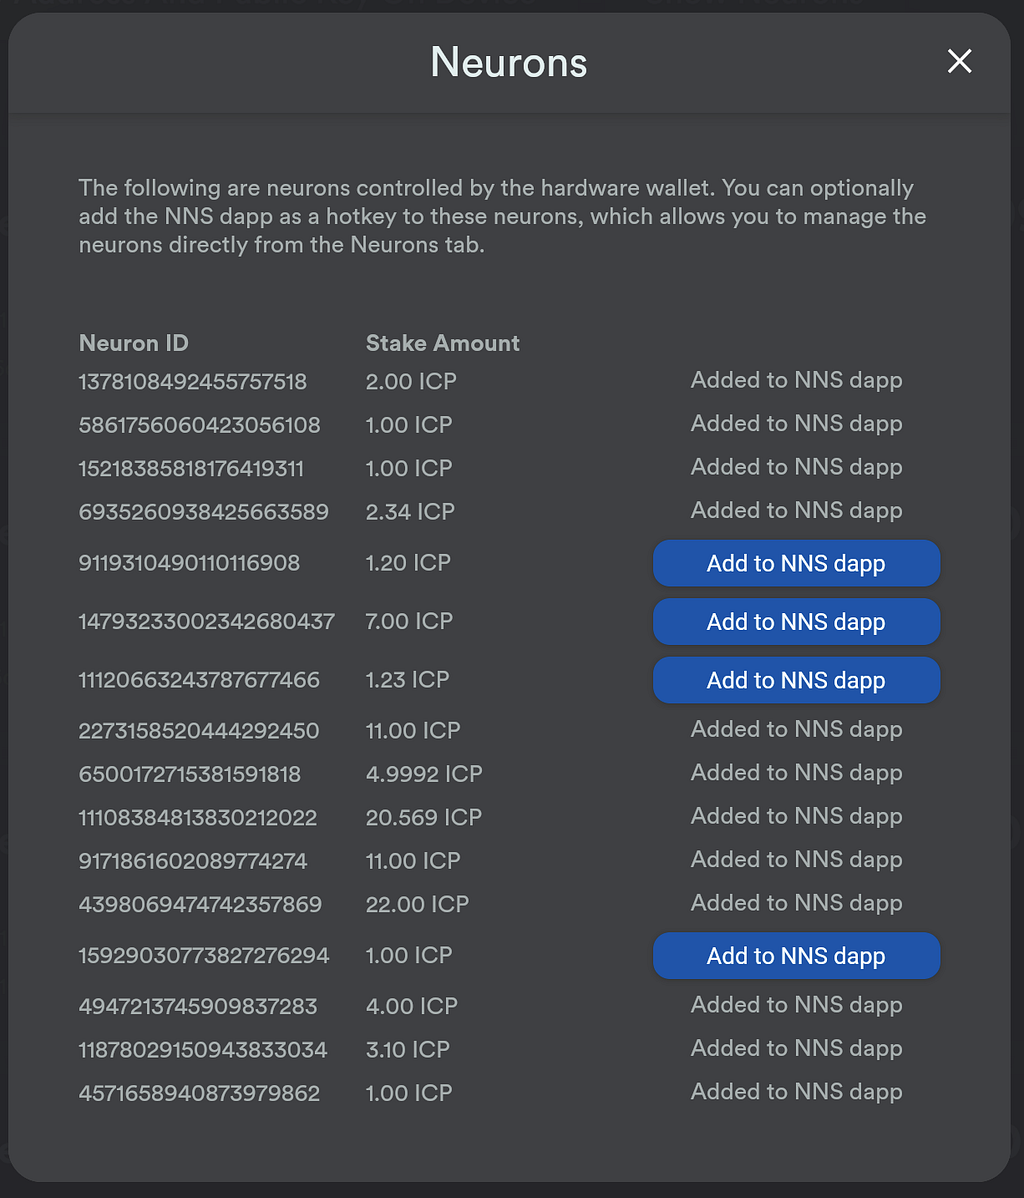
Listing Your Neurons
In the hardware wallet’s account page you click on “Show Neurons”, which will show all the neurons owned by your wallet. This is particularly useful if you have neurons that the NNS dapp doesn’t have permission to see (i.e., the NNS dapp isn’t added as a hotkey to these neurons).
If you have neurons where the NNS dapp isn’t added as a hotkey, you can click on “Add to NNS dapp”. This will ask you to approve adding the NNS dapp’s principal as a hotkey, and afterwards you’ll be able to see and manage that neuron on the Neurons tab.
Request Status
By design, all transactions that mutate the state of the Internet Computer are asynchronous, and therefore all Ledger wallet transactions are asynchronous as well.
For every transaction, you will need to actually approve two transactions:
- The transaction to mutate the state (e.g. “Send ICP”, “Stake Neuron”).
- The “Check Status” transaction. This is a separate transaction that happens a few seconds after the first transaction, to retrieve the result.

Support
- Submit a support ticket
- Ask questions on the Developer Forum
- Join the conversation on Reddit
- Join the community Discord
____
Start building at smartcontracts.org and join the developer community at forum.dfinity.org.
Integrating Ledger Nano With the NNS Front-End Dapp: User Manual was originally published in The Internet Computer Review on Medium, where people are continuing the conversation by highlighting and responding to this story.
Publication date
Disclaimer
The views and opinions expressed in this article are solely those of the authors and do not reflect the views of Bitcoin Insider. Every investment and trading move involves risk - this is especially true for cryptocurrencies given their volatility. We strongly advise our readers to conduct their own research when making a decision.