Latest news about Bitcoin and all cryptocurrencies. Your daily crypto news habit.
Using Linting, Formatting, and Unit Testing with Code Coverage to Enforce Quality Standards Licensed from Adobe Stock Photo
Licensed from Adobe Stock Photo
In my last article, I showed you how to use docker-compose to leverage standardized, already existing Dockerfiles for development. The next step in getting our application ready for deployment is productionizing it.
I’m going to continue using the React/Parcel example from my earlier tutorial: Move over Next.js and Webpack!
Here is the source code: https://github.com/patrickleet/streaming-ssr-react-styled-components
I also haven’t done anything else related to getting the application “production ready”, so I’ll also talk about what is required for that, though it may take another article to finish… we’ll see how it goes. I’m ad-libbing this.
Let’s start with some quality control.
If you are going to be writing code and shipping it to production, it’s important that the code is high quality.
In this article we will explore Linting, Formatting, Unit Testing and Code Coverage and enforce some quality standards.
Linting & Formatting
According to Wikipedia, to “Lint, or a linter, is a tool that analyzes source code to flag programming errors, bugs, stylistic errors, and suspicious constructs.”
This means it enforces things like using spaces vs. tabs or making sure your code using semicolons consistently or not.
There are probably a bunch of linting errors in my project currently.
My goal so far has to demonstrate particular concepts and having too many sidebars about different things really takes away from the concepts at hand. Therefore I chose to forgo linting to keep the previous articles focused.
Now that it’s time to “productionize” our app, quality is of increased priority.
My preferred linter format is StandardJS, which is a very minimalist setup. But before we set that up, let’s talk about formatting as well.
Formatting is similar to linting, but less focused on syntax errors and more focused on just making the code look prettier, hence the name of the popular package prettier.
Thanks to a couple of awesome open-source contributors on Github we can use them both in one package — prettier-standard. Thanks to Adam Stankiewicz, Kent C. Dodds, Adam Garrett-Harris, and Benoit Averty!
In the past I’ve written about using husky to make sure rules are run before each commit. The prettier-standard package also recommends doing so, so let’s add prettier-standard, husky, and lint-staged now.
Configuring prettier-standard
First install the required packages:
npm i --save-dev prettier-standard husky lint-staged
In package.json add the following “format” script and new “lint-staged” and “husky” sections:
{ //... "scripts": { // ..."format": "prettier-standard 'app/**/*.js' 'app/**/*.jsx' 'server/**/*.js'" }, "lint-staged": { "linters": { "**/*.js": [ "prettier-standard", "git add" ], "**/*.jsx": [ "prettier-standard", "git add" ] } }, // ...}I couldn’t get RegExp to work so without looking into the source I’m assuming it uses glob and not RegExp.
Now you can run npm run format to format your code and check for linting errors. Also, any time you try to commit, husky’s pre-commit hook will be called, which will make sure any staged files (git add stages files) are properly linted before allowing them to be commited.
Let’s see how I did on the first pass.
➜ npm run format
> stream-all-the-things@1.0.0 format /Users/patrick.scottgroup1001.com/dev/patrickleet/open-source-metarepo/stream-all-the-things> prettier-standard 'app/**/*.js' 'app/**/*.jsx' 'server/**/*.js'
app/client.js 52msapp/imported.js 11msapp/styles.js 7msapp/App.jsx 11msapp/components/Header.jsx 76msapp/components/Page.jsx 7msapp/pages/About.jsx 6msapp/pages/Error.jsx 5msapp/pages/Home.jsx 6msapp/pages/Loading.jsx 6msserver/index.js 8msserver/lib/client.js 11msserver/lib/ssr.js 17ms
And basically every file except styles.js had linting errors or didn’t look pretty enough!
Ignoring files for linting and formatting
There is one small issue which is specific to this project — app/imported.js is a generated file, and should be ignored by the linter.
Although is has eslint-disabled at the top of the file, prettier does not know to enforce linting rules. No worries, let’s undo changes to that file, and then create a .prettierignore file and an .eslintignore file to explicitly ignore it from being formatted on future runs.
git checkout -- ./app/imported.js
Will undo changes to that file.
And now create .prettierignore and .eslintignore with the following lines:
app/imported.jsdistcoveragenode_modules
Now when running npm run format the file app/imported.js remains unchanged. Not addressing this could be problematic due to the fact the file is generated.
Finally, I’ve mentioned committing should also run npm run format as a pre-commit hook. Let’s try it out.
➜ git commit -m 'feat: prettier-standard'husky > pre-commit (node v11.6.0) ↓ Stashing changes... [skipped] → No partially staged files found... ✔ Running linters...
Here’s the commit on Github.
Unit Testing and Code Coverage
As part of productionizing our application, we really should make sure our code is well-tested. Ideally, you should do this along the way, but I’m a bad person and have neglected it in this project thus far.
Let’s address that.
Installing and Configuring Jest
First, let’s install Jest for writing our unit tests.
npm i --save-dev jest babel-jest
Next, let’s add a jest config file so we configure jest to know where to find our files and be able to use pretty paths.
Add the following jest.json file:
{ "roots": ["<rootDir>/__tests__/unit"], "modulePaths": [ "<rootDir>", "/node_modules/" ], "moduleFileExtensions": [ "js", "jsx" ], "transform": { "^.+\\.jsx?$": "babel-jest" }, "transformIgnorePatterns": ["/node_modules/"], "coverageThreshold": { "global": { "branches": 10, "functions": 10, "lines": 10, "statements": 10 } }, "collectCoverage": true, "collectCoverageFrom" : [ "**/*.{js,jsx}" ]}Alright, let’s unpack that. First, we set roots to <rootDir>/__tests__/unit. I like putting staging tests in __tests__/staging so setting the root to __tests__/unit will allow me to do that later on.
Next, we set modulePaths to the root directory, and node_modules. This way in our tests instead of using relative paths like ../../ we can just import app/* or server/*.
The next two keys are telling jest to use babel to load our files so things like import will work without issues.
And finally, the last three sections define coverage settings — the minimum thresholds, all at 10%, and where to collect coverage from. In this article I just aim to get the pieces configured. In the next one I’ll increase the coverage threshold to 100% and walk through that process of getting there.
And to run, we can define a test script in our package.json's scripts section. Because we are using babel-jest we will need to provide some babel settings as well, so we can set BABEL_ENV to test, and we will address that in the next section.
"scripts": { // ..."test": "cross-env BABEL_ENV=test jest --config jest.json", "test:watch": "cross-env BABEL_ENV=test jest --config jest.json --watch"}Configuring Jest with Babel
First in order for the tests to work, we are going to need configure some babel settings. Add the following section in the env key of your .babelrc file:
{ "env": {"test": { "presets":[ ["@babel/preset-env"], ["@babel/preset-react"], ], "plugins": [ ["@babel/plugin-syntax-dynamic-import"] ] }, // ... }}And let’s install the plugins and presets that we’ve referenced:
npm i --save-dev @babel/core @babel/preset-env @babel/preset-react @babel/plugin-syntax-dynamic-import babel-jest
We have 0% coverage currently, let’s add one test for the app, and one test for the server which should put us above our low threshold of 10%.
Testing the client side app with Enzyme
First, let’s test a file in app. We will want to shallow-render our components in app to test them. To do so, we will use enzyme.
npm i --save-dev enzyme enzyme-adapter-react-16
Enzyme has a setup step that we must add before we can use it in our tests. In our jest.json file, add a new key:
{//other settings"setupTestFrameworkScriptFile": "<rootDir>/__tests__/setup.js"}And the setup file at __tests__/unit/setup.js:
import { configure } from 'enzyme';import Adapter from 'enzyme-adapter-react-16';configure({ adapter: new Adapter() });Now with Enzyme configured we can create __tests__/unit/app/pages/Home.jsx:
import React from 'react'import { shallow } from 'enzyme'import Home from 'app/pages/Home.jsx'describe('app/pages/Home.jsx', () => { it('renders style component', () => { expect(Home).toBeDefined() const tree = shallow(<Home />) expect(tree.find('Page')).toBeDefined() expect(tree.find('Helmet').find('title').text()).toEqual('Home Page') expect(tree.find('div').text()).toEqual('Follow me at @patrickleet') expect(tree.find('div').find('a').text()).toEqual('@patrickleet') })})Seems how our component is just a single function, that’s all we need to reach 100% coverage for this file.
Server side tests
For good measure, let’s create a server side test as well.
I want to test server/index.js but before I do, there are a couple of refactors that will make our lives a little bit easier.
Unit tests are meant to test a single unit. That means even though our app is using express, we are not testing express as part of this unit test. We are testing that our server is configured with the appropriate routes, middleware, and that listen is called to start the server. Unit Tests for express belong in the express project.
In order to only test the single unit we care about, we can use mocking to create lightweight interfaces that we can track using jest.mock. If we extract the server instantiation out of index into it’s own file, we will be able to more easily mock the server.
Create the file server/lib/server.js with the following contents:
import express from 'express'
export const server = express()export const serveStatic = express.static
And update server/index.js like so:
import path from 'path'import log from 'llog'import { server, serveStatic } from './lib/server'import ssr from './lib/ssr'// Expose the public directory as /dist and point to the browser versionserver.use( '/dist/client',serveStatic(path.resolve(process.cwd(), 'dist', 'client')))
// Anything unresolved is serving the application and let// react-router do the routing!server.get('/*', ssr)// Check for PORT environment variable, otherwise fallback on Parcel default portconst port = process.env.PORT || 1234server.listen(port, () => { log.info(`Listening on port ${port}...`)})Now in our test we can simply mock server/lib/server.js instead of a more complex mock of express.
Let’s create the test at __tests__/unit/server/index.js:
import 'server/index'
jest.mock('llog')jest.mock('server/lib/server', () => ({ server: { use: jest.fn(), get: jest.fn(), listen: jest.fn() }, serveStatic: jest.fn(() => "static/path")}))jest.mock('server/lib/ssr')describe('server/index.js', () => { it('main', () => { const { server, serveStatic } = require('server/lib/server') expect(server.use).toBeCalledWith('/dist/client', "static/path") expect(serveStatic).toBeCalledWith(`${process.cwd()}/dist/client`) expect(server.get).toBeCalledWith('/*', expect.any(Function)) expect(server.listen).toBeCalledWith(1234, expect.any(Function)) })})If we run the coverage now, we will notice that the coverage for server/index.js is not 100%. We have an anonymous function passed to listen which is difficult to get at. This calls for some minor refactoring.
Refactor the listen call to extract the anonymous function.
export const onListen = port => () => { log.info(`Listening on port ${port}...`)}server.listen(port, onListen(port))Now we can easily test onListen.
Let’s add another test to our server/index.js suite to account for it.
import { onListen } from 'server/index'// ...
describe('server/index.js', () => { // ... it('onListen', () => { const log = require('llog') onListen(4000)() expect(log.info).toBeCalledWith('Listening on port 4000...') })})And with that, we have 100% coverage for server/index.js as well as app/pages/Home.jsx.
With our two tests we’ve managed to increase our coverage from 0% to 35–60% depending on the metric:
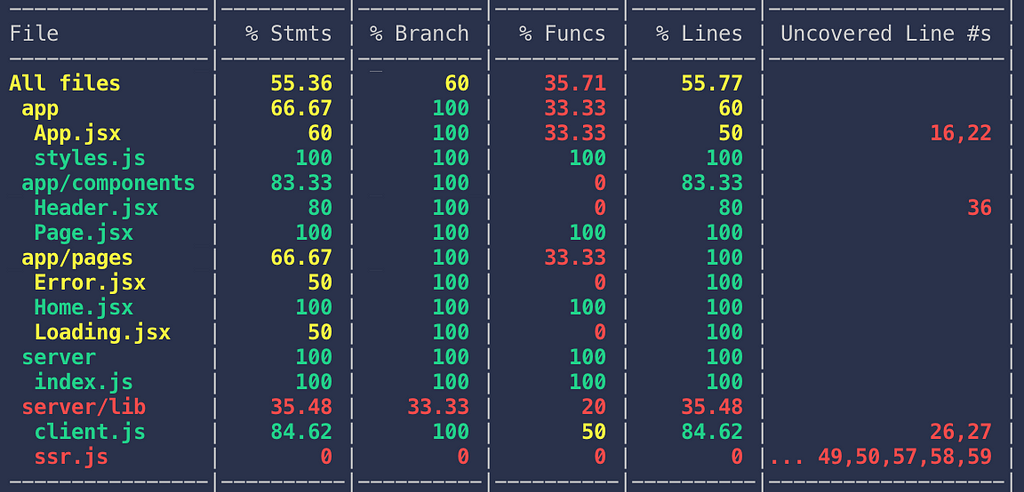 Current CoverageAdd testing to pre-commit hooks
Lastly, we want to only make sure that tests as a pre-commit hook as well to prevent broken tests from making it into the code, and later on, any untested code.
In package.json change pre-commit to:
"pre-commit": "lint-staged && npm run test"
Now when someone tries to commit to the project it will enforce the coverage standards defined in your Jest config as well as making sure all the tests pass!
Conclusion
When it comes time to get your application production ready, it is imperative to enforce quality standards in an automated way. In this article I showed you how to set up and configure tools for linting and formatting your code, as well as how to configure your project for testing using enzyme and jest with enforced code coverage.
In the next part we will increase coverage to 100% before continuing on with creating a production ready Dockerfile.
As always, if you’ve found this helpful, please click and hold the clap button for up to 50 claps, follow me, and share with others!
Best,Patrick Lee Scott
Enforcing Code Quality for Node.js was originally published in Hacker Noon on Medium, where people are continuing the conversation by highlighting and responding to this story.
Publication date
Disclaimer
The views and opinions expressed in this article are solely those of the authors and do not reflect the views of Bitcoin Insider. Every investment and trading move involves risk - this is especially true for cryptocurrencies given their volatility. We strongly advise our readers to conduct their own research when making a decision.