Latest news about Bitcoin and all cryptocurrencies. Your daily crypto news habit.
How to Set up a Private Blockchain with Quorum
Today I’m going to show you how to build your first private blockchain using Quorum but first let’s see what Quorum is.

Quorum is a fork of the go-ethereum (geth) client with a few updates that add enterprise-level features such as supporting private transactions, node permissioning, fast consensus algorithms, block finality, and some others. It was originally created through a joint effort by JPMorgan and core engineers from the Ethereum Foundation.
Let’s get started and get our hands dirty to set up our own private blockchain.First of all, you will need the following software installed before proceeding:
In this tutorial we will be using the 7nodes example provided by Quorum, this example consists of seven nodes already set up and configured for us inside a virtual machine.Note: nodes are the participants of the network, for example inside our company the participants would be company X and company Y which are my clients and they can vote on proposals and do many more things.
First of all, we are going to create a directory for where you’d like it installed:
mkdir workspacecd workspace
We will download the Quorum examples repository:git clone https://github.com/jpmorganchase/quorum-examples
Then it’s the turn to initialize the virtual machine we will use Vagrant for that:
cd quorum-examplesvagrant up
Now that the virtual machine has been initialized, we will need to access it in some way. Note that the virtual machine is like having another computer running inside our own:
vagrant ssh
You will now see that we are connected to the virtual machine and now we can run our commands directly from the command line
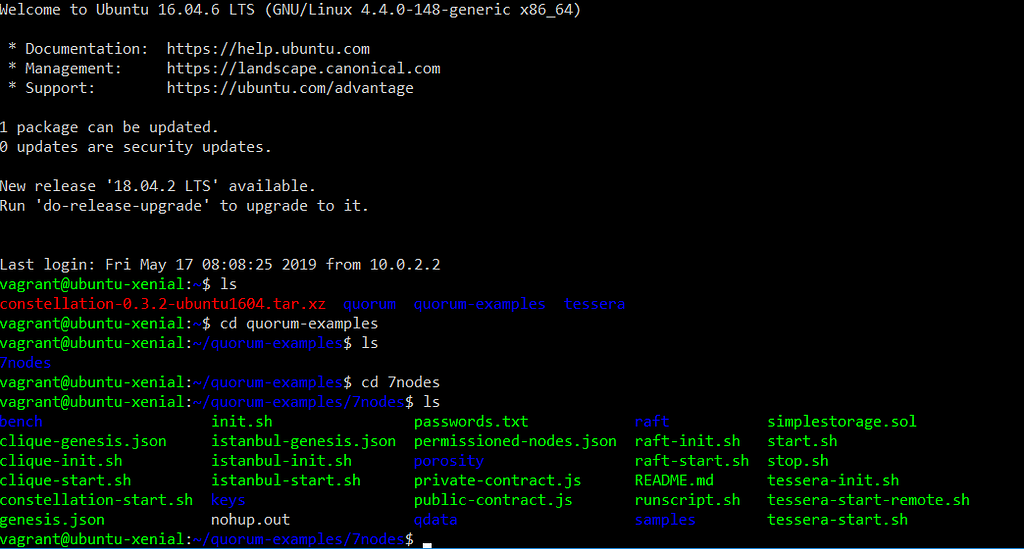 Vagrant running
Head over to the directory that has the examples:
ubuntu@ubuntu-xenial:~$ cd quorum-examples/7nodes/
Now that the Quorum Client is ready we need to run two more commands, the first one creates our seven nodes and the second one starts up those nodes. Note that the first command needs to be run once while the second one has to be run every time you restart the virtual machine:
ubuntu@ubuntu-xenial:~/quorum-examples/7nodes$ ./raft-init.shubuntu@ubuntu-xenial:~/quorum-examples/7nodes$ ./raft-start.sh
Note: it may take some time for your computer to run the nodes so don’t worry if it takes more than 5 minutes for the nodes to be configured.
Congratulations! Now you have your private blockchain running inside your computer.
Now that the setup part has been done we will create our smart contract to run it inside our blockchain, in order to do this, we will need Truffle which is a development tool used to code Smart Contracts in Solidity.Please follow this guide to setup Truffle: https://www.youtube.com/watch?v=-zUBML3R--o
Open a new terminal window and head over to your workspace, create a new directory and finally initialize a new truffle project.
cd workspacemkdir myquorumcd myquorumtruffle init
If you look at myquorum you will see that directories were created for you, let me explain the meaning of those directories.

- Migrations: Migrations are Javascript files that help you deploy contracts to the Ethereum network. These files are responsible for staging your deployment tasks, and they’re written under the assumption that your deployment needs will change over time.
- Contracts: this folder contains our contract written is Solidity, you will find a file named “Migrations.sol”, this contract keeps track of which migrations were done on the current network.
- Test: this folder is used to accommodate Solidity or javascript files in order to test the smart contract and guarantee its stability.
- Build: this folder contains the JSON of the compiled contract, right now it won’t be useful to us.
Refer to the truffle documentation for a better understanding: https://truffleframework.com/docs/getting_started/project
There is a file called truffle-config.js(truffle.js in MacOs), this one is used mostly to set up the connection to the blockchain, in this case, we will connect to our Quorum client.(There is an issue with truffle in Windows, refer here if you experience any issue: https://truffleframework.com/docs/truffle/reference/configuration#resolving-naming-conflicts-on-windows)
Edit the development network configuration :
module.exports = { networks: { development: { host: "127.0.0.1", port: 22000, // this is node 1 network_id: "*", // Match any network id gasPrice: 0, gas: 4500000, type: "quorum" // needed for Truffle to support Quorum } }};With the magic of Vagrant and VirtualBox, the node running inside our ethereum client is made available through local ports.Note: The 7 nodes range from 22000(Node 1) to 22006(Node 7)
What we will do now is to deploy a smart contract in our private chain and for doing this we are going to use Truffle.First of all, we need to create a new file called SimpleStorage.solinside our contracts/ directory:
Next, create a new migration called 2_deploy_simplestorage.js within your migrations/ directory. Note that in quorum contracts can be hidden to other participants of the network and thus we need to add a parameter that says who can execute and see the contract code.Remember: Ethereum addresses uses only the last 20 bytes of the public key, while Quorum uses the full public key that’s why the address provided in the privateFor parameter is not the same as the Ethereum one.
var SimpleStorage = artifacts.require("SimpleStorage");module.exports = function(deployer) { deployer.deploy(SimpleStorage, {privateFor: ["ROAZBWtSacxXQrOe3FGAqJDyJjFePR5ce4TSIzmJ0Bc="]})};For this transaction, the public key we chose represents node 7. As you remember Truffle is connected to Node 1 and deploying the contract will be made available only between node 1 and node 7.
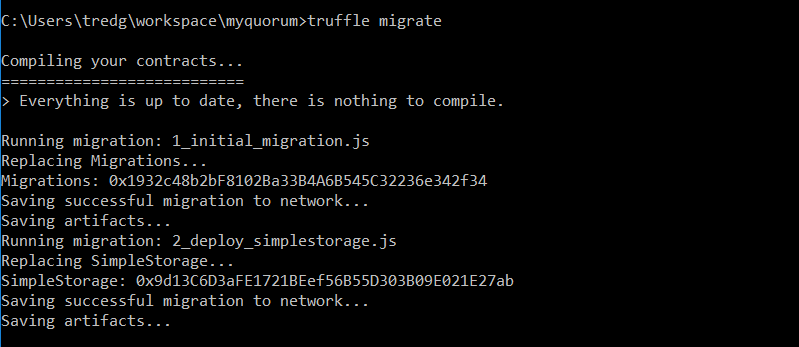
Now we have to deploy our contract to the network by running the migration files.truffle migrate
You will see an output like this once it’s deployed:
Now that we have the Contract deployed in our chain, let’s test it and to do so the next step will be to add to the connection to node 7.Make sure the truffle.js file in your project folder looks like this
module.exports = { networks: { development: { host: "127.0.0.1", port: 22000, network_id: "*", // Match any network id gasPrice: 0, gas: 4500000, type: "quorum" // needed for Truffle to support Quorum }, nodeseven: { host: "127.0.0.1", port: 22006, network_id: "*", // Match any network id gasPrice: 0, gas: 4500000, type: "quorum" // needed for Truffle to support Quorum } }};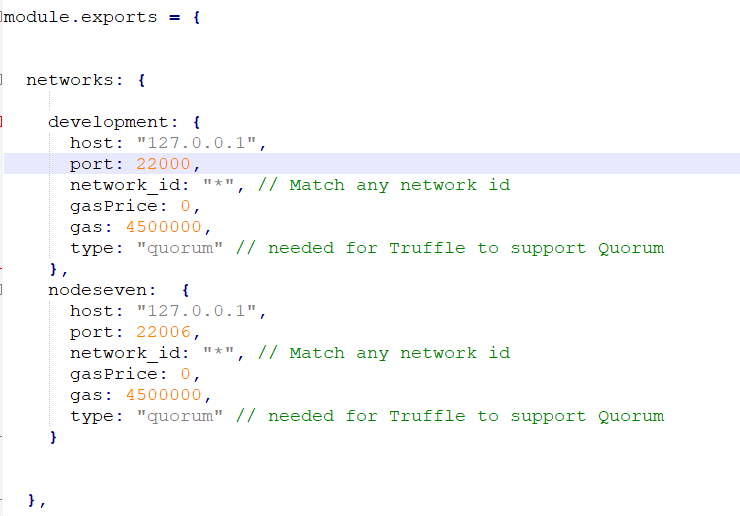
To start interacting with the contract we will use an interactive console that connects to our Quorum client.truffle console
Now let’s get to the juicy part and test our contract, and the best part is that it’s very simple!Let’s try to add the most common string known in programming.
(await SimpleStorage.deployed()).set("Hello World!")Now that the contract has stored the string in our private blockchain let’s retrieve it
(await SimpleStorage.deployed()).get.call()
And that will be the output
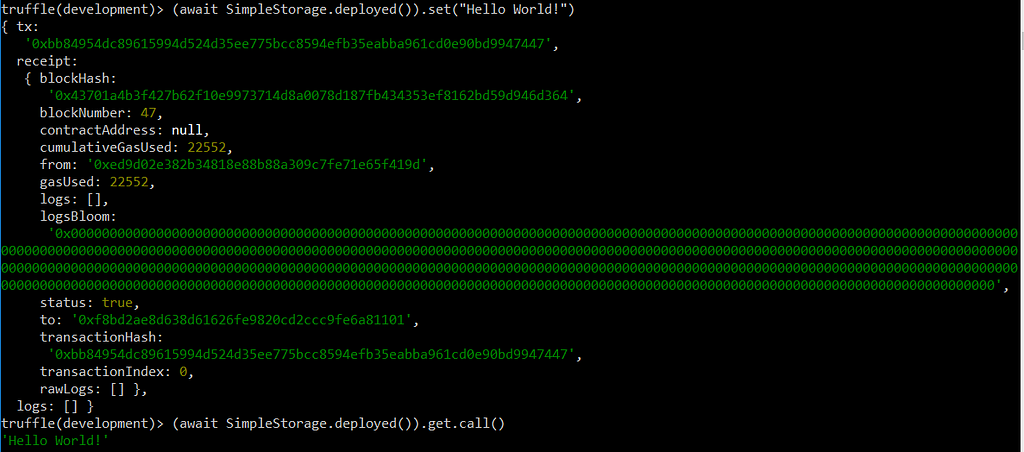
Congratulations! Now you can run any smart contract inside your private blockchain and you can even play with it more and build an election contract where each node that participates in the network has a vote.
I hope that you are much smarter now as that’s my goal.
Here is more documentation:
- https://github.com/jpmorganchase/quorum/wiki
- https://docs.goquorum.com/en/latest/
- https://github.com/jpmorganchase/quorum/wiki/QuorumChain-Consensus
See you soon!
How to set up a private blockchain with Quorum was originally published in Hacker Noon on Medium, where people are continuing the conversation by highlighting and responding to this story.
Publication date
Disclaimer
The views and opinions expressed in this article are solely those of the authors and do not reflect the views of Bitcoin Insider. Every investment and trading move involves risk - this is especially true for cryptocurrencies given their volatility. We strongly advise our readers to conduct their own research when making a decision.