Latest news about Bitcoin and all cryptocurrencies. Your daily crypto news habit.


Hello and welcome to my tutorial on how to make a Sapphire RX 470 8GB Mining Edition (ME) hash 29 – 30 MH/s. I have reviewed the card some time ago – you can click here to know more about the specs, pricing and other aspects of the card.
This is my first BIOS and mining performance test of a mining edition GPU.
I’m really excited about this guide because I have found the exact steps on how to make the card hash properly and I will be sharing all of them with you right now.
If you liked this guide, you might also be interested in my 570 8GB mining edition GPU one. I will be posting it soon, so stay tuned.
 Sapphire RX 470 8GB Mining Edition Review Hashrate Performance 1
 Sapphire RX 470 8GB Mining Edition Review Hashrate Performance 2
 Sapphire RX 470 8GB Mining Edition Review Hashrate Performance 3
 Sapphire RX 470 8GB Mining Edition Review Hashrate Performance 4
What You Will Find In This Guide
Do you have trouble configuring your Sapphire RX 470 8GB ME? Do you feel depressed because your card fails to hash properly? Are you considering selling it because it simply refuses to work? I know how you feel. Luckily enough, I have discovered the needed steps to make my Sapphire hash normally. It took me a lot of research and trial and error; I have made this tutorial so you don’t have to reinvent the wheel.
The trick is to find the right BIOS version and spice it up with the right clocks. I have managed to make hash properly each of my four Sapphire RX 470 8GB ME. Hashrate is stable so far, as well as power consumption.
To receive the latest updates follow me on social media! 
facebook
twitter
Follow
google
youtube
Before we start with the guide, I’d want to mention that Sapphire RX 470 8GB ME have some sort of design issue that makes them hard to set up for mining. Since other people are apparently facing the same exact problems, I’ve thought that I’d start this guide with some troubleshooting.
If you are like me, you will encounter one or more of the following bugs along the way. Therefore, I thought it would be a good idea to inform you on the potential problems you might face and provide you with the adequate solutions.
Note: The Sapphire RX 470 8GB Mining Edition I am using have Samsung memory – this bios wont work with Hynix memory chip manufacturer.
 Sapphire Radeon RX 470 8GB GDDR5 Mining Quad SAMSUNG MEMORY 11256-38-10G
 Price Disclaimer
recommended mining rig hardware
Problems and Fixes
I will update this list with more problems and solutions soon.
- GPU not recognized by atiflash
- Uninstall drivers with latest version of DDU in safe mode.
- Install latest mining edition drivers
- Download latest Atiflash 2.77 and try again
- Also try to backup via CMD and apply the patch
- Exclamation mark in device manager after rig reboot
- Apply the patch and restart
- Flashing BIOS error message
- If you get that while trying to flash the bios via atiflash gui, try again via CMD with –f –p
- If you still get the same error message switch BIOS jumpers to the other side and try again (you can do it without restarting the rig)
- Empty Backup BIOS – 0 KB BIOS Size
- For some reason, the silent BIOS version that was saved by atiflash resulted in a 0 KB file. I was able to backup it with GPUz and getting a full-sized back-up with a size of 256 KB. You can also try to backup via CMD using –s command (I missed that)
- Claymore no AMD or CUDA GPU detected
- Apply the patch and restart the rig
Software and Tools used for this tutorial
- Drivers Official AMD Mining Drivers
- Atiflash 2.77 https://www.techpowerup.com/download/ati-atiflash/
- Latest Claymore Miner https://mega.nz/#F!O4YA2JgD!n2b4iSHQDruEsYUvTQP5_w
- ATImdag Patcher https://www.monitortests.com/atikmdag-patcher-1.4.5.zip
- Display Driver Uninstaller http://www.guru3d.com/files-details/display-driver-uninstaller-download.html
- MSI Afterburner BETA http://forums.guru3d.com/showpost.php?p=5459908&postcount=637
The BIOS
As you already know, the card offers 4 BIOS versions to choose from (Quad UEFI BIOS). Here is how this works, according to the manufacturer:
- BIOS #1 (default mode) has the maximum performance
- BIOS #2 is called ‘Efficiency’ and in theory it should make the GPU consume less power and consequently output lower hashrate
- BIOS #3 and #4 another two BIOS set like the efficiency one.
 Sapphire RX 470 8GB Mining Edition Quad Uefi Switch 1
 Sapphire RX 470 8GB Mining Edition Quad BIOS Switch
I have tried all of them and I wasn’t able to get more than 27 MH/s. In fact, there were times I was getting only 23 MH/s. Yeah, I know… you can express your condolences in the comment section. Fun fact is that power consumption always remains the same, no matter which one of the four BIOSes you choose.
Stock BIOS Hashrate Performance
- BIOS #1: 27 Mh/s (download)
- BIOS #2: 24 Mh/s (download)
- BIOS #3: 27 Mh/s (download)
- BIOS #4: Error :/ (download)

How to Make the Rig Work without the GPU Display Adapter
Mining edition GPUs come with no display adapters to reduce costs. In on order to have an image on your monitor, you’ll have to connect an HDMI cable directly to the motherboard. Then, you’ll have to do a couple BIOS modifications and you’re set. Let’s review the steps in detail:
(In my case, I am using an AsRock H81 PRO BTC R2.0)
- Access Motherboard BIOS
- Go to Advanced tab, then Chipset Configuration
- On Primary Graphics Adapter choose “Onboard”
- Save changes and exit
- Now you are able to have display via the motherboard. The thing is that if you open MSI Afterburner, you will notice that “Core Voltage (mV)” is frozen and cannot be changed. Here’s what you do to fix that:
- First make sure MSI Afterburner is closed; go to “Device manager”, dropdown Display Adapters, right click on “Microsoft Basic Display Adapter” and disable it. Now, start MSI Afterburner; if you still see the voltage frozen then you probably forgot to unlock it in the settings. Simply go to Settings -> General tab and check “Unlock Voltage Control” and “Unlock Voltage Monitoring” boxes.
- That’s it; now let’s move on to the next steps
 AsRock H81 PRO BTC R2.0 Primary Graphics Adapter
 Sapphire Rx 470 8GB Mining Edition Core Voltage Enabled 1
 Sapphire Rx 470 8GB Mining Edition Core Voltage Enabled 2
 Sapphire Rx 470 8GB Mining Edition Core Voltage Enabled 3
 Sapphire Rx 470 8GB Mining Edition Core Voltage Enabled 4
 HINT Sapphire RX 470 8GB Mining Edition HDMI Display Port
Flashing the BIOS
Since this card has two BIOS switches with 4 BIOS versions, I had to test each of them to achieve the best results. If you try each of the versions on default settings, you will not achieve more than 28 MH/s. You can test it on your own if you want to.
This is why we have to flash it to achieve better results. Important Note: I have modded the Efficiency Setting BIOS. This means that before flashing it you will have to toggle both bios switches down and restart the rig
1 Back Up the BIOS
Before flashing the new BIOS, I recommend you to back up the original one first.
- If you don’t know how to do it follow point 2 from my previous tutorial: click here
 atiflash saving sapphire rx 470 default bios
2 Download Modded BIOS for Sapphire RX 470 8GB Mining Edition
V1: https://mega.nz/#!ghpiTCJT!5ZBEA-qEDhNlW2Mb-irZ-6OcCOZZCbTl-NY7CjzDGOw
V2: https://mega.nz/#!hhh0XKoR!klV0tzoAPCtcYR0011taY2iDxYtUTljyi7hIMDjsyTY
3 Flashing
VERY IMPORTANT: Always extract ATIflash to C:/atiflash folder and place the ROM file that needs to be flashed in the same directory
If you need help, follow point 5 from my previous tutorial or check the following video: click here
Before to continue further, please share this thanks!
My results with this BIOS ROM
Sapphire RX 470 8GB Mining Edition – Mining Performance Stock Clocks (Samsung Memory)
 Sapphire RX 470 8GB Mining Edition Samsung Memory Ethereum mining stock clocks
 Sapphire RX 470 8GB Mining Edition Samsung Memory Power Draw Stock Clocks
 Sapphire RX 470 8GB Mining Edition Samsung Memory gpu-z details
 Sapphire RX 470 8GB Mining Edition Samsung Memory gpu-z sensors
System power draw is 50W
RX 470 8GB Mining Edition Ethereum (Ethash) Mining Hashrate Performance & Power Consumption
Ethereum Only
Same settings can be applied and the results will be the same if you want to mine any coin that runs on Ethash Algorithm like Ethereum Classic (ETC), Ubiq (UBQ), Expanse (EXP), Soilcoin (SOIL) etc..
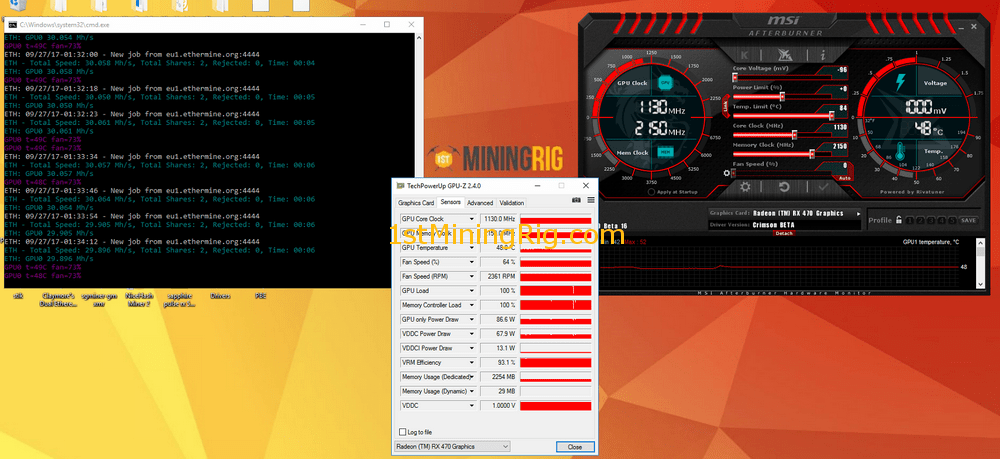
MSI Afterburner 30 MH/s
- Clocks 1130/2150
- Core Voltage -96mV
- GPU-Z 85w
- From wall 120w
 RX 470 8GB Mining Edition Ethash Ethereum Mining Hashrate Performance OC
 RX 470 8GB Mining Edition Ethash Ethereum Power Draw
Claymore 30.050 Mh/s
- Clocks 1130/2150
- Voltage -cvddc 850 -mvddc 875
- GPU-Z 69w
- From wall 100w
 Claymore RX 470 8GB Mining Edition Ethash Ethereum Mining Hashrate Performance
 Claymore RX 470 8GB Mining Edition Ethash Ethereum Mining Power Draw
start.bat file for Ethereum only with claymore clocks and voltage: EthDcrMiner64.exe -epool eu1.ethermine.org:4444 -ewal ETHEREUM_WALLET.WORKER_NAME -epsw x -tstop 85 -tt 65 -fanmin 75 -fanmax 100 -cclock 1150 -mclock 2150 -cvddc 850 -mvddc 875 –dcri 5
Ethereum Dual Mining Decred and Siacoin
I only used .bat commands to overclock the cards
Ethereum 29.950 Mh/s – Decred 630 Mh/s
- Clocks -cclock 1130 -mclock 2150
- Voltage -cvddc 850 -mvddc 875
- GPU-Z 85w
- From wall 125w
 RX 470 8GB Mining Edition Ethash Ethereum Dual Mining Decred Hashrate Performance
 RX 470 8GB Mining Edition Ethash Ethereum Dual Mining Decred Hashrate Performance
Ethereum 28.200 MH/s – Siacoin 400 Mh/s
- Clocks -cclock 1150 -mclock 2150
- Voltage -cvddc 850 -mcvddc 875
- GPU-Z 83w
- From wall 120w
 RX 470 8GB Mining Edition Ethash Ethereum Dual Mining Siacoin Hashrate Performance
 RX 470 8GB Mining Edition Ethash Ethereum Dual Mining Siacoin Power draw
start.bat file for ethereum dual decred with claymore clocks and voltage: EthDcrMiner64.exe -epool eu1.ethermine.org:4444 -ewal ETHEREUM_WALLET.WORKER_NAME -epsw x -dpool dcr.suprnova.cc:3252 -dwal SUPRNOVA_USER.WORKER_NAME -dpsw WORKER_PASS -tstop 85 -tt 65 -fanmin 75 -fanmax 100 -cclock 1130 -mclock 2150 -cvddc 850 -mvddc 875 -dcri 5
start.bat file for ethereum dual siacoin with claymore clocks and voltage: EthDcrMiner64.exe -epool eu1.ethermine.org:4444 -ewal ETHEREUM_WALLET.WORKER_NAME -epsw x -dpool stratum+tcp://sia-eu1.nanopool.org:7777 -dwal SIA_WALLET.WORKER_NAME -dcoin sia -tstop 85 -tt 65 -fanmin 75 -fanmax 100 -cclock 1130 -mclock 2150 -cvddc 850 -mvddc 875 -dcri 20
RX 470 8GB Mining Edition ZCash (Equihash) Mining Hashrate Performance & Power Consumption
You get the same results and power consumption for the following coins running on Equihash algorithm: Zencash (ZEN), Zclassic (ZCL), Hush (HUSH), Komodo (KMD)
Download and extract Claymore ZCash Miner: https://bitcointalk.org/index.php?topic=1670733.0
Claymore Miner ZCash Hashrate 278 H/s – 300 H/s
- Clocks 1130/2150
- Core Voltage -cvddc 850 -mcvddc 875
- GPU-Z 70w
- From wall 90w
 Claymore RX 470 8GB Mining Edition ZCash Mining Hashrate Performance
 Claymore RX 470 8GB Mining Edition ZCash Mining Power Consumption
start.bat file for ZCash (ZEC): ZecMiner64.exe -zpool eu1-zcash.flypool.org:3333 -zwal ZCASH_WALLET.WORKER_NAME -zpsw x -tstop 85 -tt 65 -fanmin 75 -fanmax 100 -cclock 1130 -mclock 2150 -cvddc 850 -mvddc 875
The bios is not really optmized for ZCash, maybe i will work something soon..
RX 470 8GB Mining Edition Monero (CryptoNight) Mining Hashrate Performance & Power Consumption
Once again, the same procedure can be applied to mine CryptoNight Algorithm coins like Karbowanec (KRB), Bytecoin (BCN), Sumokoin (SUMO), DigitalNote (XDN)
Download and extract Claymore’s CryptoNote GPU Miner: https://mega.co.nz/#F!e4JVEAIJ!l1iF4z10fMyJzY5-LnyC2A
In this case, for some reason I wasn’t able to set the clocks via .bat file and I had to split the commands. I set the clocks to 1130/2150, undervolted the GPU to -100mV via MSI Afterburner and added –mvddc 900 to the .bat file.
MSI Afterburne / Claymore 760 H/s
- Clocks 1130/2150
- Core Voltage -96mV –mvddc 900
- GPU-Z 80w
- From wall 100w
 RX 470 8GB Mining Edition Monero Mining Hashrate Performance
 RX 470 8GB Mining Edition Monero Power Consumption.png
start.bat file for Monero (XMR): ZecMiner64.exe -zpool eu1-zcash.flypool.org:3333 -zwal ZCASH_WALLET.WORKER_NAME.WORKER_NEM -zpsw x -tstop 85 -tt 65 -fanmin 75 -fanmax 100 -cclock 1130 -mclock 2150 -cvddc 850 -mvddc 875
In Conclusion
It took me a lot of work and time to come up with the mentioned steps. Hopefully, this tutorial saved you a lot of time. I have tried to make it an easy read and as beginner-friendly as possible. Please leave me a comment if you have any questions or suggestions, I highly appreciate your feedback.
Thank you for reading. As always, your comments, suggestions and questions are welcome.
Subscribe and stay tuned for further updates!
Found this useful? Buy me a beer
PayPal: https://www.paypal.me/1stMiningRig
ETH: 0x8a159cc27454130ee4880504f4d2afe2ebb22d15
BTC: 3DWC5xaaapSRmccAvv12dF3nsRYqx3Y1YM
ZEC: t1T9dLLM14Jh6NNuCPfNsRgGnj58LkT3yYX
NEED HELP WITH YOUR RIG? CLICK HERE!The post Best BIOS ROM for Sapphire RX 470 8GB Mining Edition with Samsung Memory 29 – 30 MH/s appeared first on 1st Mining Rig.
Publication date
Disclaimer
The views and opinions expressed in this article are solely those of the authors and do not reflect the views of Bitcoin Insider. Every investment and trading move involves risk - this is especially true for cryptocurrencies given their volatility. We strongly advise our readers to conduct their own research when making a decision.