Latest news about Bitcoin and all cryptocurrencies. Your daily crypto news habit.
Recently, I had the idea for a site which allowed you to brainstorm ideas. Here’s what I had basically envisioned:
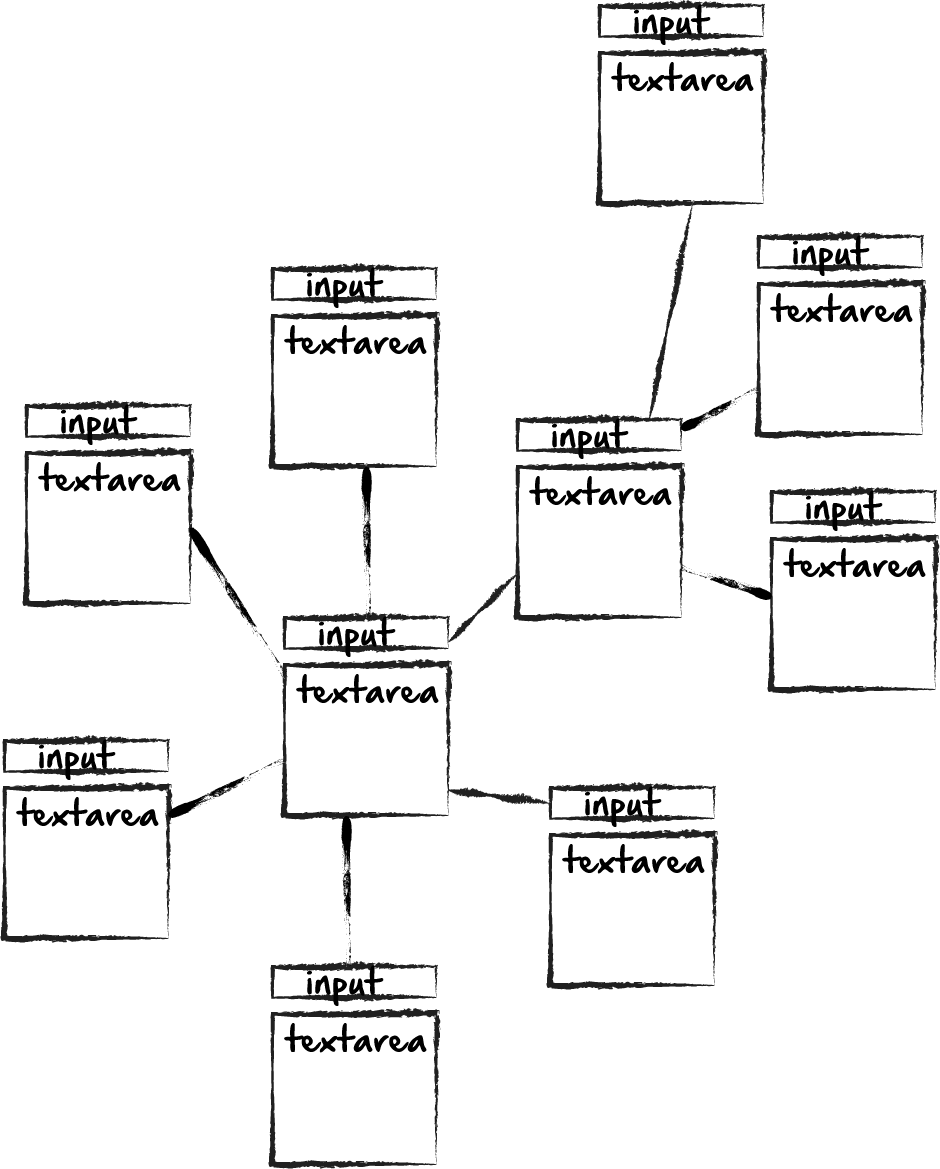
A user would start off with a central idea or thought and be able to branch off related ideas or thoughts. This would be great for planning lessons, presentations or even studying. As I was brainstorming this idea, I came up with 4 components that the project would need:
1 An Input/Textarea
2 A button to create a new branch of an idea.
3 A line to visually connect the idea and the branched idea.
To do this, I quickly ran into a problem. Creating an input/textarea is easy. Creating a button that creates a new input/textarea is also pretty easy. The difficult piece is visually designing it in a way that is both functional and makes sense visually. For example, for simplicity’s sake we could simply have each button that creates a new form element place the form element vertically below the previous element. Although this would be simpler from a programming standpoint, visually, it wouldn’t make much sense for the user, as it would be hard to tell which branched text box was connected to which previous idea or text box. As usually serves me well, I decided to start small, and see if I could get the mechanics working on a small scale first. I started with dots, each dot representing a from element / text box. Each dot is 25 pixels in width and 25 pixels in height, black in color. My first goal was to add a new dot when the first dot is clicked, and then distribute subsequent dots around the first dot each time it is clicked. To solve this, I created a variable called “click” and set it to 0; Then, on each click event, I add one.
let clicks = 0; $('button').click(function() { clicks = clicks + 1;Then I create an element inside an if statement.
if(clicks == 1) { let blackDot = document.createElement('div'); blackDot.id = "outerDiv1"; document.body.appendChild(blackDot); document.getElementById('container').appendChild(blackDot); blackDot.className = "blackDotClass";}That’s the basics of it. Then I add a top and left margin to it. The isn’t included in the class “blackDotClass” because the margin will be different for each created element. For example, the first dot will be to the right of the parent element, the second created dot will be below it, and the third to the left, etc, etc. I’ll insert it like this:
if(clicks == 1) { let blackDot = document.createElement('div'); blackDot.id = "blackDotID1"; document.body.appendChild(blackDot); document.getElementById('container').appendChild(blackDot); blackDot.style.marginTop = "25px"; blackDot.style.marginLeft = "200px"; blackDot.className = "blackDotClass";}Then, if the parent dot is clicked a second time, we could do something like this:
if(clicks == 2) { let blackDot = document.createElement('div'); blackDot.id = "blackDotID2"; document.body.appendChild(blackDot); document.getElementById('container').appendChild(blackDot); blackDot.style.marginTop = "0px"; blackDot.style.marginLeft = "200px"; blackDot.className = "blackDotClass";}The only thing we’ve changed is the “ID” and the top margin. Then for the third element, we would probably change the top and left margin, to place each new element in a circle around the parent dot. This part is simple enough but still, this would be confusing for a user without physical lines that connect one dot to another. Otherwise, again, it would be really difficult to tell which elements are actually connected, with nothing more to go on than spaces.
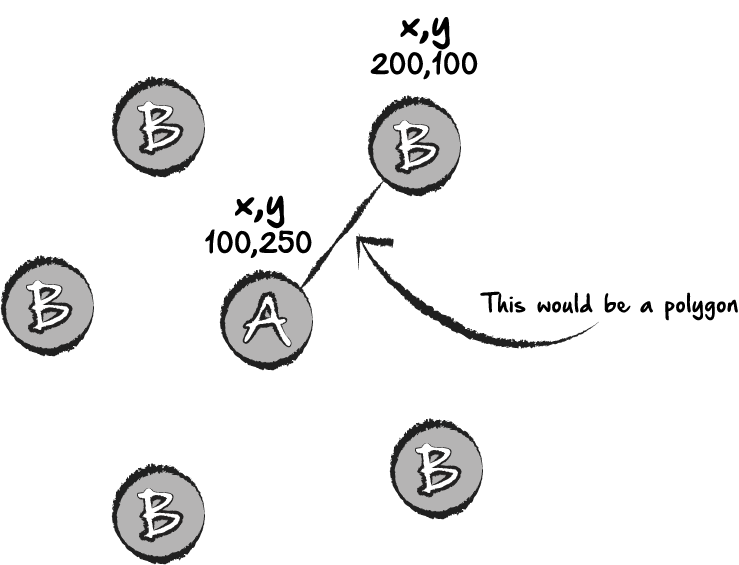
My initial idea to solve this was to use polygons. Since each “dot” or “element” or whatever we’re using will have a set of x and y coordinates, I could use the coordinate of the parent element and the coordinates to draw a polygon line from one element to the next. Here’s a diagram of what I had envisioned:
I actually went through several iterations of this idea before coming to the conclusion that svg polygons wouldn’t work. The reason is that polygons are an svg element, and have to be inside an svg container. Because of this, you aren’t simply lining a up with b. But you’re also lining them up with the svg element itself, which has it’s own set of dimensions. Take this for example:
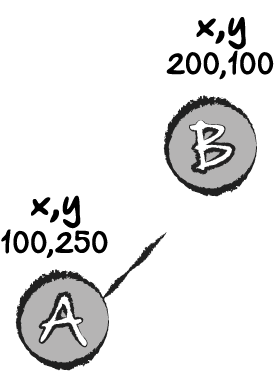
You might start the process, and have everything lined up properly, and end up with the above example, where the line doesn’t connect from point a to point b. Naturally, the assumption is that the line isn’t long enough, and is a problem with either the coordinates, or length of the polygon. When you’re problem could be that the svg container isn’t the right size or isn’t aligned properly. What you actually have is this:
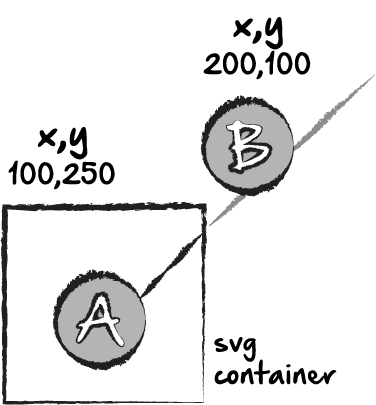
You’re line is right, and your coordinates may be right, but because the svg container is too small, you only see a small portion of the actual polygon. Sure, you can make a border around the container to see where it is, but imagine how complex doing this gets when you have several elements, then the svg containers and polygons…it’s a nightmare.
So I came up with a slightly more simple solution. Just a div, with a width of 1 and a border. Each time I click “A” and create a new child element “B”, I also create a third element, “C” a line connecting the two, or a div with a border, between the two elements.
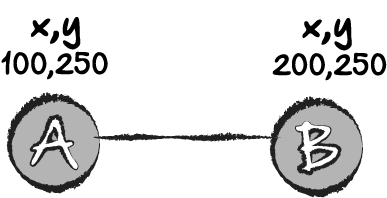
If A and B are on the same X axis, and the display is set to inline, or they’re contained in a span tag, then your job is done, because you don’t need to may any calculations for the y axis. However, again, from the user standpoint, it would be difficult to know where ideas and elements are connected if everything is in a straight line. Thus, in these mind mapping diagrams, they usually tend to be circular in shape. So here’s what I came up with. After I’ve created B, from clicking A, I get the coordinates of each, just like I had done with the polygon.
let element1 = dot1.getBoundingClientRect(); let element2 = dot2.getBoundingClientRect(); console.log(element1); console.log(element2);
I also want to find the midpoint of my element. In case my dot is 300px large, I don’t want the line to connect to the top, but rather the middle. I do this by dividing the height and width by 2, which is data I can find from my “getboundingClient” function.
let midpointX1 = element1.width/2; let midpointY1 = element1.height/2; let midpointX2 = element2.width/2; let midpointY2 = element2.height/2;
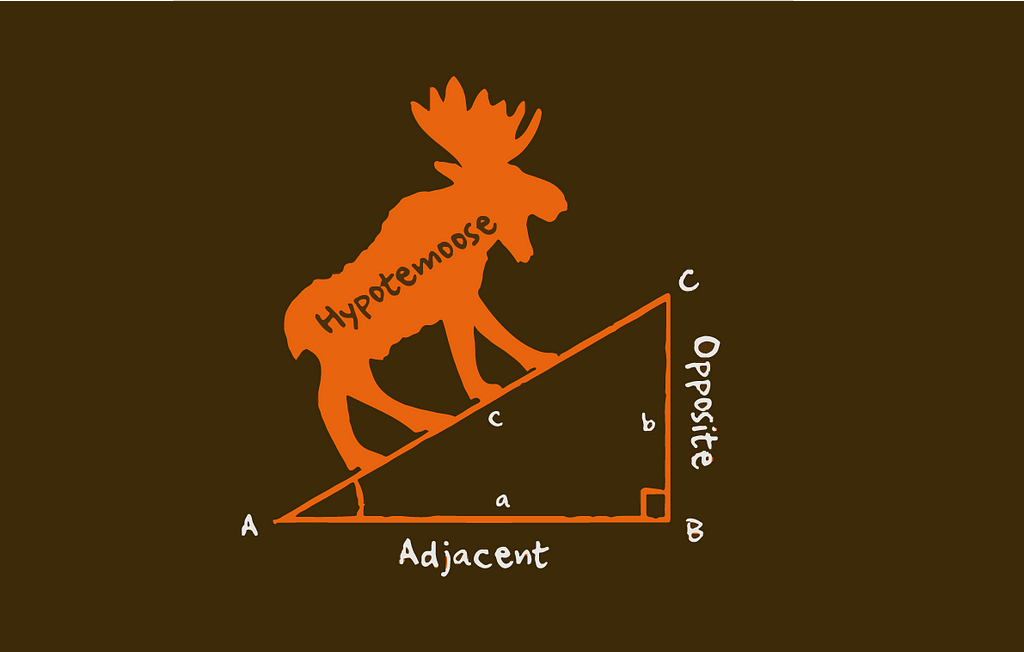
Now, my thought process is this. If I know the x and y coordinates, aslo included in the “getBoudningClient” function, then I can hopefully do some math. What I want to know is the length of the line that would connect both elements, and the angle of the line. I can do this with some trigonometry, First, I’ll find the length with the Pythagorean Theorem: A squared + B squared = C squared.
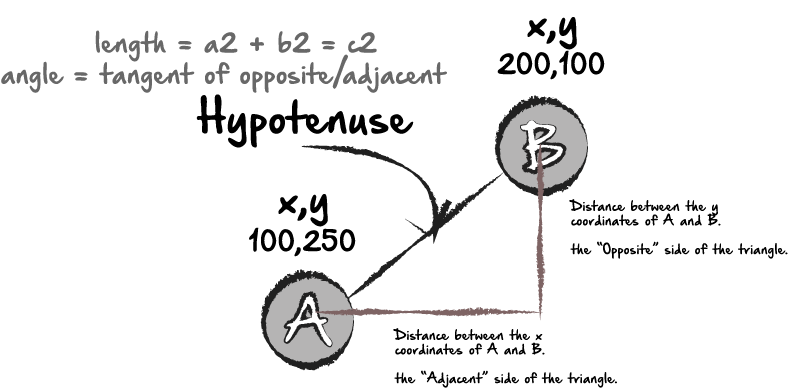
By turning the relationship of the two elements into the corners of a triangle, we can then use math to discover the length of the line, as I mentioned above, and then we can use the tangent to discover the angle of the line. What I’ll do is create a function that takes the coordinates of both and runs them to find what I’m looking for.
let midpointX1 = element1.width/2; let midpointY1 = element1.height/2; let midpointX2 = element2.width/2; let midpointY2 = element2.height/2; let top1 = element1.top - midpointY1; let top2 = element2.top - midpointY2; let left1 = element1.left - midpointX1; let left2 = element2.left - midpointX2; function findTriangle (w, x, y, z) { let difference = function (a, b) { return Math.abs(a - b); } let opposite = difference(w, x); let adjacent = difference(y, z); let hypotenuseLengthSquared = Math.pow(opposite, 2) + Math.pow(adjacent, 2); console.log(hypotenuseLengthSquared); let hypotenuseLength = Math.sqrt(hypotenuseLengthSquared); console.log(hypotenuseLength); console.log(adjacent); let angle = Math.atan(opposite/adjacent)*100; console.log(angle); return [opposite, adjacent, hypotenuseLength, angle]; } let triangle = findTriangle(top1, top2, left1, left2); console.log(triangle);The function “findTriangle” takes the element top and left, minus the midpoint, assuming our elements are symmetrical, and gives it basically the x and y coordinates of both elements to calculate the angle and length of the hypotenuse. I also have the function return the adjacent and opposite sides in case I need to use them later as well. Now, I’ll create my div, using those coordinates and returns.
let newDiv = document.createElement('div'); newDiv.id = "test"; document.body.appendChild(newDiv); document.getElementById('dot1').appendChild(newDiv); newDiv.style.borderColor = "#1cce3a"; newDiv.style.borderWidth = "3px"; newDiv.style.borderStyle = "solid"; newDiv.style.borderColor = "#1cce3a"; newDiv.style.width = ""+triangle[2]+"px"; newDiv.style.transform = "rotate("+triangle[3]+"deg)"; newDiv.style.zIndex = -1;Because my return statement is an array, when I call for the width and transform of my element, I’m using only the array indices that I need [2] and [3].
Now, I can run this exact same function inside my second if statement. Since the second dot will appear slightly lower on the DOM than the first, the function will calculate the distance between the two and return the connecting line (div) so that they will be visually connected on the screen, and we can have something similar to what my original vision was. However, even with these precise calculations, things can easily go bad here. For example, if the container is set to a flexbox display, it will throw all of the calculations off. But, all in all, it’s a pretty fun exercise.
One of the main reasons for writing this is that, as a younger man, I loathed math. I wasn’t any good at it, and in all honesty, I didn’t put forth much effort. Even when first learning JavaScript, I would come across these exercises where you’d need to find some obscure number through some complicated formula. And I would always think to myself, “Why would I ever need to use this? It’s pointless!!”. I know at least for me, when I have those thoughts, I immediately start to tune out. But, during this process, it was cool to see how incredibly practical and useful it is to use the Pythagorean Theorem, and other Trigonometry equations. The point is, if you also ever feel that way, don’t tune out. You may need to use that information sooner than you think! Feel free to reach out for feedback or questions. Thanks!
Finding a Hypotenuse with JavaScript was originally published in Hacker Noon on Medium, where people are continuing the conversation by highlighting and responding to this story.
Publication date
Disclaimer
The views and opinions expressed in this article are solely those of the authors and do not reflect the views of Bitcoin Insider. Every investment and trading move involves risk - this is especially true for cryptocurrencies given their volatility. We strongly advise our readers to conduct their own research when making a decision.