Latest news about Bitcoin and all cryptocurrencies. Your daily crypto news habit.
 a mini-tutorial on building npm modules
Overview
NOTE: This is a cross-post from my tutorial in JavaScript January! If you like this article, you should check out others there as well.
This is a suggested workflow for building npm modules locally. We’ll be building an input validation utility, but the principles can be applied to any library. Input validation is a common challenge for UI developers, and it’s important to handle it consistently. This makes it a really good candidate for an npm module. So let’s build a small library!
ASSUMPTIONS & EXPECTATIONS
This tutorial is designed to walk you through a good workflow as you develop an npm module. The example is fairly simple, but there are lots of good principles, practices, and tooling built-in. Those are really what I want you to take away from this exercise. I’m assuming you’ve never built an npm module before, but you’ll need to be fairly proficient with JavaScript, familiar with npm, and comfortable using the command line to get the most out of this tutorial. I’m also assuming you’re familiar with git and GitHub. However, if you don’t want to code-along, you can certainly review the snippets in the article. Our playground app for integrating this library is a React app, and it would be helpful to have some knowledge of React. That said, our library isn’t dependent on React, and you won’t really need any React-specific knowledge to complete this. I’ll use Yarn for my examples here, but you can certainly use npm if you’d prefer.
Many of the tools and tricks I’ll show you do the same thing: automate manual effort. This allows you to focus on building a useful library instead of fumbling around managing configuration and processes.
Up & Running
I created a starter repo on Github to help with the setup and configuration. Go ahead, pull it down and install the dependencies:
Cool. Now let’s take a look at some of our scripts in package.json:
We’re using Babel to transpile our code and put it in a new directory, /build, which is what will be pushed up to npm. This will allow us to use modern JS syntax in development, while ensuring our code will work in any browser. We could use Rollup to accomplish the same goal, but for this small library, Babel will be sufficient.
NOTE: If you’re not familiar with the word “transpile”, it’s a mashup of transform + compile. You can mostly equate it with “compile” and not worry too much about the details. If you want to learn more though, there’s a great article here.
Our prepublishOnly script automatically runs build anytime we run npm publish, which is really handy. We don't have to worry about whether the /build directory is up-to-date before we publish a new version of our library.
Adding a Phone Number Validator
Now let’s add a validatePhone function to our library:
First, we’ll add some tests. We’re using Jest as our test runner. Jest is normally associated with React testing, but there are also a lot of helpful utils for testing outside of a React-specific context. For brevity, I’ll list the tests below, but Jest’s jest --watch script is really handy for test-driven development.
Now we’ll add our validation function:
Now when you run your tests (yarn test), you should see them pass as expected. Great! Tests give us a lot of confidence that our code is working as expected, and that we aren't pushing up broken code to npm. You probably also noticed that Jest gave us some detailed feedback on our test coverage as well:
This helps us know that we haven’t missed anything in our tests. You can find the configuration for this in the jest section of package.json. This may seem overkill for our tiny library, but as your modules grow, this tooling becomes invaluable to your workflow.
While our tests help us know our validator function works as expected, we also want to know if our library works properly before we publish. It would be great if we could test this locally in an actual input field. 🤔 Well, our friends at npm gave us a handy script, link, to do just that! But before we go any further, we need to make sure we properly export validatePhone so it will be included in our library. To do that, update lib/index.js to look like this:
Awesome! Now when the build script runs, Babel will transpile validatePhone and make it available for our users.
Using link
To test our new library, we’ll create a separate playground application. I set up a small React app for you here. Let’s pull it down from GitHub and install our dependencies:
NOTE: This playground app will live outside of our library. It doesn’t matter where you pull it down, but be sure to hop out of the library before cloning.
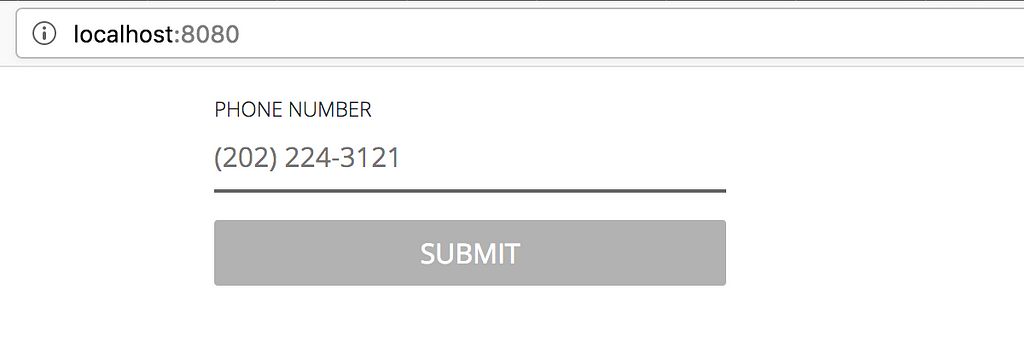
You can fire up the playground by running yarn dev and opening your browser to http://localhost:8080/. The UI is pretty sparse. You should see a label, an input field, and a submit button.
Let’s take a look at the code:
If you’re not familiar with React, that’s okay. All you need to know about this is that we have a handler function, handleChange that's called any time the value of the input field changes. handleChange then updates the component's state based on the new value the user entered. We're going to use handleChange to also validate our input. But to do that we'll need to link our new module to this app. We can do that by hopping over to the root of our input-validator-lib directory and running yarn link.
NOTE: We’ll be hopping back and forth between the library and playground app, and we’ll be compiling them concurrently. So it would helpful for you to have two terminal panes or windows open for the rest of this tutorial.
So, what did we just do? link creates a global symlinked copy of this module locally on your machine. That means when we make a change to our library, the global module is automatically updated!
NOTE: You can also use npm link. They effectively do the same thing, but they store the global module in a different location. This will be important when you want to unlink later.
Great! Now we can link this module to our app! Running yarn link input-validator-lib will add our library to our playground's dependencies.
NOTE: If input-validator-lib was already installed in input-validator-playground, this local module will replace the preexisting copy. You'll need to run yarn install to reinstall the original external module when you're finished.
Cool! Now we can import our validator function into our playground to see how it works:
As you can see above, we are able to import and use this module just like we would any other external dependency. That’s pretty cool! We’ll pass the phoneNumber input value to validatePhone, and let it set the state of inputError. We can use this validation to give helpful feedback and disable the submit button until the input is valid.

Everything is looking great, and our module is working as expected. But I just noticed that we missed an edge case. What if the user enters a country code (e.g +1(202) 224–3121)? That would break our current validation.
NOTE: For this simple example, we’re only validating the US country code (1). If you’re not from the US, feel free to adapt this to use your country code if you’d like.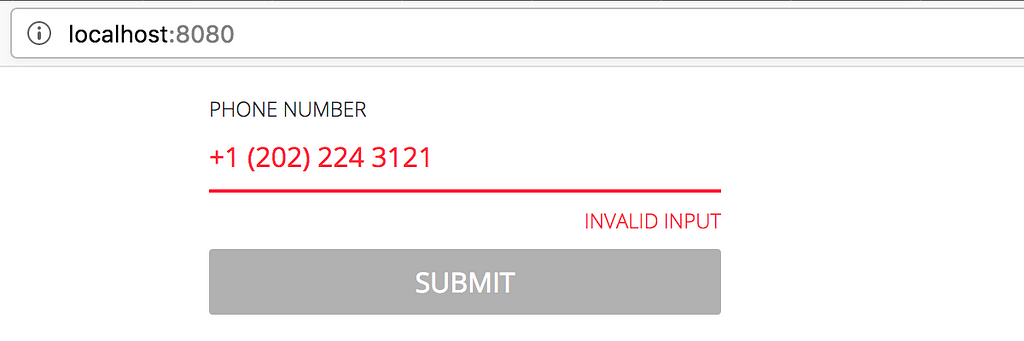
We should update our module to support that.
Updating Our Module
We’ll add a simple if statement in our function to catch this:
We’ll also add a test to validate it works as expected:
Easy enough, right? Except when we hop back to our playground; we’re still seeing the same error. 🤔 Hmm, why is that? Remember how I said the module is globally symlinked and updates automatically? Well, that’s mostly true. The module does update, but Babel does not auto-update the /build directory when changes are made. That means we need to run our build script every time we make a change. That's a pretty annoying workflow. Thankfully, I added a little script to help with that, yarn build:watch. 🎉
When you run yarn build:watch, Babel will watch for changes in /lib and update /build automatically. And because our module is symlinked to the playground app, it updates automatically as well! That's pretty cool!
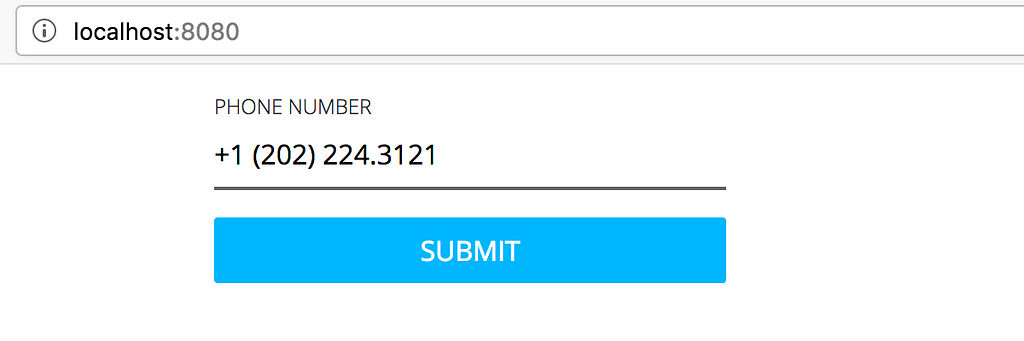
Because we’re running yarn dev in our playground app, we should see it hot-reload to reflect the changes we made in our library. This streamlines our workflow significantly. We can add more input validations for email addresses, street addresses, credit card numbers, etc. and test them live in a separate application.
Using unlink
Once we’re done testing locally, it’s a good idea to clean up our dependencies. To remove the library from the playground’s dependencies, run yarn unlink input-validator-lib in input-validator-playground. Also, remember to hop back to input-validator-lib and remove the symlink as well:
This will keep you from having any unexpected side-effects down the road.
Thanks for Reading!
I hope you enjoyed this tutorial! Module development has been a huge win for our team’s productivity, and this workflow has been really helpful for us. I hope you and your team find it beneficial as well.
You can find me on Twitter and GitHub. If you enjoyed this, you should also subscribe to my newsletter! https://tinyletter.com/alanbsmith.
Originally published in JavaScript January.
Module Development Workflow was originally published in Hacker Noon on Medium, where people are continuing the conversation by highlighting and responding to this story.
Publication date
Disclaimer
The views and opinions expressed in this article are solely those of the authors and do not reflect the views of Bitcoin Insider. Every investment and trading move involves risk - this is especially true for cryptocurrencies given their volatility. We strongly advise our readers to conduct their own research when making a decision.