Latest news about Bitcoin and all cryptocurrencies. Your daily crypto news habit.
I like to tinker and build stuff myself. Recently I built my own Bitcoin / Lightning Node with a simple Raspberry Pi. It took several iterations to get it right and it taught me a lot. This is my attempt to share my learnings and encourage you to run a node yourself.
⚡️ At the moment, the Lightning section covers the basic setup. A detailed guide how to open channels and transact is in the making.⚡️
Why am I excited about Bitcoin and Lightning?
Bitcoin as a new technology is an incredibly interesting endeavor, especially because of its interdisciplinary nature. Bitcoin as sound money is going to have a major impact on economic principles and thus society as a whole. In my opinion, a solid, anti-fragile base layer for this future monetary network will be more important than the most novel feature of competing projects. Due to network effects, I can only see one major monetary blockchain — Bitcoin — evolving over time.
At the moment, Bitcoin is more of a store of value and not really suited for small everyday transactions. Due to limitations of the blockchain and the incredible growth of its usage, fees have risen and business models relying on cheap transactions are being priced out. This is fine. Truly decentral blockchains are a scarce resource and cannot scale to accommodate all global transactions. The current scaling pains are a great motivator to build better technology to scale exponentially, as opposed to just making everything bigger for linear scaling.
This is where the Lighting Network comes in. As one of several new blockchain “extensions”, its promise is to accommodate nearly unlimited transactions, with instant confirmation, minimal fees and increased privacy. It sounds almost too good to be true, but in contrast to ubiquitous ICO with their own token, this technology is well researched, committed to the cypherpunk open-source ethos and leverages the solid underpinnings of Bitcoin.
To preserve the decentralized nature of this monetary system, I think it is important that everybody can run their own trustless Bitcoin node, preferably on cheap hardware like a Raspberry Pi.

This is why I set out to run my RaspiBolt and think that I have now — through numerous iterations — quite a good configuration, that I would like to share as my modest contribution to the community. I am not a system specialist, so please feel free to point out improvements in the comments.
Purpose
My aim is to set up a trustless Bitcoin Core and Lighting node that runs 24/7, is part of and supports the Lightning network by routing payments and can be used to send and receive personal payments using the command line interface.
This server is set up without graphical user interface and is used remotely using the Secure Shell (SSH) command line. In the future, this server should function as my personal backend for desktop and mobile wallets, but I haven’t found a good solution to this yet. So, command line it is for the moment.
As all components of the Lightning network are still under development, this server is configured for the Bitcoin Testnet. A switch to the mainnet will be straightforward.
Requirements
The following components are necessary:
- Raspberry Pi: version 2 or 3
- Micro SD card: 8 GB+ (incl. connection to your computer)
- USB power adapter: 5V with 1A+ and Micro USB cable
- External hard disk: 500 GB+ with dedicated power supply
I used a Raspberry Pi 3 Model B, which is a bit faster than the Pi 2 and has built-in Wifi, and set it up with a 8 GB SD card. To run a Lightning node, the full Bitcoin blockchain must be stored locally, which is ~200 GB and growing. I bought a cheap hard disk enclosure and reused an old 500 GB hard disk that was lying around. I use two power adapters: an old 5v USB mobile phone charger with 1A, and the separate power supply of the hard disk enclosure, as the USB ports of the Raspberry Pi cannot provide enough power to run an external hard disk directly.
Write down your passwords
You will need several passwords and I find it easiest to write the all down in the beginning instead of bumping into them throughout the guide. They should be unique and very secure, at least 12 characters in length.
[ A ] User password for “pi”[ B ] User password for “root” [ C ] User password for “bitcoin”[ D ] Bitcoin wallet password[ E ] Bitcoin RPC password[ F ] Eclair API password
Store a copy of your passwords somewhere safe and keep your original notes out of eyes sight once your system is up and running.
Installing the operating system
The node runs headless, without keyboard or display, so the operating system Raspbian Stretch Lite is used. Download the Zip file and follow the installation guide on the Raspberry Pi website.
As no direct interaction with the Pi is possible during the initial setup, the remote SSH connection needs to be enabled beforehand. After writing the image to the Micro SD card, create an empty file called “ssh” (without extension) on the main directory of the card, so SSH will be enabled from the start. The SD card can now be inserted into the Pi.
For the initial setup, the Pi needs to be connected to the home network using a network cable (it can run on Wifi later). With the SD card inserted and a network cable plugged in, start the Pi by connecting it to the mobile phone charger using the Micro USB cable.
Connecting to the network
The node is starting and getting a new address from your home network. This address can change over time. To make the Pi reachable from the internet, we assign it a fixed address.
The fixed address is configured in your network router: this can be the cable modem or the Wifi access point. So we first need to access the router. To find out its address,
- start the Command Prompt on a computer that is connected to your home network (in Windows, click on the Start Menu and type cmd directly or in the search box, and hit Enter)
- enter the command ipconfig(or ifconfig on Mac / Linux)
- look for “Default Gateway” and note the address (eg. “192.168.0.1")
👉 additional information: accessing your router.
Now open your web browser and access your router by entering the address, like a regular web address. You need so sign in, and now you can look up all network clients in your home network. One of these should be listed as “raspberrypi”, together with its address (eg. “192.168.0.240”).
 Client list in my ASUS router
👉 don’t know your router password? Try routerpasswords.com.
We now need to set the fixed (static) IP address for the Pi. Normally, you can find this setting under “DHCP server”. The manual address should be the same as the current address, just change the last part to a lower number (e.g. 192.168.0.240 → 192.168.0.20).
 Static IP address assignment in my ASUS router
👉 need additional information? Google “[your router brand] configure static dhcp ip address”
Next, “Port Forwarding” needs to be configured. Different applications use different network ports, and the router needs to know to which internal network device the traffic of a specific port has to be directed. The port forwarding needs to be set up as follows:

👉 additional information: setting up port forwarding.
Save and apply these router settings, we will check them later. Disconnect the Pi from the power supply, wait a few seconds, and plug it in again. The node should now get the new fixed IP address.
Working on the Raspberry Pi
We are going to work in the command line of the Pi, entering commands and getting results back. To make it clear where a command begins, every command in this guide you need to enter starts with the $ sign. In the following example, just enter “ls -la” and press the enter/return key:
$ ls -la

You can also copy these commands from this guide and paste them into PuTTY by clicking the right mouse button.
Connecting
Now it’s time to connect to the Pi via SSH and get to work. For that, a Secure Shell (SSH) client is needed. Install, start and connect:
- Windows: PuTTY (Website)
- Mac OS: built-in SSH client (see this article)
- Linux: just use the native command, eg. ssh pi@192.168.0.20
- Use the following SSH connection settings: - Host Name: the static address you set in the router, eg. 192.168.0.20- Port: 22
Accept the server authentication and log in with the username “pi” and password “raspberry”.
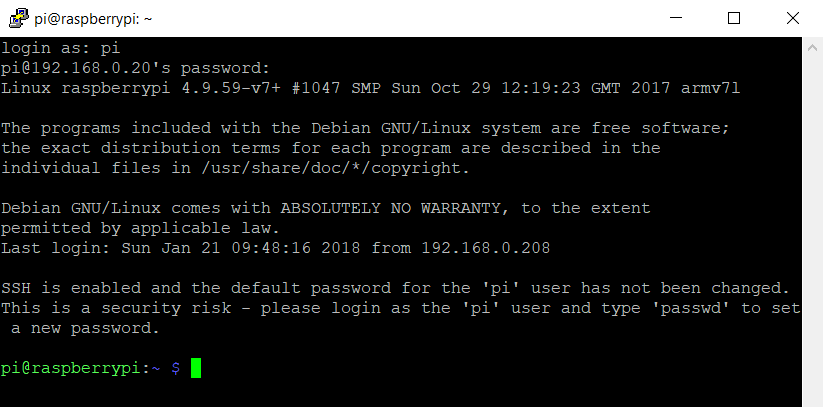
👉 additional information: using SSH with Raspberry Pi
Raspi-Config
You are now on the command line of your own Bitcoin node. First we finish the Pi configuration. Enter the following command:$ sudo raspi-config
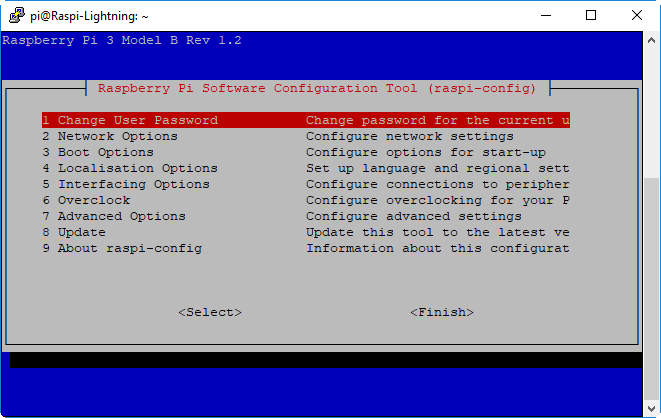
- First, with (1) change your password to your password [A].
- Next, choose Update (8) to get the latest configuration tool
- Network Options (2): you can give your node a cute name (like “RaspiBolt”) and configure your Wifi connection (Pi 3 only)
- Boot Options (3): choose “Desktop / CLI” → “Console”
- Localisation (4): set your timezone
- Advanced (7): run “Expand Filesystem” and set “Memory Split” to 16
- Exit by selecting <Finish>, and <No> as no reboot is necessary
Software update
It is important to keep the system up-to-date with security patches and application updates. The “Advanced Packaging Tool” (apt) makes this easy: $ sudo apt-get update $ sudo apt-get upgrade
Do this regularly every few months.
Disabling Swap File
The usage of a swap file can degrade your SD card very quickly. Therefore, we will disable it completely. $ sudo swapoff --all $ sudo apt-get remove dphys-swapfile
Adding the service user “bitcoin”
Bitcoin Core will run in the background (as a daemon) and use the separate user “bitcoin” for security reasons. This user does not have admin rights and cannot change the system configuration.
- Enter the following command, set your password [B] and confirm all questions with the enter/return key.$ sudo adduser bitcoin
- And while you’re at it, change the password of the “root” admin user to your password [C]. $ sudo passwd root
Mounting external hard disk
The external hard disk is attached to the file system and can be accessed as a regular folder (this is called “mounting”). The hard disk should be empty and formatted. With your desktop computer, add the single directory “bitcoin”.
Now plug your hard disk into the running Pi, power the drive up and enter the following commands in the command line to identify the partition:
- Identify the partition and note the UUID at the left (eg. “12345678”) and the FSTYPE (eg. “exfat”, “ntfs”…)$ sudo lsblk -o UUID,NAME,FSTYPE,SIZE,LABEL,MODEL
- Open the file “/etc/fstab” in the Nano text editor$ sudo nano /etc/fstab
- Add the following line, but use the “UUID” and the correct “FSTYPE”noted above, then use Ctrl+O to save, confirm with Enter and use Ctrl+X to exitUUID=12345678 /mnt/hdd exfat defaults,auto,umask=000,users,rw 0 0
- Create the directory to add the hard disk and set the correct owner $ sudo mkdir /mnt/hdd $ sudo chown bitcoin:bitcoin /mnt/hdd
- Mount all drives, view mounted partitions (is /mnt/hdd listed?), navigate to the hard disk and check for the existing “bitcoin” directory $ sudo mount -a $ df /mnt/hdd $ cd /mnt/hdd $ ls
👉 additional information: external storage configuration
Enabling the Uncomplicated Firewall
The Pi will be visible from the internet and therefore needs to be secured against attacks. A firewall controls what traffic is permitted and closes possible security holes.
The line ufw allow from 192.168.0.0/24 … below assumes that the IP address of your Pi is something like 192.168.0.???, the ??? being any number from 0 to 255. If your IP address is 12.34.56.78, you must adapt this line to ufw allow from 12.34.56.0/24 ….
$ sudo apt-get install ufw $ sudo su $ ufw default deny incoming $ ufw default allow outgoing $ ufw allow from 192.168.0.0/24 to any port 22 comment 'allow SSH from local LAN' $ ufw allow 9735 comment 'allow Lightning' $ ufw allow 18333 comment 'allow Bitcoin testnet' $ ufw reject 8333 comment 'deny Bitcoin mainnet' $ ufw enable $ systemctl enable ufw $ ufw status $ exit
👉 additional information: UFW Essentials
Bitcoin Core
The base of the Lightning node is a fully trustless Bitcoin Core node. It downloads all blocks since the Genesis block to rebuild the complete blockchain, validates all blocks and creates an index with all transactions that ever happened. By doing all this work ourselves, nobody else needs to be trusted.
Installation
We will download the software manually from bitcoin.org and verify its signature to make sure we use an official release.
- Create a download folder$ mkdir /home/pi/download $ cd /home/pi/download
We download the latest Bitcoin Core binaries (the application), the checksums and the signature of Wladimir J. van der Laan, who is signing the binaries at the moment.
- Check bitcoin.org/en/download for the current links, they change with each update. Then run the following adjusted commands: $ wget https://bitcoin.org/bin/bitcoin-core-0.15.1/bitcoin-0.15.1-arm-linux-gnueabihf.tar.gz $ wget https://bitcoin.org/bin/bitcoin-core-0.15.1/SHA256SUMS.asc $ wget https://bitcoin.org/laanwj-releases.asc $ ls -l

- Import Wladimir’s signature into GPG (GNU Privacy Guard) $ gpg --import laanwj-releases.asc
- Verify that the file “SHA256SUMS.asc” has been signed by Wladimir. If the output contains “ Good signature from “Wladimir J. van der Laan (Bitcoin Core binary release signing key) <laanwj@gmail.com>”, the other warnings can be ignored. $ gpg --verify-files SHA256SUMS.asc laanwj-releases.asc
- Create your own checksum of the bitcoin binaries (“ceba…f305”) and compare it to the control checksum. They must match exactly. $ shasum -a 256 bitcoin-0.15.1-arm-linux-gnueabihf.tar.gz $ grep arm-linux SHA256SUMS.asc

- Extract the Bitcoin Core binaries and install them $ tar -xvf bitcoin-0.15.1-arm-linux-gnueabihf.tar.gz $ sudo install -m 0755 -o root -g root -t /usr/local/bin bitcoin-0.15.1/bin/*
Configuration
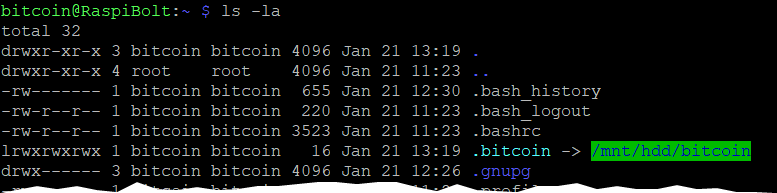
We use the Bitcoin daemon, called “bitcoind”, that runs in the background without user interface and stores all data in a hidden subdirectory of the user’s home directory: /home/bitcoin/.bitcoin
- Change to user “bitcoin” and enter the password.$ sudo su bitcoin
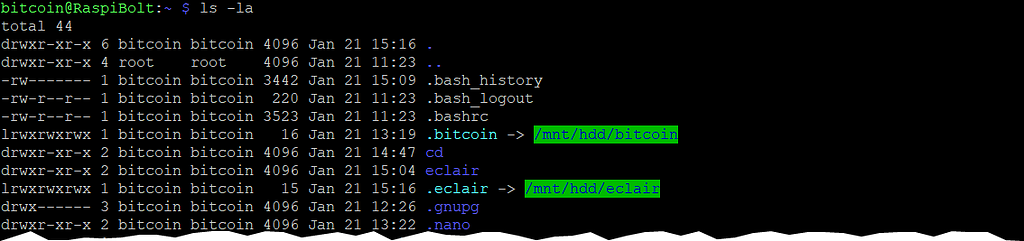
- We create a symbolic link that points to the external hard disk.$ ln -s /mnt/hdd/bitcoin /home/bitcoin/.bitcoin
- Navigate to the home directory and check the symbolic link. The content of this directory will actually be on the external hard disk. $ cd $ ls -la
- Now, the configuration file for bitcoind needs to be created. $ nano /home/bitcoin/.bitcoin/bitcoin.conf
You can copy the next block directly into your SSH client. In PuTTY, just click the right mouse button, in a terminal window in Linux or Mac it usually is Ctrl+Shift+V .
⚠️ Change rpcpassword to your very secure password [E] (you don’t have to remember it), otherwise our funds might get stolen.
Autostart bitcoind
The system needs to run the bitcoin daemon automatically in the background, even when nobody is logged in. We use “systemd“, a daemon that controls the startup process using configuration files.
- Exit the “bitcoin” user session back to user “pi” $ exit
- Create the configuration file in the Nano text editor and copy the following paragraph. $ sudo nano /etc/systemd/system/bitcoind.service
- Save Ctrl+O and exit Ctrl+X.
- Enable the configuration file $ sudo systemctl enable bitcoind.service
- Restart the Raspberry Pi $ sudo shutdown -r now
Verification of bitcoind operations
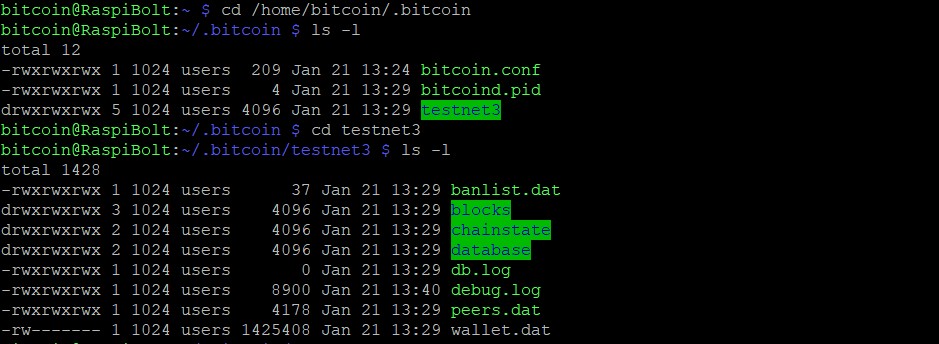
After rebooting, the bitcoind should start and begin to sync and validate the Bitcoin blockchain.
- Wait a bit, reconnect via SSH and login with the user “bitcoin”
- The bitcoind started working in the “.bitcoin” folder. All data related to the Bitcoin testnet is stored in the subdirectory “testnet3”$ cd /home/bitcoin/.bitcoin $ ls -l $ cd testnet3 $ ls -l
- Check the status of the bitcoin daemon that was started by systemd (exit with Ctrl+C)$ systemctl status bitcoind.service

- You can also check the Bitcoin Core logfile and see the bitcoind in action (exit with Ctrl+C) $ tail -f /home/bitcoin/.bitcoin/testnet3/debug.log
- Use the Bitcoin Core client “bitcoin-cli” to get the current progress of the blockchain validation $ bitcoin-cli getblockchaininfo
- Among other infos, the “verificationprogress” is shown. Once this value reaches 1 (or 0.99999…), the blockchain is up-to-date and fully validated.
The validation of the testnet blockchain will take several hours, mainnet would take more than a day.
Create your bitcoin wallet
Personally, I keep only a small amount of bitcoin in a wallet that is connected to the internet, like change in a purse. Most bitcoin is in cold storage, where using a hardware wallet is a very convenient but secure solution. That said, never put more bitcoin than necessary in the wallet on the Pi.
👉 Check out Ledger and Trezor for highly recommended hardware wallets.
At the moment, we are just dealing with worthless testnet bitcoin, but the goal is to go onto mainnet as soon as the Lightning network is ready. So we secure the wallet just the same:
- Your wallet has already been created by Bitcoin Core. First we get some info about it, we encrypt it with a your strong password [D] and then we unlock it for a certain number of seconds (eg. 600 for 10 minutes): $ bitcoin-cli getwalletinfo $ bitcoin-cli encryptwallet PASSWORD_[D] $ bitcoin-cli walletpassphrase PASSWORD_[D] 600
- Now, we create a backup of the wallet and restore it. If your wallet is locked, you need to unlock it (with walletpassphrase)before restoring it.$ bitcoin-cli backupwallet /mnt/hdd/wallet.backup $ bitcoin-cli importwallet /mnt/hdd/wallet.backup
- Store a backup copy of the “wallet.backup” file somewhere save. After the initial sync, you can shut down the Pi, connect the hard disk to your desktop computer and copy the backup file. As long as you used a really strong password, the backup file reveals no sensitive information.
Get some testcoins
Want to get “testnet” rich? Let’s create a Bitcoin address and get some testnet Bitcoins from a faucet.
- Generate a new bitcoin address and copy it to your desktop’s clipboard (in PuTTY, just double click on it)$ bitcoin-cli getnewaddress
- On your desktop computer, go to the following website, paste the address and get some coins!https://testnet.manu.backend.hamburg/faucet
- Check your wallet balance: you should see the incoming coins in “unconfirmed balance”, later in the regular “balance” $ bitcoin-cli getwalletinfo
Bitcoin wallet preparation for Lightning
On testnet, the funds in your Bitcoin Core wallet need to be held in a special address type. We create such an address and transfer the whole balance of your wallet.
- Check your balance: you get the amount of test bitcoin [A] $ bitcoin-cli getbalance
- Unlock your wallet and generate a new bitcoin address [B] $ bitcoin-cli walletpassphrase PASSWORD_[D] 600 $ bitcoin-cli getnewaddress
- Import this new address [B] as a witness address [C]$ bitcoin-cli addwitnessaddress NEW_ADDRESS
- Create a new Bitcoin transaction that sends your balance [A] to the new witness address [C]. You get the transaction id [D].$ bitcoin-cli sendtoaddress NEW_WITNESS_ADDRESS BALANCE "" "" true

- To check the transaction, look the transaction id [D] up in a Bitcoin Testnet Blockchain Explorer.
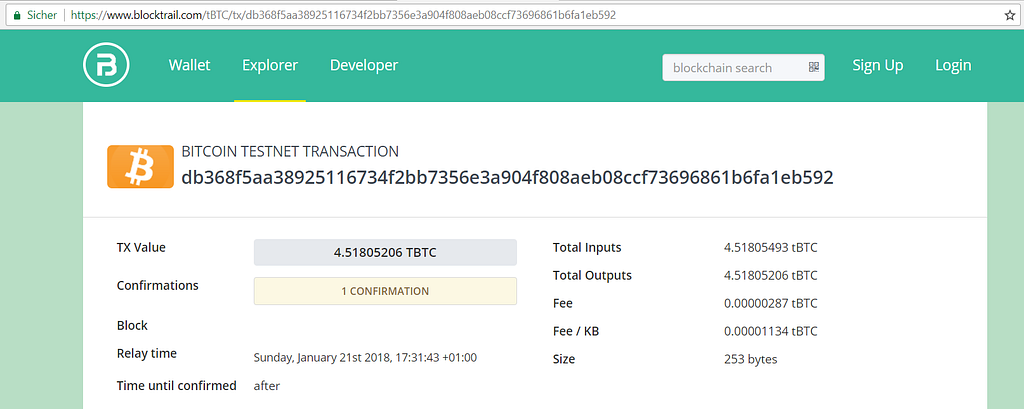
After some time, a bitcoin miner will pick up the transaction and add it to a new block.
Explore bitcoin-cli
If everything seems to run smoothly, and now you have some bitcoin to use, this is the perfect time to familiarize yourself with Bitcoin Core and play around with bitcoin-cli until the blockchain is up-to-date.
A great point to start is the book “Mastering Bitcoin” by Andreas Antonopoulos — which is open source — and in this regard especially chapter 3 (ignore the first part how to compile from source code).
Once the blockchain is synced, the Lightning node can be set up.
Lightning Network
My Pi uses the Acinq Eclair Lightning node. The reason for choosing Eclair is that it runs in the Java virtual machine and must not be compiled especially for the Raspberry Pi. The source code is very clean and support is great. Still, it’s Alpha software and bugs are to be expected.
⚡️ From here on, this guide is still being refined. I plan to update and finalize this documentation, as soon as the next Eclair alpha9 release, containing some important bugfixes, is available. ⚡️
Installation
- Log in as “pi”, as only this user has admin rights. First, we install Java and JQ and check if the program runs correctly.$ sudo apt-get install oracle-java8-jdk $ sudo apt-get install jq $ java -version
- As user “bitcoin” we create a directory for the application and download the binary files from GitHub. Please check the Releases page for current download links.$ sudo su bitcoin $ mkdir /home/bitcoin/eclair $ cd /home/bitcoin/eclair $ wget https://github.com/ACINQ/eclair/releases/download/v0.2-alpha8/eclair-node-0.2-alpha8-8edb2a4.jar $ wget https://raw.githubusercontent.com/ACINQ/eclair/master/eclair-core/eclair-cli $ chmod +x eclair-cli $ ln -s eclair-node-0.2-alpha8-8edb2a4.jar eclair-node.jar $ ls -l

- The working directory “.eclair” will also link to the external hard disk $ cd /home/bitcoin/ $ mkdir /mnt/hdd/eclair $ ln -s /mnt/hdd/eclair /home/bitcoin/.eclair $ ls -la
- Create the configuration file with the following content. Save and exit.$ nano /home/bitcoin/.eclair/eclair.conf
- Exit the “bitcoin” user session and install the Eclair client script$ exit $ sudo cp /home/bitcoin/eclair/eclair-cli /usr/local/bin
Configuration
The Eclair Lightning node will also run as a daemon, started by systemd, but only after “bitcoind.service” has been started.
- Create the configuration file in the Nano text editor and copy the following paragraph. $ sudo nano /etc/systemd/system/eclair.service
- Save Ctrl+O and exit Ctrl+X.
- Enable the configuration file $ sudo systemctl enable eclair.service $ sudo systemctl start eclair.service $ sudo systemctl status eclair.service
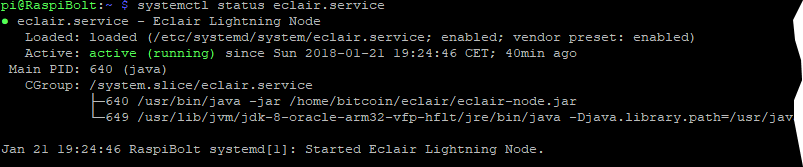
- You are now all set to interact with your Lighting Node! Use eclair-cli to query your node, open channels and make payments. $ eclair-cli getinfo

To be continued… stay tuned!
Did you like my guide so far? Do you have questions or improvments proposals? Let me know in the comments, on reddit or on Twitter (@Stadicus3000)!
Publication date
Disclaimer
The views and opinions expressed in this article are solely those of the authors and do not reflect the views of Bitcoin Insider. Every investment and trading move involves risk - this is especially true for cryptocurrencies given their volatility. We strongly advise our readers to conduct their own research when making a decision.