Latest news about Bitcoin and all cryptocurrencies. Your daily crypto news habit.
Besides the shitty todo apps that are so conveniently demonstrated for all new technologies I wondered what the world of serverless would really be like.
This is part 1 of 3 of building a real world example using the serverless framework and how you can monetize your new infinitely scalable solutions.
In this part I talk about how to use serverless (the framework) to build an ffmpeg wrapper based on bucket events. The code for my open sourced serverless-ffmpeg can be found here.
Intro
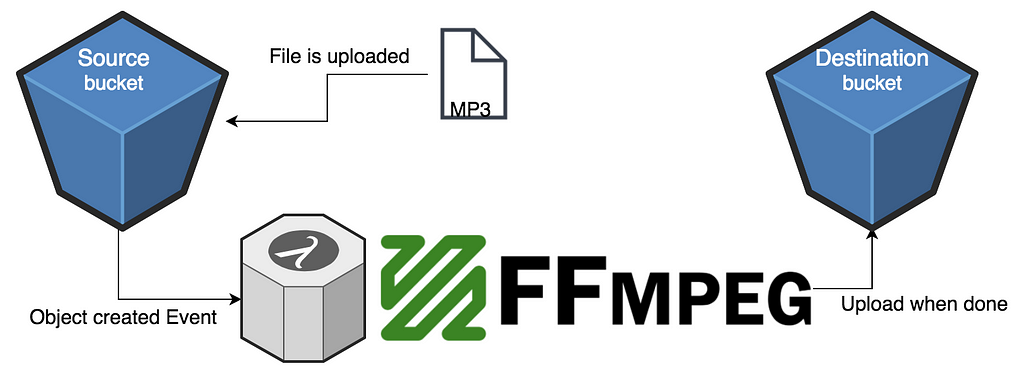
What we want to do: Whenever a media file is uploaded to an s3 bucket, we want to post-process that into various formats using ffmpeg.
Why serverless: Serverless allows us to trigger a function once a file has been added/delete to a bucket, perfect for our post-processing action. Also we pay for the time we process, no more, no less. Last but not least, we can batch process and not worry about how many files are uploaded at once.
The code
1. The serverless.yml
This is THE file where it all is tied together and if you’ve ever built anything bigger than a todo app, you know this will be a bottleneck — and it is. However! there are some fancy stuff you can do to make it a bit better, such as reference another file (see notes below) or use javascript to generate parts of the yml.
A couple of notes:
- As you can see I’m using things like: ${file(./config.yml):source_bucket} to grab values out of another yaml file. This is one way to abstract away the complexity of the serverless.yml and focus on a few parameters that may be important for deployment.
- Line 29, we define the parameters that will be passed to the ffmpeg binary. They’re passed as env variables in the lambda function! (as you’ll see in the coming sections)
- Line 30–60 is for having access to the buckets that we need for the app.
- Line 67 defines the event handler, funny enough it also creates the bucket
2. The webpack config
We need webpack to bundle our javascript nicely, as well as use es6/7 features to write some modern day JS (rather than being bound to node 6.10 that lambda allows us). Let’s take a look at the webpack config + babelrc files to make that happen.
- On line 8, we’re using the slsw.lib.entries in order to auto generate entries based on our functions in serverless. Thanks to the smarts of the serverless-webpack lib.
- On line 23–24 we’re copying the binaries that will be used in our app. The reason we’re doing that here, is because we need the binaries to have executable permissions (+x).
3. The handler code
This is where serverless starts! As we specified in our serverless.yml we want a function called main to run from our handler.js file, whenever there is an object created event in our source bucket.
- Line 7 calls a function to extract the newly uploaded file’s location in the source bucket.
- Thanks to our fancy webpack config, we can now use await/async which is what we do while we download the recently uploaded file from the source bucket into the lambda process.
- Line 14 we run the ffmpeg function, which calls the binary in turn (see next section).
- Line 15 we upload the results into the destination bucket.
- Line 23 showcases how we use the predefined parameters as environment variables.
4. The ffmpeg app code
Let’s take a look at some of the interesting parts of the app code to see how this is all tied together.
- Line 4 Make sure our lambda root is in the PATH env variable, this way we can call binaries with spawn directly located in our project root!
- Line 21 we’re merging the arguments that we pass to the ffmpeg process.
- Line 29 we call spawn with our arguments and hook up some event handlers
- Line 34–35 we make sure to capture stdout and stderr, without this we literally have no idea what’s going on, if anything goes wrong.
4. Unit testing of course!
As part of any real world application unit testing is important. But how can we test serverless functions? We can unit test parts of them! But how do we unit test calling a binary to do things? We set up our testing infrastructure to support this!
In order for us to achieve this we’ll need ava (ava is great!), it allows us to quickly get started with a minimalistic configuration (see this package.json for how to configure it properly).
- Import ava and some helpers to deal with files.
- Line 8 Run our ffprobe function which returns a json result (see it’s code to see how)
- Line 16 Run ffmpeg on a test file and expect a file to exist at the end of the test
- Line 26 clean up after testing
Deploying
One of the great things about serverless is how easy it is to deploy and tear down. Since serverless framework does it all in a cloudformation templates it’s fast and easy. No more “what command did I run where”.
To deploy the whole stack, we run: sls deploy -v. This will show the output of the cloudformation status so that we can make sure all resources are created as they should.
That’s it!
The Result
You can view this little video to see how it all works in the end.
Conclusion
I hope you enjoyed this quick deep dive into serverless and a real world example! In the next parts we’ll be looking at more fun real world scenarios and how to monetize them, so stick around!
A couple of real life problems we encountered in this part:
- We want to add webpack to make this worth our time
- We need to use a plugin with webpack and keep permissions for this binary to actually work (together with serverless framework)
- A bucket is created if we attach events to it! Seems random, I know. But I don’t make the rules.
In the next parts I’ll reveal more life scenarios and problems solved.
If you have any questions or comments please post them here and I’ll do my best to help.
Appendix
Serverless Plugins — find them, use them
One thing that wasn’t obvious to me when I started out was how important plugins were for the serverless framework. The two plugins we’ll be using in this part are (more plugins in part 2 and 3):
serverless-webpackBecause as of today aws lambda supports node 6.10, which does not fully support es6. We want that fancy es6/7 and some other nice packaging features.
serverless-s3-removerYou’ll quickly realize you’re deploying and tearing down your stack with the serverless framework many times as you’re testing things. If you’re working with buckets, this simply helps us remove the buckets and the content in them when we destroy our stack. (WARNING: You will loose content with this)
Serverless — Beyond the over simplistic todo apps into the world of reality (part 1) was originally published in Hacker Noon on Medium, where people are continuing the conversation by highlighting and responding to this story.
Publication date
Disclaimer
The views and opinions expressed in this article are solely those of the authors and do not reflect the views of Bitcoin Insider. Every investment and trading move involves risk - this is especially true for cryptocurrencies given their volatility. We strongly advise our readers to conduct their own research when making a decision.