Latest news about Bitcoin and all cryptocurrencies. Your daily crypto news habit.
Understanding One-to-One and One-To-Many relationships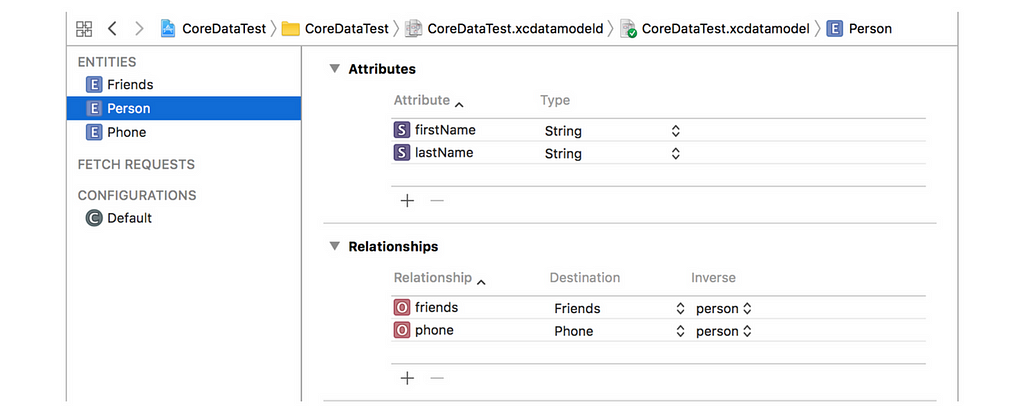
While working on my latest project I have decided to write a tutorial about Core Data Relationships between Entities.
Persistent Storage has become an essential part of the majority of iOS apps that are released today. When we speak about persistency in iOS, we should only think on Core Data. This powerful tool will provide a great experience for you while managing your data storage.
Core Data Relationships Example
For the purposes of this tutorial, I have created a simple project with Core Data Entities that will handle both One-To-One and One-To-Many relationships.
There are 3 Entities created in the example:
- Person - this will be the main entity, that will have relationships with the Phone and Friends entities.
- Phone - an entity that will keep the Person’s mobile phone information. It will be used as a One-To-One relationship, assuming that the Person has only one phone.
- Friends - an entity that will keep all the Person’s friends. It will be used as a One-To-Many relationship, assuming that the person has more than one friend.
As you can see in the above screenshot, I have already created the relationships. I will now explain to you how to that properly (it’s quite straightforward).👇
One-To-One Relationship (Person -> Phone)
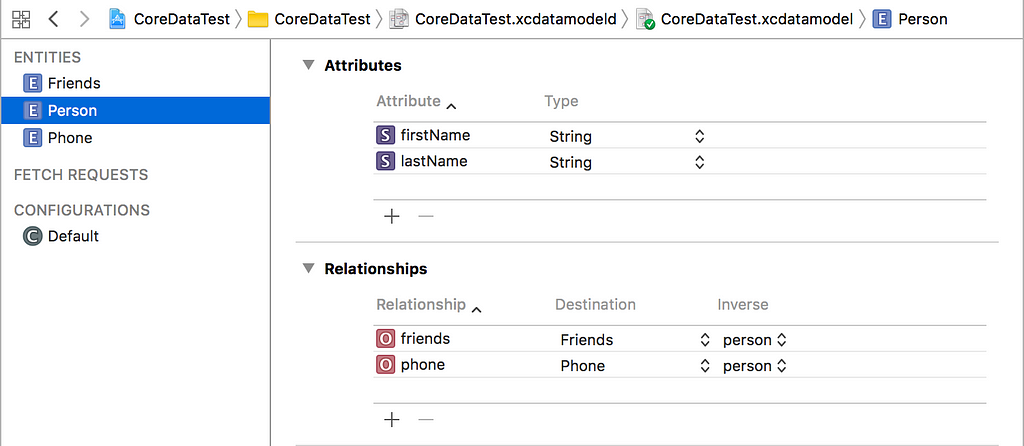
If you have created the Entities we can proceed with creating the relationship between Person and Phone. You will need to add 3 values in order to create a relationship.
- Relationship - name your relationship.
- Destination - add the entity you want to establish a relationship with (in our case Phone).
- Inverse - create an inverse relationship from Phone and pick it under Person. Apple recommends that you always add an inverse value, so never leave this empty.
 Part 1 (Person)
 Part 2 (Phone)Code
Each Entity contains its own automatically generated NSManagedObject that you can work within the code. This is one of the advantages of Core Data before others.
Here is an example how you can write in Person and its One-To-One Relationship (Phone).👇
One-To-Many Relationship (Person -> Friends)
I hope that by far you understood how relationships work. Now we will go further and create a One-To-Many relationship. The concept is the same as the One-To-One relationship, just with some minor changes.
When creating a One-To-Many relationship, you will have to change the type to To Many from the Data Model Inspector. This isn’t the case with One-To-One because this type is set to To One by default.
 Code
Code
Here is an example how you can write in Person and its One-To-Many Relationship (Friends).👇
The NSManagedObject contains generic methods like addToFriends() where you can pass either a Friends object or an array of Friends.
NOTE: The code that you saw in this tutorial is written in the AppDelegate for simplicity and to provide faster tests, due to the predefined context and Core Data save method.I am using Core Data relationship in my latest project:
1 BET - Betting Predictions on the App Store
If you have liked my tutorial and it helped you, please 👏 or share this story so others can find it as well. Cheers! 🚀
Read more of my writing at theappspace.com:
- SWIFT - Custom UIView with XIB file - The App Space
- Introducing Clean Swift Architecture (VIP) - The App Space
- Speed up Swift compile time - The App Space

Core Data Relationships was originally published in Hacker Noon on Medium, where people are continuing the conversation by highlighting and responding to this story.
Publication date
Disclaimer
The views and opinions expressed in this article are solely those of the authors and do not reflect the views of Bitcoin Insider. Every investment and trading move involves risk - this is especially true for cryptocurrencies given their volatility. We strongly advise our readers to conduct their own research when making a decision.