Latest news about Bitcoin and all cryptocurrencies. Your daily crypto news habit.
If you use Twitter, you’ve probably noticed a nifty little feature that’s been around for a while: real-time tweet statistics. This basically means that you get to see the number of Likes or Retweets of a tweet increase (or decrease) as people around the world like or retweet it, without having to refresh the page. Cool, eh?
In this article, I’ll walk you through implementing your own real-time post statistics (we’ll limit ourselves to Likes) in a simple Node.js app. Here’s a demo of the app in action (please forgive my bland UI):
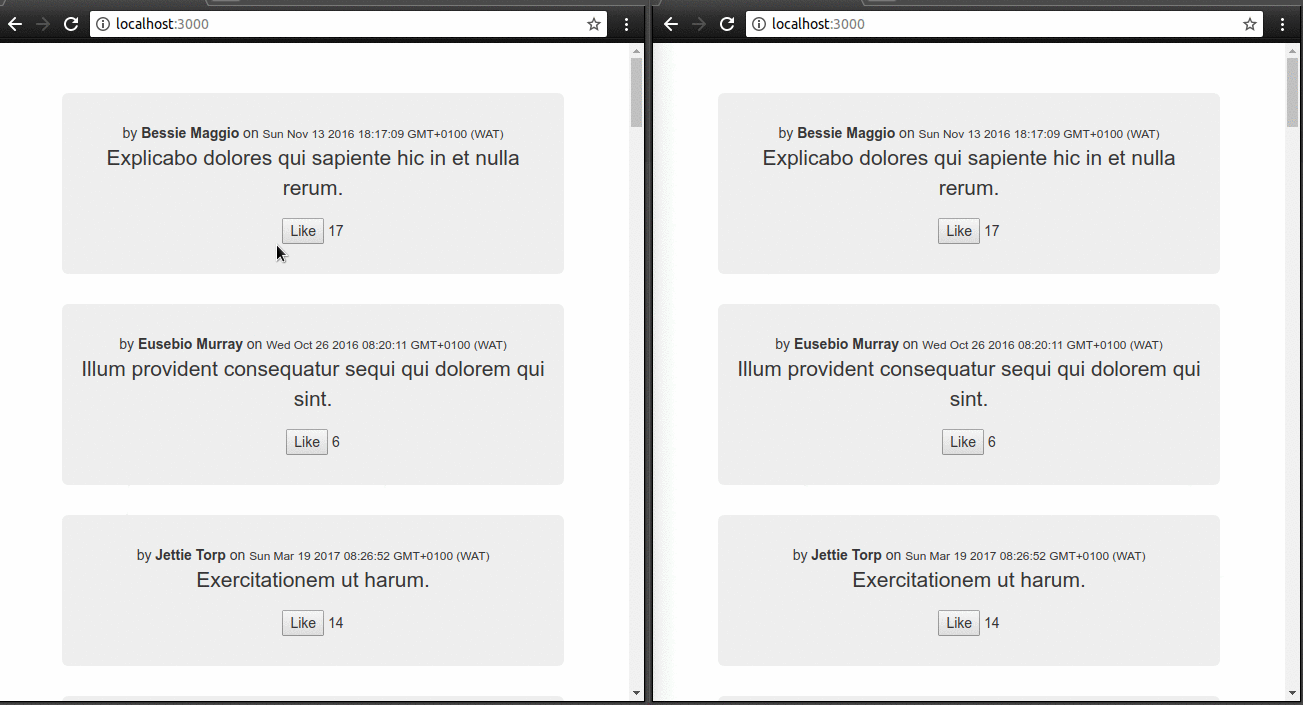 Liking a post in one window immediately reflects in the otherSet up the project
This tutorial assumes you have Node.js (version 6 or higher) and MongoDB (version 3.2 or higher) installed. We’ll be using Express, a popular lightweight Node.js framework. Let’s get our app set up quickly by using the express application generator:
# if you don't already have it installednpm install express-generator -g
# create a new express app with view engine set to Handlebars (hbs)express --view=hbs postercd poster && npm install
Then we’ll add the dependencies we’ll need:
npm install --save dotenv faker mongoose pusher
Here’s a breakdown of what each module is for.
- We’re using MongoDB for our data store, so we’ll use Mongoose to map our MongoDB documents to models (JavaScript objects).
- Faker will help us generate fake data for our app, since we just want to demonstrate the likes feature.
- We need pusher to talk to Pusher’s APIs.
- Lastly, dotenv is a small package that helps us load our private configuration variables (like our Pusher app credentials) from a .env file.
Basic Data and View
First, let’s define our data structures. We’ll limit the scope of this demo to two entities: users and posts. For users. we’ll store only their names. For posts, we’ll store:
- the text
- the date it was posted
- the user who posted it (the author), and
- the number of likes it has received
Since the only detail we need about our users is their names, we won’t set up a User model; we’ll reference the user’s name directly from our Post model. So, let’s create a file, models/post.js:
Now, we’ll write a small script to get some fake data into our database. Create a file called seed.jsin the bindirectory, with the following content:
Run the seed using node (remember to start your MongoDB server by running sudo mongodfirst):
node bin/seed.js
Let’s set up the route and view for our home page.
The first thing we’ll do is add our MongoDB connection setup, so the connection gets created when our app gets booted. Add this line somewhere near the top of your app.js:
require('mongoose').connect('mongodb://localhost/poster');
Next up, the route where we retrieve all posts from the db and pass them to the view. Replace the code in routes/index.jswith this:
let router = require('express').Router();let Post = require('./../models/post');router.get('/', (req, res, next) => { Post.find().exec((err, posts) => {res.render('index', { posts: posts }); });});module.exports = router;
Lastly, the view where we render the posts (views/index.hbs). We’ll use Bootstrap for some quick styling.
A few notes:
- We attach a data-post-id attribute to each Like button so we can easily identify which post it points to. This will come in useful soon.
- We give each likes_count field an id which includes the post ID, so we can directly reference the correct likes_count with just the post ID.
- We have a click handler on the Like button (actOnPost) . This is where we’ll toggle the button text (Like → Unlike) and increment the likes_count. (And the reverse for when it’s an Unlike button). We’ll implement that in a bit.
Liking and Unliking Logic
When a user clicks on ‘Like’, here’s what we want to happen:
- The text on the button changes from “Like” to “Unlike”.
- The likes count displayed next to the post increases by 1.
- An AJAX request is made to the server to increment the likes_count in the database by 1.
- The likes count displayed next to the post increases by 1 in all other tabs/windows where the page is open. (This is where Pusher comes in.)
For unliking:
- The text on the button changes from “Unlike” to “Like”.
- The likes count displayed next to the post decreases by 1.
- An AJAX request is made to the server to decrement the likes_countin the database by 1.
- The likes count displayed next to the post decreases by 1 in all other tabs/windows where the page is open. (Once again, via Pusher.)
We’ll classify both Likes and Unlikes as actions that can be carried out on a post, so we can handle them together.
Let’s add some JavaScript to our home page for the actOnPost method. We’ll pull in Axios for easy HTTP requests. Add the following to your views/index.hbs:
<script src="https://unpkg.com/axios/dist/axios.min.js"></script>
<script> var updatePostStats = { Like: function (postId) { document.querySelector('#likes-count-' + postId).textContent++; }, Unlike: function(postId) { document.querySelector('#likes-count-' + postId).textContent--; } }; var toggleButtonText = { Like: function(button) {button.textContent = "Unlike"; }, Unlike: function(button) {button.textContent = "Like"; } }; var actOnPost = function (event) { var postId = event.target.dataset.postId; var action = event.target.textContent.trim();toggleButtonText[action](event.target);updatePostStats[action](postId); axios.post('/posts/' + postId + '/act', { action: action }); };</script>
Then we define the act route in our routes/index.js:
router.post('/posts/:id/act', (req, res, next) => { const action = req.body.action; const counter = action === 'Like' ? 1 : -1; Post.update({_id: req.params.id}, {$inc: {likes_count: counter}}, {}, (err, numberAffected) => {res.send(''); });});Here, we change the likes_count using MongoDB’s built-in $inc operator for update operations.
Notifying Other Clients with Pusher
At this point, we’ve got our regular Liking and Unliking feature in place. Now it’s time to notify other clients when such an action happens.
Let’s get our Pusher integration set up. Create a free Pusher account if you don’t have one already. Then visit your dashboard and create a new app and take note of your app’s credentials. Since we’re using the dotenv package, we can put our Pusher credentials in a .env file in the root directory of our project:
PUSHER_APP_ID=WWWWWWWWWPUSHER_APP_KEY=XXXXXXXXXPUSHER_APP_SECRET=YYYYYYYYPUSHER_APP_CLUSTER=ZZZZZZZZ
Replace the stubs above with your app credentials from your Pusher dashboard. Then add the following line to the top of your app.js:
require('dotenv').config();
Next we’ll modify our route handler to trigger a Pusher message whenever an action updates the likes_count in the database. We’ll initialise an instance of the Pusher client and use it to send a message by calling pusher.trigger.
The trigger method takes four parameters:
- the name of the channel to send this message on
- the name of the message
- the payload (any data you wish to send with the message)
- the socket ID. If this is supplied, Pusher will send this message to every client except the client with this ID. This is useful so we can exclude the client who caused the action from being notified of it again.
Here’s what we want our payload to look like in the case of a Like action:
{ "action": "Like", "postId": 1234}So let’s add this logic to our route handler:
let Pusher = require('pusher');let pusher = new Pusher({ appId: process.env.PUSHER_APP_ID, key: process.env.PUSHER_APP_KEY, secret: process.env.PUSHER_APP_SECRET, cluster: process.env.PUSHER_APP_CLUSTER});router.post('/posts/:id/act', (req, res, next) => { const action = req.body.action; const counter = action === 'Like' ? 1 : -1; Post.update({_id: req.params.id}, {$inc: {likes_count: counter}}, {}, (err, numberAffected) => { pusher.trigger('post-events', 'postAction', { action: action, postId: req.params.id }, req.body.socketId);res.send(''); });});On the client side (index.hbs) we need to handle two things:
- subscribe each client to the post-events channel
- .add the client’s socket ID to our act API request, so the server can use it to exclude the client
We’ll pull in the Pusher SDK:
<script src="https://js.pusher.com/4.1/pusher.min.js"></script>
<script> var pusher = new Pusher('your-app-id', { cluster: 'your-app-cluster' }); var socketId; // retrieve the socket ID on successful connectionpusher.connection.bind('connected', function() {socketId = pusher.connection.socket_id; }); var channel = pusher.subscribe('post-events');channel.bind('postAction', function(data) { // log message data to console - for debugging purposesconsole.log(data); var action = data.action; updatePostStats[action](data.postId); });</script>
All done! Start your app by running:
npm start
Now, if you open up http://localhost:3000 in two (or more) tabs in your browser, you should see that liking a post in one instantly reflects in the other. Also, because of our console.log statement placed earlier, you’ll see the event is logged:
 Conclusion
In this article, we’ve seen how Pusher’s publish-subscribe messaging system makes it straightforward to implement a real-time view of activity on a particular post. Of course, this is just a starting point; I look forward to seeing all the great things you’ll build. You can check out the source code of the completed application on Github.
This article was originally published by the author on Pusher’s blog.
How to Build Twitter’s Real-time Likes Feature with Node.js and Pusher was originally published in Hacker Noon on Medium, where people are continuing the conversation by highlighting and responding to this story.
Publication date
Disclaimer
The views and opinions expressed in this article are solely those of the authors and do not reflect the views of Bitcoin Insider. Every investment and trading move involves risk - this is especially true for cryptocurrencies given their volatility. We strongly advise our readers to conduct their own research when making a decision.