Latest news about Bitcoin and all cryptocurrencies. Your daily crypto news habit.
In this guide I wanted to share my experience on building a complete Kubernetes Cluster (with LoadBalancer, Ingress and external storage) with SBC’s (Single Board Computers like the Raspberry Pi and similar) using the Rock64 boards and the history behind it. There are a couple of lessons learned that might be of interest to have a fully integrated environment avoiding some problems I had on the way.
Raspberry Pi 3 Starts
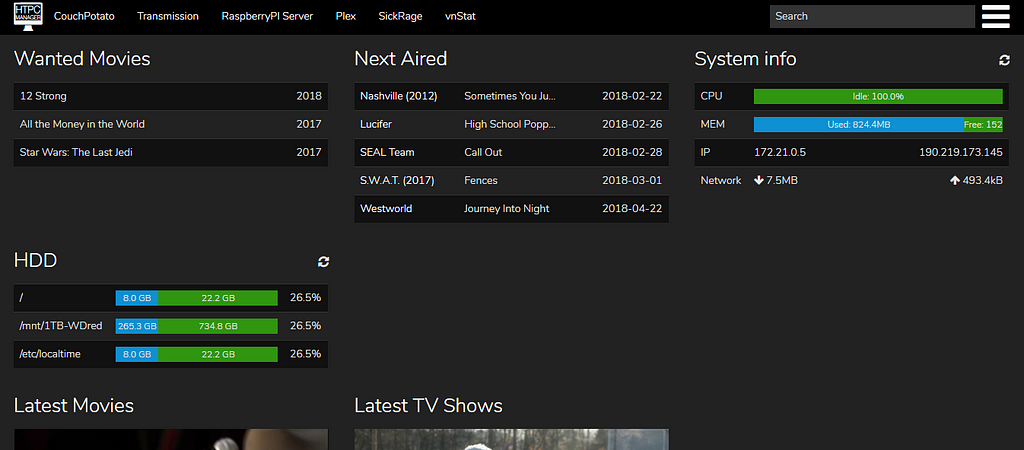
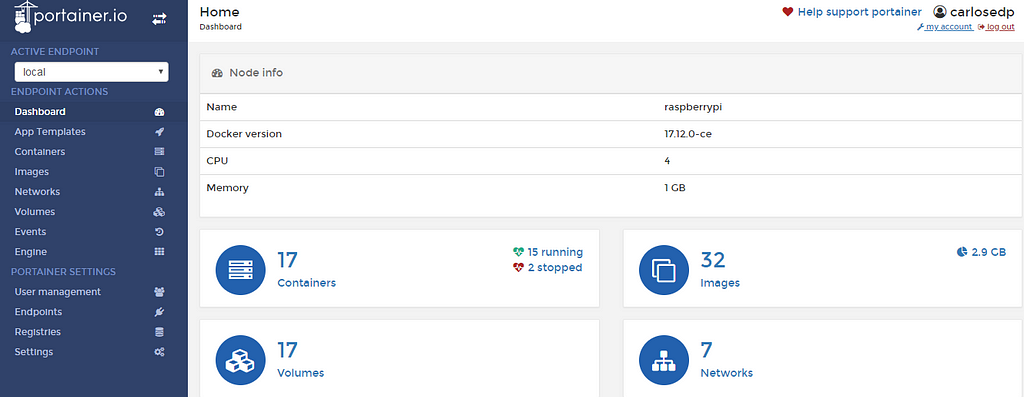
After I started playing with my first SBC, a Raspberry Pi 3, I deployed a full media server stack composed of Transmission, SickRage, CouchPotato, Plex and HTPCmanager(based on nice packages from HTPCGuides). After it worked, I started converting all those applications to Docker containers and automated the deployment using docker-compose files. Later I deployed a complete monitoring solution and management composed of Portainer, cAdvisor, Prometheus, Grafana and even Traefik to expose some apps to the internet as an ingress and HTTPS front-end (with Letsencrypt certificates).
I learned a lot on this process where I had to build many images to run these apps, compose the deployment and even setup a CI on Travis to automatically cross-build Docker images for AMD64/ARM32/ARM64.
But it didn’t stop there, after reading lots of articles on building home clusters with these the Pi, I absolutely wanted one. But a more powerful one.
Hardware Choice
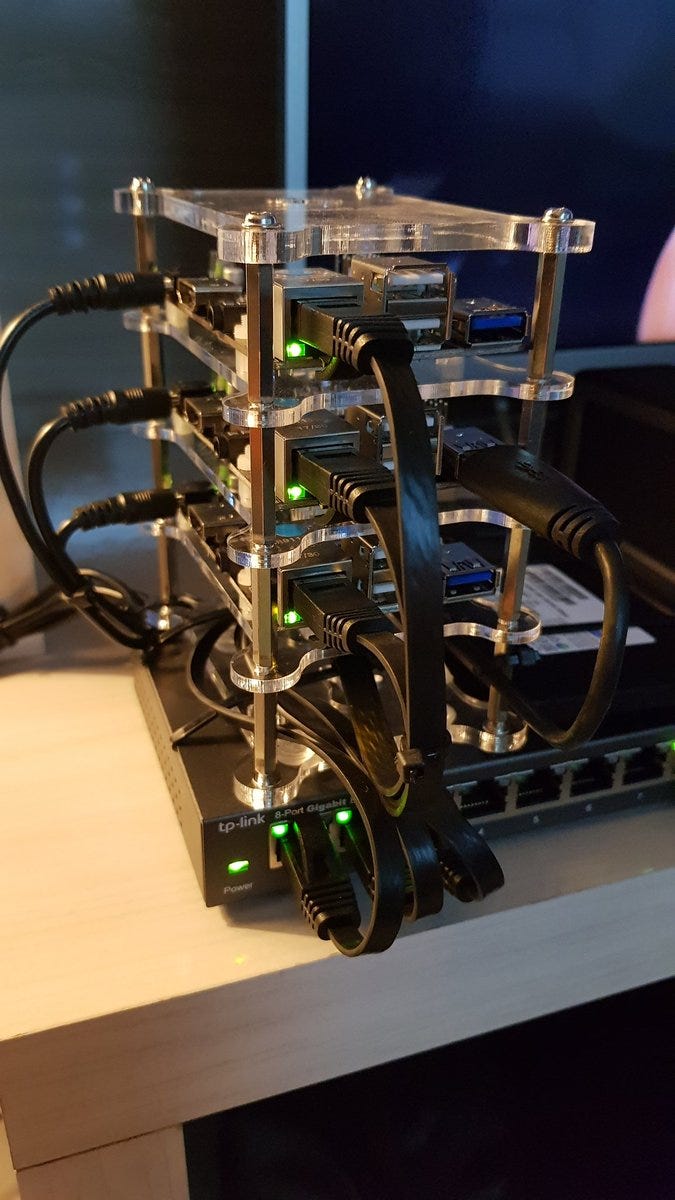
I ended up choosing the Rock64 SBC from Pine64, a quad-core A53 ARM board that can run 64bit Linux, 4GB RAM and a eMMC connector to use this kind of memory instead of the slow-as-molasses SDCards used on the Pi. Here is my shopping list:
- 3x Rock64 4GB SBCs with power supplies and heatsinks
- 3x 32GB eMMC memory cards
- USB3 to SATA adapter to run an external drive for storage
- 1 External SATA disk to store deployment data over NFS
- Serial to USB adapter (important to debug and initial config)
- USB to eMMC adapter to flash the images to the eMMC module
- TP-Link 8-Port Gigabit Ethernet Easy Smart Switch
- A stackable case and flat ethernet cables
And it all arrived, ready for a weekend of fun.
 Planning and installation
As I was already planning the cluster, I did a brief IP Plan for my home network. This is important to set the DHCP ranges you use for clients, the LoadBalancer ranges and the fixed IPs.
Network: 192.168.1.0/24
Gateway: 192.168.1.1DNS: 192.168.1.1 (running dnsmasq on DD-WRT Router)Router DHCP range: 192.168.1.101 - 192.168.1.200
Reserved: 192.168.1.2 - 192.168.1.15
* 192.168.1.1 - Router* 192.168.1.3 - Managed Switch* 192.168.1.4 - RPi3 (media server)
Kubernetes Nodes: - Master1: 192.168.1.50 - Node1: 192.168.1.55 - Node2: 192.168.1.56
MetalLB CIDR: 192.168.1.16/28 - 192.168.1.17 - 192.168.1.30
Traefik Internal Ingress IP: 192.168.1.20Traefik External Ingress IP: 192.168.1.21
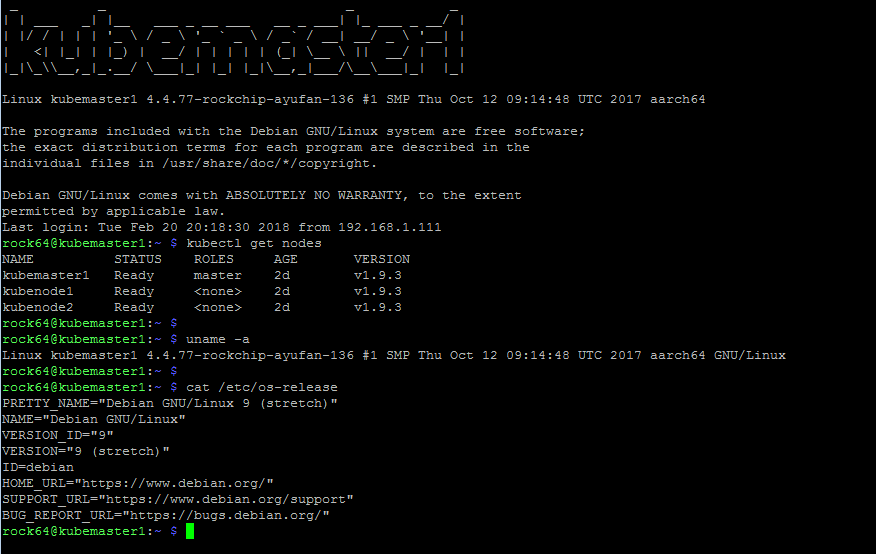
At first, I downloaded the Debian Stretch image from Ayufan’s repository. He is the guy that maintains the most up-to-date Linux builds for these boards. I went with latest version (0.6.20 at the moment of writing) that was marked as a pre-release version (it crashed, more on this later).
Very straightforward, I flashed the image to the eMMC module using Etcher, on the eMMC-USB adapter, popped the card into the board, connected it thru the Serial-USB adapter (GND-GND, Rx-Tx, Tx-Rx) to my computer and set a serial console (Putty on Windows or screen on Mac/Linux) to the correct COM port and speed of 1500000. You can also connect an HDMI monitor and keyboard for instead of serial.
I went thru all basic configurations for the boards, hostnames, IPs, install Docker/Kubernetes utilities and etc (check the links to the gist and script of steps I used).
At first, it all went perfect but after installing Kubernetes and MetalLB (more on this later), I got a kernel crash instantly. Trying again with a previous 0.6.15 build but now with Ubuntu Xenial got me the same problem. Issue filled.
Avoiding being edgy, I downloaded the last Stable build, 0.5.15 for Debian Strech and all went fine so stick to this version for time being. After some time, I had the boards assembled and installed.
 Kubernetes Cluster Stack
- Kubernetes 1.9.3 (kubeadm installs latest stable version, you can specify a different one with parameters)
- Weave Net as the overlay network
- MetalLB LoadBalancer — This works perfectly integrated with Kubernetes and you can request LB services like if using a cloud provider
- Traefik as the ingress controller to be able to map URLs to internal Kubernetes deployments (for example dashboard.yourdomain.com can point to a specific pod service). Also there is another instance of Traefik for external ingress and external certificates thru Letsencrypt
- A DNS server to resolve my internal names to the IPs of the LoadBalancer on Traefik or other services that might be created
For the internal DNS server I first thought about running Bind on a container in the infrastructure but I found a “design decision” on Kubernetes that avoids having TCP and UDP ports in the same Service (DNS uses TCP and UDP on port 53). This might be mitigated by MetalLB in the future.
In the end, I decided to go to a more reliable way and flashed DD-WRT into my Netgear R7000P router to be able to configure it’s internal dnsmasq daemon. Easy task, all configured and just one line added to DD-WRT. Now my router is the internal DNS server and cache on my network.
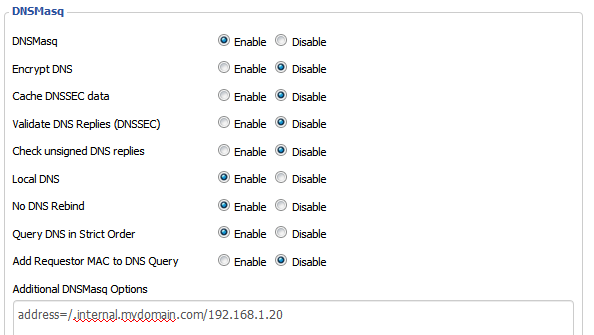
In case you can’t deploy an internal DNS, map all domains that will be used for your applications on your computer “hosts” file pointing to the Traefik Ingress IP configured.
cat /etc/hosts
192.168.1.20 application.internal.mydomain.com192.168.1.20 grafana.internal.mydomain.com192.168.1.20 dashboard.internal.mydomain.com
...
Kubernetes Deployment
I followed the official kubeam guide:
sudo kubeadm init
# After init is finishedmkdir -p $HOME/.kubesudo cp -i /etc/kubernetes/admin.conf $HOME/.kube/configsudo chown $(id -u):$(id -g) $HOME/.kube/config
# Install Weave Net as overlay networkexport kubever=$(kubectl version | base64 | tr -d '\n')kubectl apply -f "https://cloud.weave.works/k8s/net?k8s-version=$kubever"
# Taint the master node so application pods can run on it tookubectl taint nodes --all node-role.kubernetes.io/master-
# Join other nodes (Get the command from kubeadm init command)kubeadm join --token secret.yourtoken 192.168.1.50:6443 --discovery-token-ca-cert-hash sha256:a57508843sdasdas6303d879722885710dsdsdacb502f9d8370ef5c354
This will give you a pretty functional Kubernetes Cluster with an overlay network that allows all pods on all nodes to communicate to each other but I added a few other modules to have a more complete cluster.
To follow the next tasks, it’s easier to clone my repo from GitHub.
In case you need to reset your deployment and start over (happened for me), you need to clean every rule kubernetes and Weave added to your nodes. I made a gist with the steps needed. Follow this to avoid your pods not talking to each other after a redeployment.
 Loadbalancer and Ingress
MetalLB is a Kubernetes load balancer that integrates directly to the API. This way you can request a Service with type: LoadBalancer and your service will have an IP allocated from a pool configured in MetalLB. Check their website for more info.
For installation and configuration, run the script install_metallb.sh and deploy the manifest kubectl apply -f metallb-conf.yaml in from 1-MetalLB dir. Adjust the IP CIDR on the manifest for your network.
Traefik is an ingress controller that can act as a reverse proxy/loadbalancer on the service layer of Kubernetes.
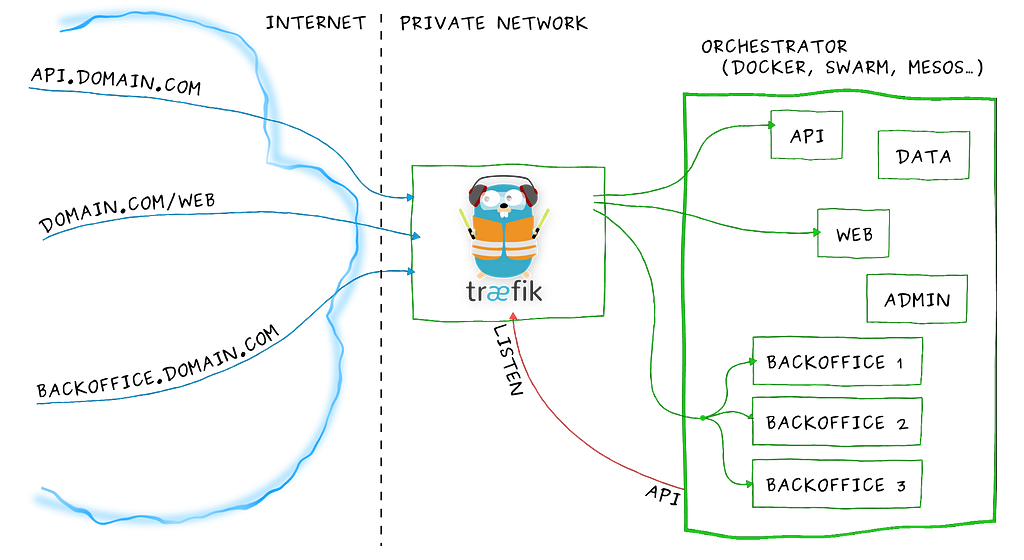
With Traefik, any application deployment can be exposed with it’s services on a subdomain on the network. Traefik was deployed itself with a LoadBalancer service type and a fixed IP. This IP was mapped as a wildcard on my internal DNS so all calls to *.internal.mydomain.com goes to this IP and Traefik forward to the correct pod based on the ingress rule. Use hosts file in case you don’t have a DNS. Ex:
myapp.internal.mydomain.com -> Internal DNS -> resolved to the MetalLB IP allocated to Traefik -> Traefik matches the called domain to the associated service -> traffic is sent to the pod.
There are two deployments of Traefik, one for internal ingress (on domain *.internal.mydomain.com) and one for external ingress (on domain *.cloud.mydomain.com). These deployments have two different IPs assigned by the load balancer. The separation is due to the external Traefik handles certificate generation on Letsencrypt.
For this you need to point your HTTP and HTTPS ports to the loadbalancer IP assigned on external Traefik using the PortForward feature on your router.
Adjust the config files on the 2-Traefik dir (mostly the configmaps and the LoadbalancerIP on services)to suit your domain and IPs and deploy all with kubectl apply -f traefik* If you will not use external access and don't need certificates for it, don't deploy the external-traefik* manifests.
Kubernetes storage and dashboard
To have data persistence on your applications, you need to create Persistent Volumes on Kubernetes. The most flexible way of getting this is having a StorageClass allowing your deployments to request volumes to store the data.
I went with the option of having an external disk connected via USB3 to one of my nodes (I chose kubenode1) and shared the volume over NFS on the node. Format and mount your external drive and install the NFS server(adjust your mount path and network):
sudo apt-get install nfs-kernel-server nfs-commonsudo systemctl enable nfs-kernel-server
# Add following like to /etc/exports
/mnt/extssd1/kube/ 192.168.1.*(rw,sync,no_subtree_check,no_root_squash)
sudo exportfs -a
Then, I used nfs-client-provisioner to create the StorageClass on Kubernetes pointing to the NFS server using the files on 3-NFS_Storage (adjust the IP and mountpoint on deployment-arm.yaml).
kubectl apply -f auth/*kubectl apply -f deployment-arm.yamlkubectl apply -f class.yaml
Check if your StorageClass is the default:
rock64@kubemaster1:~/kube $ kubectl get storageclassNAME PROVISIONER AGEnfs-ssd-node1 (default) fuseim.pri/ssd1 2d
If not, use the command
kubectl patch storageclass nfs-ssd-node1 -p '{"metadata":{"annotations": {"storageclass.kubernetes.io/is-default-class": "true"}}}'Dashboard, heapster and InfluxDB
Heapster and InfluxDB collects some statistics from your cluster and show them on the web GUI. The Dashboard allows the management of the cluster using a web console.
Install the manifests from 4-Dashboard and 5-Heapster-Influx directories. There is an option to deploy the dashboard externally with HTTPS and authentication, this depends on the external Traefik. Generate your authentication with the generate_auth.sh and apply the external-ingress.yaml manifest.
cd 4-Dashboardkubectl apply -f dashboard*
cd 5-Heapster-Influxkubectl apply -f *
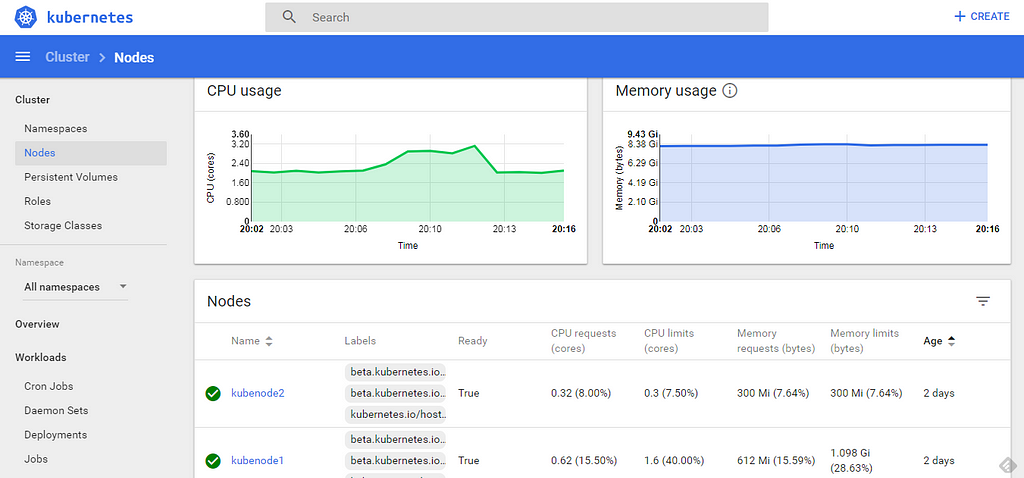
There you have a nice dashboard to manage your pods.
Monitoring Stack
Since deploying the cluster, I migrated the solution to a more elaborate version using Prometheus-operator.
I made a new article for this with detailed explanation, please follow that guide as I will keep the information below only for historic matter:
As an option, you can deploy a nice monitoring stack going with Prometheus, Grafana and their supporting applications. I advise this is kinda heavy on resources but the visuals and customization are great. Deploy all manifests from the 6-Monitoring directory. Remember to adjust the ingress domains for grafana/ingress.yaml and prometheus/ingress.yaml.After this, you need to configure the Prometheus datasource in Grafana (add data source with URL http://prometheus:9090) and import the dashboards from the dashboards dir in grafana.Access it on your ingress domain: http://grafana.internal.mydomain.com.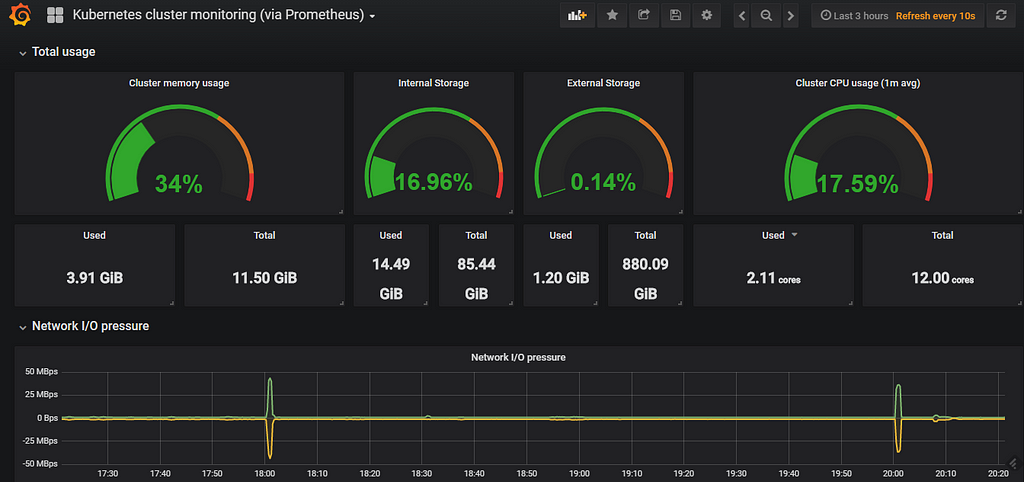 Kubernetes Dashboard
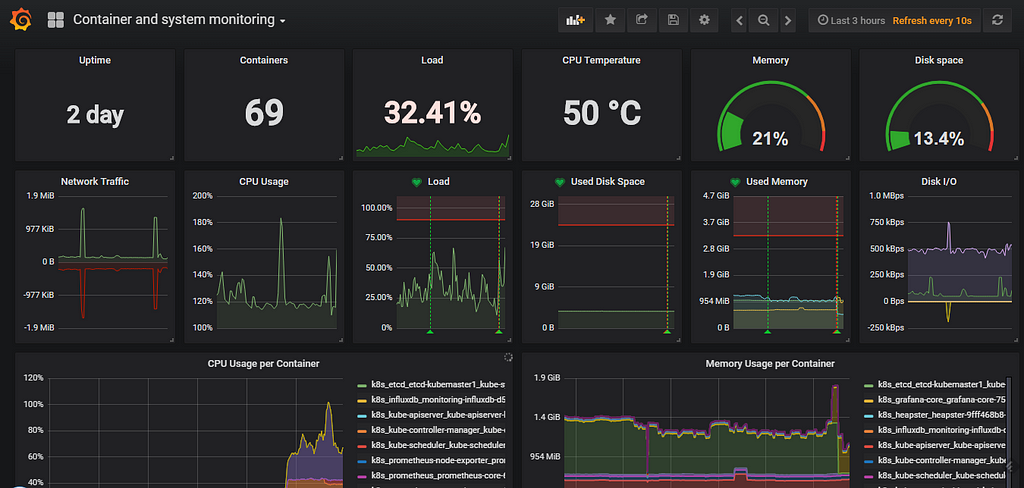 System and Container Dashboard
From here, you have a fully functional and featured cluster ready to deploy your applications or play with different stacks. OpenFaaS, Helm and many more options all in your hands. Just remember that you need to find (or build) ARM32 or ARM64 images to deploy on this cluster.
All configuration scripts and manifests used to install are hosted in https://github.com/carlosedp/kubernetes-arm.
To keep up on news or send suggestions, follow me on Twitter @carlosedp
References:
- https://blog.alexellis.io/serverless-kubernetes-on-raspberry-pi/
- http://blog.kars7e.io/2018/01/14/Kubernetes-cluster-on-ARM-using-Asus-Tinkerboard
- https://www.hanselman.com/blog/HowToBuildAKubernetesClusterWithARMRaspberryPiThenRunNETCoreOnOpenFaas.aspx
- https://github.com/carlosedp/kubernetes-arm
- https://github.com/carlosedp/kubernetes-kit
Building an ARM Kubernetes Cluster was originally published in Hacker Noon on Medium, where people are continuing the conversation by highlighting and responding to this story.
Publication date
Disclaimer
The views and opinions expressed in this article are solely those of the authors and do not reflect the views of Bitcoin Insider. Every investment and trading move involves risk - this is especially true for cryptocurrencies given their volatility. We strongly advise our readers to conduct their own research when making a decision.