Latest news about Bitcoin and all cryptocurrencies. Your daily crypto news habit.
React Context is one of the most interesting features in React 16.3.0. There had been a lot of buzz about this hot feature. In this easy tutorial, we will take a look at how to use React, React Router and React Context to build a simple multilingual website. I hope you will enjoy this tutorial. And now, without further ado, let’s begin.
Table of Contents:
What are we building
Project setup
Index.html and index.js
Bringing in the Context
Creating the Main component
Closing thoughts on React Context and building a multilingual website
What are we building
Our primary goal fr this tutorial is simple. We will use React, React Router and React Context to build a simple website that will allow visitors browse its content in four different languages. These languages will be Czech, English, French and German. All texts for these languages will be stored in JSON format in external files. The best thing about our website is that there will be no need to reload the page when visitor changes the language.
For example, when visitor decide to switch from English to French, the change will be instant and visitor will immediately see content in French. The same is true for changing the page itself. Everything will be seamless. When visitor decide to change the page, content will re-render without reloading the page itself. This will be possible thanks to the React Router handling the routing and React state handling the language switching.
So, this is the goal for this tutorial, creating a simple “one-page” website with four language variants. That’s for the briefing. Now, let’s get our hands dirt … with zeros and ones.
Project setup
The first thing we need to do is creating the initial setup for this project. This means especially two things. First, we need to decide what dependencies do we want to use in this project and install them. This quick tutorial on React Context and build a simple multilingual website will be very simple. However, there are still some 3rd party packages we will need. Second, we need to put together necessary npm scripts.
Let’s tackle both of these tasks, one by one. First, the dependencies. We will need to add and install following packages: react, react-dom, react-router-dom and react-scripts. That’s not so much, right? Second, the npm scripts. As some of you may have already guessed, we will make this part easier by using scripts and configs provided by Create React App project. In other words, we will nod need to setup Webpack or anything else.
For the scripts, we will create four scripts: start, build, test and eject. These are the default scripts for developing React app with Create React App. Well, today and in this tutorial we will need only the first one, the start script. Now, we can put all this information together and create the final version of package.json.
// package.json{ "name": "multi-language-website", "version": "1.0.0", "private": false, "license": "MIT", "homepage": ".", "author": { "name": "Your name", "url": "https://your-website.com/" }, "engines": { "node": ">=9.x", "npm": ">=5.x", "yarn": ">=1.x.x" }, "dependencies": { "react": "^16.3.1", "react-dom": "^16.3.1", "react-router-dom": "^4.2.2", "react-scripts": "1.1.4" }, "scripts": { "start": "react-scripts start", "build": "react-scripts build", "test": "react-scripts test", "eject": "react-scripts eject" }}Two more things before we move any further and start working on implementing React Context, and the website. First, let me give you a quick outline of the project structure. This is how our multilingual website powered by React and React Router and enhanced with React Context will look like when we are done. The structure of this project can become difficult as we go deeper. So, I will always specify the location and the name of the file on the first line of every code snippet.
Hopefully, this will make it easier for you to work with the code. And, you can always scroll back here and use this outline to find out where we are at the moment.
react-context-multilingual-website├── node_modules/├── public/├── src/│ └── app/│ └── components/│ └── header.jsx│ └── pages/│ └── About.jsx│ └── Home.jsx│ └── Portfolio.jsx│ └── styles/│ └── components/│ └── header.css│ └── links.css│ └── pages/│ └── about.css│ └── base.css│ └── grid.css│ └── layout.css│ └── Main.jsx│ └── translations/│ └── cz.json│ └── de.json│ └── en.json│ └── fr.json│ └── context.jsx│ └── index.js│ └── registerServiceWorker.js├── .env├── package.json└── yarn.lock
The second thing. As you can in the outline, there is a .env file. This file, or rather its content, will make our work easier. If we add NODE_PATH=src/ to this file, we can use absolute paths for import statements. In other words, no more ../../../../x/y/Component. Instead, we will use something like x/y/Component (starting from src/). That is all there is in that file. Nothing more.
Index.html and index.js
Setup is done. Now, let’s quickly put together the index.html and index.js. The index.html will be short and simple. We will use a template provided by Create React App project. The only thing I added was a custom typeface, Montserrat, served by Google Fonts CDN. Other than that, it will be a default index.html, some meta tags, title, tags for favicon and the most important thing, a div with id and class root where our page will be rendered. Keep in mind that index.html file will be inside the public directory.
// public/index.html<!DOCTYPE html><html lang="en"> <head> <meta charset="utf-8"> <title>Jake Stuart</title> <meta name="viewport" content="width=device-width, initial-scale=1, shrink-to-fit=no"> <!-- manifest.json provides metadata used when your web app is added to the homescreen on Android. See https://developers.google.com/web/fundamentals/engage-and-retain/web-app-manifest/ --> <link rel="manifest" href="%PUBLIC_URL%/manifest.json?v=OmyOw0MO2d"> <link rel="manifest" href="%PUBLIC_URL%/site.webmanifest?v=OmyOw0MO2d"> <link rel="shortcut icon" href="%PUBLIC_URL%/favicon.ico?v=OmyOw0MO2d"> <link rel="apple-touch-icon" sizes="180x180" href="%PUBLIC_URL%/apple-touch-icon.png?v=OmyOw0MO2d"> <link rel="icon" type="image/png" sizes="32x32" href="%PUBLIC_URL%/favicon-32x32.png?v=OmyOw0MO2d"> <link rel="icon" type="image/png" sizes="16x16" href="%PUBLIC_URL%/favicon-16x16.png?v=OmyOw0MO2d"> <link rel="mask-icon" href="%PUBLIC_URL%/safari-pinned-tab.svg?v=OmyOw0MO2d" color="#d30320"> <meta name="msapplication-TileColor" content="#d30320"> <meta name="theme-color" content="#d30320"> <!-- Notice the use of %PUBLIC_URL% in the tags above. It will be replaced with the URL of the `public` folder during the build. Only files inside the `public` folder can be referenced from the HTML. Unlike "/favicon.ico" or "favicon.ico", "%PUBLIC_URL%/favicon.ico" will work correctly both with client-side routing and a non-root public URL. Learn how to configure a non-root public URL by running `npm run build`. --> <!-- Font Montserrat provided by Google Fonts CDN --> <link href="https://fonts.googleapis.com/css?family=Montserrat:400,700&subset=latin-ext" rel="stylesheet"> </head> <body> <noscript> You need to enable JavaScript to run this app. </noscript> <div class="root" id="root"></div> <!-- This HTML file is a template. If you open it directly in the browser, you will see an empty page. You can add webfonts, meta tags, or analytics to this file. The build step will place the bundled scripts into the <body> tag. To begin the development, run `npm start` or `yarn start`. To create a production bundle, use `npm run build` or `yarn build`. -- </body></html>
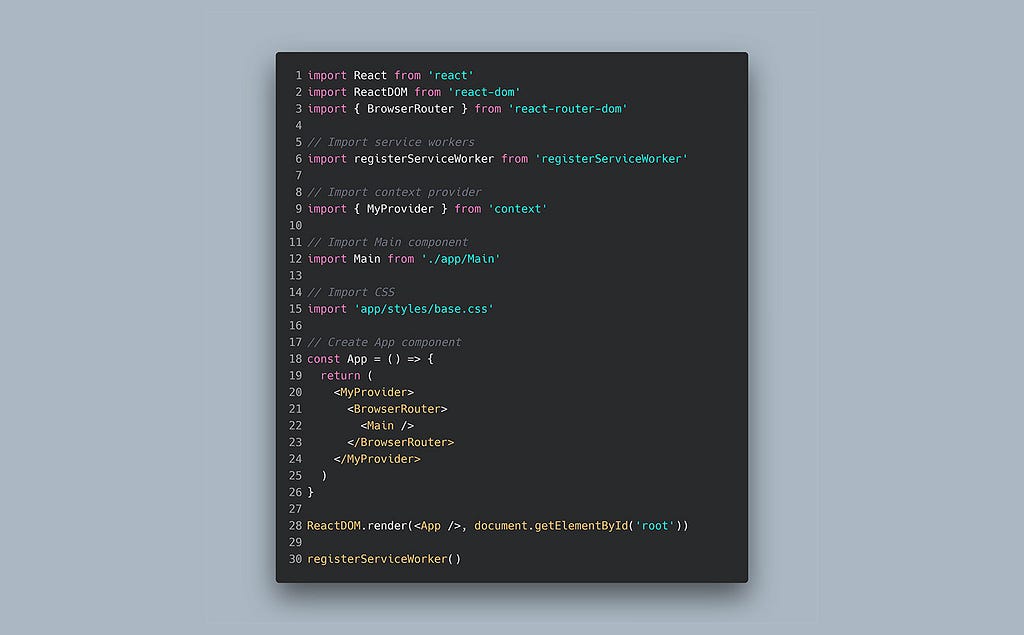
When it comes to index.js it will be simple as well. We will add imports for React, ReactDOM and BrowserRouter at the top. Then, we will also add import for service workers. Next, there will be imports for React Context Provider, main component for our website and import for some default CSS styles. After that, we will create stateless component App. This component will return the Main component wrapped inside BrowserRouter.
The BrowserRouter component will be wrapped once again inside MyProvider component. With this setup, we will be able to use the React Context Provider when we want, through Provider and Consumer components. Finally, we will render our stateless App component into the #root div element in index.html, and register service workers.
// src/index.jsimport React from 'react'import ReactDOM from 'react-dom'import { BrowserRouter } from 'react-router-dom'// Import service workersimport registerServiceWorker from 'registerServiceWorker'// Import context providerimport { MyProvider } from 'context'// Import Main componentimport Main from './app/Main'// Import CSSimport 'app/styles/base.css'// Create App componentconst App = () => { return ( <MyProvider> <BrowserRouter> <Main /> </BrowserRouter> </MyProvider> )}ReactDOM.render(<App />, document.getElementById('root'))registerServiceWorker()Bringing in the Context
Let’s move to the best part, implementing the React Context. This will require to steps. First, we will need to use React and createContext method to create new React Context, let’s call it MyContext. We can then use this new “custom” React Context and create Context Provider. The official definition of React Context Provider, provided by React docs is “component that allows Consumers to subscribe to context changes”.
I like to think about it as a storage we can use to store data and then share this data with other components, namely Consumers. Consumers can come to the storage and use whatever the Provider is willing to share with, so to speak. For anyone interested, take a look at the documentation for React Context API. Or, better, watch tutorial on React Context API by Wes Bos.
The second thing we will do is creating a new component for React Context Provider. Like with any other stateful component, we will use a regular JavaScript class. Here, we will create state with two keys, isNavOpen (boolean) and language (‘string’). We will use initially hidden navigation. When someone clicks the menu (burger icon) button isNavOpen will change to true and full-width & full-height navigation will appear.
The language will store a language code for currently active language. The default will be an empty string. We will later use if statements for checking this key and if it is empty, it will default to English. Next, we will create two methods, changeLanguage and toggleNav. It is probably not necessary to explain what each of them does, except maybe two things.
First, when navigation is open we will add nav-is-open class to the body. This class will use CSS overflow property set hidden to prevent scrolling. When navigation is closed, the classes is removed. Second, links for changing the language of our website will have data-language attribute with specific language code. When some link for language is clicked, we will update the language key inside state with the code as a new value.
Finally, there will be the render. It will contain the MyContext we created at the top with React Context, specifically the createContext() method. This element will have one prop, value. This value contains what we want the Provider to share with Consumers. In our case, it will contain three things: state, changeLanguage and toggleNav. Finally, we will let any children nested inside the Provider be rendered.
// src/context.jsximport React, { Component } from 'react'// Create new contextexport const MyContext = React.createContext()// Then create a Provider Componentexport class MyProvider extends Component { state = { isNavOpen: false, language: '' } changeLanguage = (e) => { this.setState({ isNavOpen: !this.state.isNavOpen, language: e.target.dataset.language }) document.body.classList.toggle('nav-is-open') } toggleNav = () => { this.setState({ isNavOpen: !this.state.isNavOpen, }) document.body.classList.toggle('nav-is-open') } render() { return ( <MyContext.Provider value={{ state: this.state, changeLanguage: this.changeLanguage, toggleNav: this.toggleNav }}> {this.props.children} </MyContext.Provider> ) }}Creating the Main component
Okay. Both indexes are in place React Context is ready. Now, let’s create the Main.jsx. As usually, we will start with some imports. The 3rd party will be for React and Route. Next, we will import MyContext created with React Context. Then, we will add imports for Home, Portfolio and About pages and one more for Header component.
Finally, we will create new stateless component called Main. This will be the first place where we will finally use React Context. On the top level, we will use our custom React Context, the MyContext, and create new Consumer component. Inside this component will a function with context as parameter. Two things. First, Consumer must always return a function.
Second, the parameter will be equal to the value prop of the closest Provider. In our case, the context argument, we are passing to the function inside the Consumer component, will contain what we passed as the value to the value prop of the MyContext.Provider component (in context.jsx). In other words, it will contain the state, changeLanguage and toggleNav.
One more thing. This parameter doesn’t have to be called “context”. You can choose whatever name you want. Just make sure to use the correct name whenever we will work with it. This function will return a div element with Header and three Route components, one for every page: Home, Portfolio and About.
Notice, that we are passing the context from React Context as a context prop. This will allow us to use the context React Context anywhere inside the Header component. This will be handy because Header will contain the functionality toggling navigation and changing the language of the website.
The reason behind this is to see that we can work with React Context and its content in a multiple ways, either through using Consumer from React Context or by passing and then using props. You may want to use props when you want to access React Context in the component above the render function. For, example in state or some other method. Then, implementing Consumer component inside render method would not help.
Side note: If you don’t want to use the div element, you don’t have to. Instead, you can use React Fragment to wrap all the components we want to render. Then, it is no longer necessary to use any redundant HTML element just because you need a wrapper. What will be rendered when we use React Fragment? Nothing. Or, the content of the Fragment, but without the Fragment or any other element. DOM will contain only the elements nested inside the Fragment. Let’s do that and strip away that non-essential div element.
// src/app/Main.jsx// Importsimport React from 'react'import { Route } from 'react-router-dom'// Import Contextimport { MyContext } from 'context'// Import pagesimport Home from './pages/Home'import Portfolio from './pages/Portfolio'import About from './pages/About'// Import componentsimport Header from './components/Header'// Component Implementationconst Main = () => { return ( <MyContext.Consumer> {(context) => ( <React.Fragment> <Header context={context} /> <Route exact={true} path="/" component={Home}/> <Route path="/portfolio" component={Portfolio}/> <Route path="/about" component={About}/> </React.Fragment> )} </MyContext.Consumer> )}export default MainClosing thoughts on React Context and building a multilingual website
This is all we will do in the first part of this tutorial. I hope you enjoyed it and learned how to use React Context, maybe also something about React itself. Let’s do a quick recap. Then, let’s briefly discuss what will we do in the next and also the final part. Today, we started by creating the setup for this project. Next, we created default templates. After that, we successfully created and also implemented React Context.
And, as the last thing, we created the main component for our website and prepared routes for all pages. Now, what will we do in the second part? We will start with creating a new component for Header. It will be here where we will finally use the changeLanguage and toggleNav methods we created in the context.jsx and stored inside React Context through that value prop. Then, we will create the home, about and portfolio pages.
Finally, we will create and implement four language variants, or translations, of our website. The languages we will work with will be Czech, English, French and German. With this, we will have a fully working multilingual website powered by React and React Router and enhanced with React Context.
Do you have any questions, recommendations, thoughts, advice or tip you would like to share with other readers of this blog, and me? Great! Please share it in a comment. Or, if you want to keep things more “private”, feel free to contact me on twitter or send me a mail. I would love to hear from you.
Did you like this article? Please subscribe.
Are you on social media? Let’s connect! You can find me on Twitter and Dribbble.
Originally published at Alex Devero Blog.
How to Use React Context to Build a Multilingual Website Pt.1 was originally published in Hacker Noon on Medium, where people are continuing the conversation by highlighting and responding to this story.
Publication date
Disclaimer
The views and opinions expressed in this article are solely those of the authors and do not reflect the views of Bitcoin Insider. Every investment and trading move involves risk - this is especially true for cryptocurrencies given their volatility. We strongly advise our readers to conduct their own research when making a decision.