Latest news about Bitcoin and all cryptocurrencies. Your daily crypto news habit.
So you want to do an image classification but don’t know where to start. Which pre-trained network do you use? How do you modify it to suit your needs? Should your network have 20 layers or 100? Which ones are the fastest? Most accurate? These are all questions that come up when trying to choose the best CNN for your image classification task.
When selecting a CNN for your image classification task, there are really 3 main metrics that you are trying to optimize: accuracy, speed, and memory consumption. The performance on these metrics are going to depend on which classification CNN you select and any modifications you make to it. The different networks such as VGG, Inception, and ResNets all come with their own tradeoffs on these metrics. In addition, you could modify those architectures, say by pruning some layers, adding more layers, using dilation within the network, or different network training techniques.
This post will be your design guide to properly custom designing a CNN for your specific classification task. In particular, we’re going to focus on the three main metrics of accuracy, speed, and memory consumption. We’ll look at the many different classification CNNs and explore their properties with regards to those three metrics. We’ll also look at the various modifications we could possibly make to those base CNNs and how they effect our metrics. In the end, you’ll learn how to optimally design a CNN for your specific image classification task!
Network Type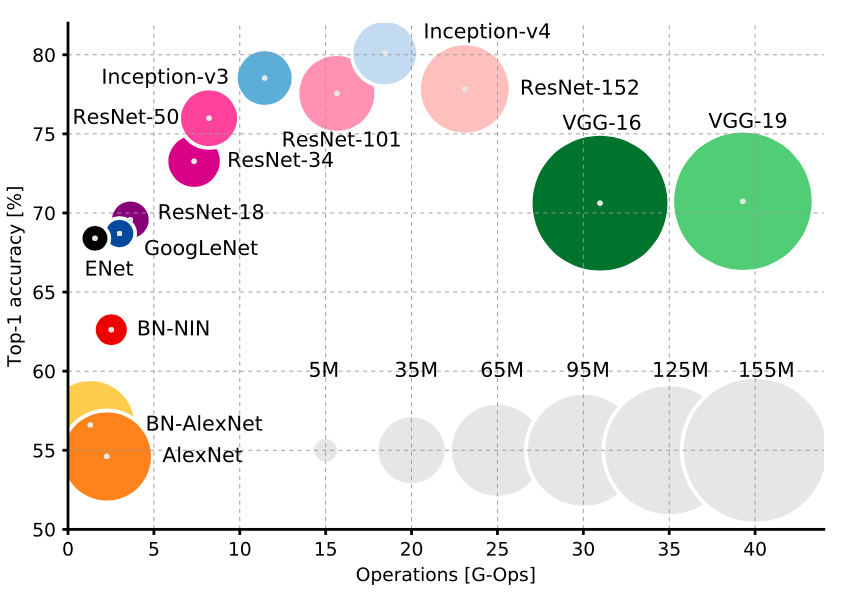
There’s a very clear tradeoff between the network type and the three metrics. First off, you’re definitely want to go with either Inception or ResNet style design. They’re newer than VGGNet and AlexNet and simply offer a much more relaxed tradeoff between speed and accuracy (as you can see in the graph above). Justin Johnson from Stanford provides some great benchmarks for a few of these CNNs.
Now between Inception and ResNet it’s really a speed vs accuracy trade off. Want accuracy? Go with an ultra deep ResNet. Want speed? Go with inception.
Reducing run time and memory consumption with smart convolution design
Recent advances in the general design of CNNs have presented some awesome alternatives that can speed up CNN run time and reduce memory consumption without too much loss in accuracy. All of these can be integrated into any of the above CNN network types quite easily:
- MobileNets uses a technique called depth-wise separable convolutions to vastly reduce the number of computations and memory consumption, while only sacrificing 1% to 5% accuracy, depending on how much computational savings you want.
- XNOR-Net uses binary convolutions i.e only two possible values for a convolution: zero or one. With this design, the network has a high degree of sparsity and can thus be easily compressed and not take up too much memory.
- ShuffleNet uses pointwise group convolution and channel shuffle to greatly reduce computation cost while maintaining accuracy even better than MobileNets. In fact, they can achieve the accuracy of earlier state-of-the-art classification CNNs while being over 10 times faster.
- Network Pruning is the technique of removing parts of the CNN in order to reduce run time and memory consumption, hopefully without reducing accuracy. In order to maintain accuracy, the parts that are removed should have little effect on the final result. The linked paper shows how easy this is to do with ResNets.
Network Depth
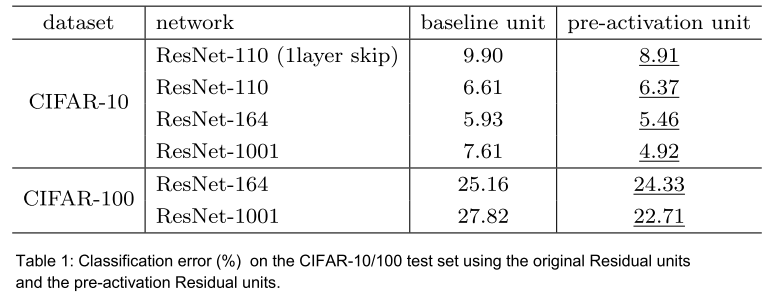
This one’s easy; of course adding more layers will usually increase accuracy at the expense of speed and memory. However, something to be aware of is that this tradeoff is governed by the law of diminishing returns i.e the more layers we add, the less increase in accuracy each layer gives us individually.
 Activation Functions
There’s been a lot of debate lately about this one. However, a great rule of thumb to follow is to start off with ReLU. Using ReLU will often get you some good results right off the bet without any tedious tuning like you would need with ELU, PReLU, or LeakyReLU. Once you’ve determined that your design is working pretty well with ReLU, then you can play around with the others and tune their parameters to try and crank out that last bit of accuracy.
Kernel Size
One might think that using larger convolution kernels will always yield the highest accuracy while losing out on speed and memory. This however, is not the case as it has been repeatedly found that using larger kernels makes it difficult for the network to diverge. It’s more optimal to stick with many smaller kernels like 3x3. Both ResNet and VGGNet explain and demonstrate this quite thoroughly. You can also use 1x1 kernels as bottleneck layers to reduce the number of feature maps, again as those two papers show.
Dilated Convolutions
Dilated convolutions use spacing in-between the weights of the convolution kernels to be able to use pixels that are far away from the center. This allows for exponential expansion of the network receptive field without increasing the parameter count i.e without increasing the memory consumption at all. It has been shown that using dilated convolutions increases the network accuracy with a minor speed trade-off.
 Data Augmentation
You should pretty much always be doing data augmentation. Using more data has been shown to consistently increase performance, even up to an extreme amount. With augmentation, you’re getting more data for free. Now the type of augmentation you use will depend on your application. For example, if you’re doing a self driving car application, you’re probably not going to have upside trees, cars, and buildings, so it doesn’t make sense to flip your images vertically. However, you’ll definitely be encountering changes in lighting from the weather and some changes across the scene, so it makes sense to augment your data with lighting changes and horizontal flips. Check out this awesome data augmentation library.
Training Optimizatizer
When you finally want to train your network, there are several optimization algorithms to choose from. Many people say that SGD gets you the best results with regards to accuracy, which in my experience is true. However, tuning the learning rate schedule and parameters can be challenging and tedious. On the other hand, using and adaptive learning rate such as Adam, Adagrad, or Adadelta is quick and easy, but you might not get that optimal accuracy of SGD.
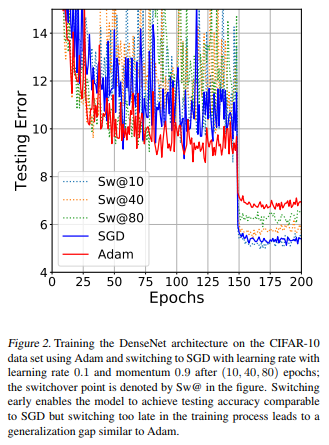
The best thing here is to follow the same “style” as the activation functions: go with the easy one first to see if your design works well, then tune and optimize using something more complex. I would personally recommend starting off with Adam, as in my experience it’s super easy to use: just set a learning rate that’s not super high, commonly default at 0.0001 and you’ll usually get some very good results! Later on you can use SGD from scratch or even start with Adam, then fine tune with SGD. In fact, this paper found that switching from Adam to SGD mid-training achieves the best accuracy in the easiest way! Check out the figure below from the paper:
 Class Balancing
There are many cases where you will be dealing with imbalanced data, especially in real-world applications. Take a simple but real-world example: You are training your deep network to predict whether someone in a video feed is holding a lethal weapon or not, for security reasons. BUT in your training data, you only have 50 videos of people holding weapons, and 1000 videos of people without weapons! If you just train your network right away with this data, your model will definitely be highly biased towards predicting that no one ever has a weapon!
There are a few things you can do to combat this:
- Use class weights in the loss function. Essentially, the under-represented classes receive higher weights in the loss function, such that any miss-classifications for that particular class will lead to a very high error in the loss function.
- Over-sample: Repeating some of the training examples that contain the under-represented class helps even-out the distribution. This works best if the available data is small.
- Under-sample: You can simply skip some training examples that contain the over-represented class. This works best if the available data is very large.
- Data augmentation for the minority class.
Optimizing your Transfer Learning
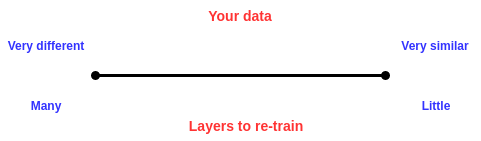
For most applications, it is suitable and really quite optimal to use transfer learning rather than training your network from scratch. However, a choice still remains about which network layers you will keep and which you will retrain. This will really depend on what exactly your data looks like. The more similar your data is to that of the pre-trained network (which is usually trained on ImageNet), the less layers you should be re-training, and vice versa. For example, lets say you’re trying to classify if an image contains grapes or not, so you have a bunch of images with grapes and a bunch without. Those kinds of images are quite similar to those in ImageNet and so you’ll only need to re-train the last couple of layers, maybe just the fully-connected layers. However, lets say you’re trying to classify whether or not an image of outer space contains a planet in it. Well such data is much different than that of ImageNet, so you’ll want to re-train some of the later convolutional layers as well. In a nutshell, go with the following rule:
 Conclusion
There you have it! Your comprehensive guide to designing a CNN for your image classification application. I hope you enjoyed this post and learned something new and useful. If you did, feel free to hit the clap button.
A Comprehensive Design Guide for Image Classification CNNs was originally published in Hacker Noon on Medium, where people are continuing the conversation by highlighting and responding to this story.
Publication date
Disclaimer
The views and opinions expressed in this article are solely those of the authors and do not reflect the views of Bitcoin Insider. Every investment and trading move involves risk - this is especially true for cryptocurrencies given their volatility. We strongly advise our readers to conduct their own research when making a decision.