Latest news about Bitcoin and all cryptocurrencies. Your daily crypto news habit.
Hi there! I am Maxim, and I have been programming for most of my life. Over the course of last year, I spent most of my time working on my own project called OneBar. Every time we had something exciting to share, we needed a video to demonstrate it to people. Our first two demos were simple screencasts with a bit of voiceover and background music. They worked quite well but, recently we went through a major pivot, re-designed OneBar from scratch and wanted something better than a plain screencast. I had a little user story in mind, and I wanted it to be a part of our demo so, I started looking for ways how to make more advanced videos. I’ve analyzed a few paid options like using online explainer makers or hiring a freelancer. All of them were either too restrictive (online editors), or too risky to deal with. Back and forth with a not-so-good freelancer could easily take a whole month or more, and we didn’t have money to hire a top-notch (expensive) animator. So DIY seemed like the only viable option.
I once saw my friend working in Adobe After Effects, and it looked crazy to me (too many buttons, too many hotkeys, impossible to understand what’s going on). Also, I am not an illustrator, I do not draw, so I knew I could not create any decent looking graphics by myself. The idea seemed dubious at least, but after watching a few YouTube tutorials, I have decided to give it a shot. Below is a little story about how I spent several days making a two-minute video, what I think about the result, and what awaits you if you decide to try it yourself.
 It all starts with a plot
I had a few pictures in mind:
- There should be an inexperienced employee with hundreds of questions.
- There should also be a person, who knows everything about the company and hence has to answer all the questions.
- That person has less than zero time to do own work. His or her Slack and email are blowing up with requests, and there is a long line of people waiting behind his/her desk. A true productivity hell.
- An inexperienced person is struggling because he or she cannot get any help.
- Then we introduce our product and show a quick demo of how we solve the problem.
- And after that, there should be a few calls to action, targeting specific use-cases.
- Finally, we end with a little joke.
Professionals recommend drawing a storyboard first. It should look something like this:
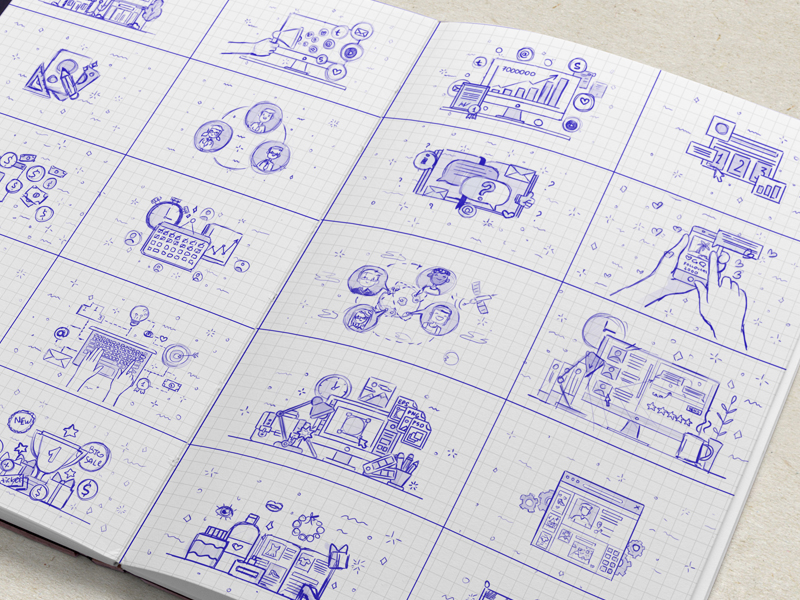 Someone’s storyboard from Dribble
And I honestly think that mine is not much worse, maybe even better:
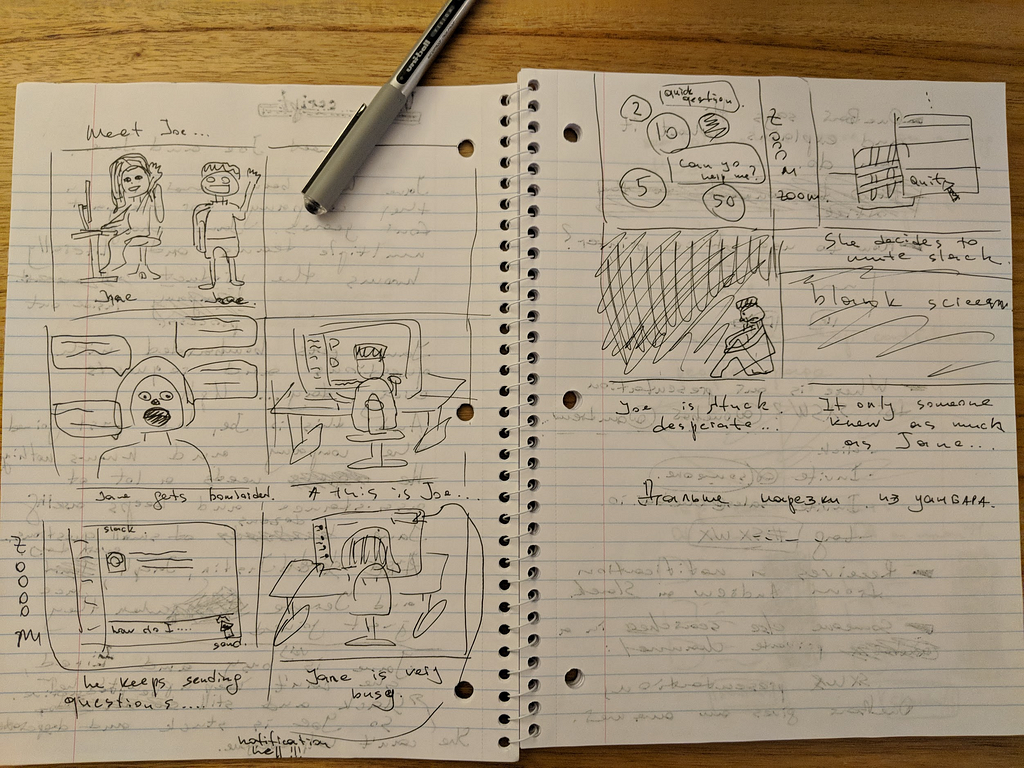
I have also come up with a draft of a text that someone would have to narrate on background and wrote down a list of product features, that I wanted to showcase.
Tip: keep it short. I planned an under two-minute video, and I had to cut out a few scenes both from the user story and from the screencast, as well as the final joke (honestly, I have not even written it yet).
For the story part, I needed animated people, computers, office stuff, etc. I needed both graphics and the way to animate it. As I said earlier, I could not draw all of that myself, so I started looking for other options. After some googling, it turned out that Adobe After Effects (AE) is a de-facto standard application for this kind of work. There are thousands of tutorials for AE on YouTube, and there’s also a massive market of presets, packs and kits with all sorts of pictures, animations, and video effects, explicitly designed for explainer videos. The price for a full pack varies from $40 all the way to $100.
This was exactly what I hoped to find, so I went ahead and picked a toolkit with good reviews, and enough tutorials on YouTube. Ah, and before that, I had to purchase After Effects too. A full subscription to a Creative Cloud has a pretty steep price tag of $50/month (steep for a non-professional user), but I found a weird promo, offering it for $30/month. Weird, because there were no links to it from an Adobe web site. I could only find a link if I searched for Creative Cloud promotions in Google multiple times and was lucky enough to catch the right ad, which would then lead me to the promo page.
Armed with the explainer kit and Adobe After Effects, I started figuring out how to use the latter. As I said earlier, AE interface looked like a 747 cockpit to me. I once tried to make simple edits to what my friend made for us for our previous explainer video, and I could not figure anything out intuitively. I was a bit afraid, but watching a few YouTube tutorials at 1.5 speed cleared out most of the mystery in less than 20 minutes. I think I watched this one, but you can pick any.
Here are a few basic concepts, that cover everything, you’ll need to do with AE for your explainer video:
- In AE you are working with compositions. You can think of a composition as an independent, reusable scene.
- A composition consists of layers, which are continuous in time and can contain different objects: pictures, vector graphics, videos, other compositions, etc.
- Hence, you can think about the whole project as a composition graph:
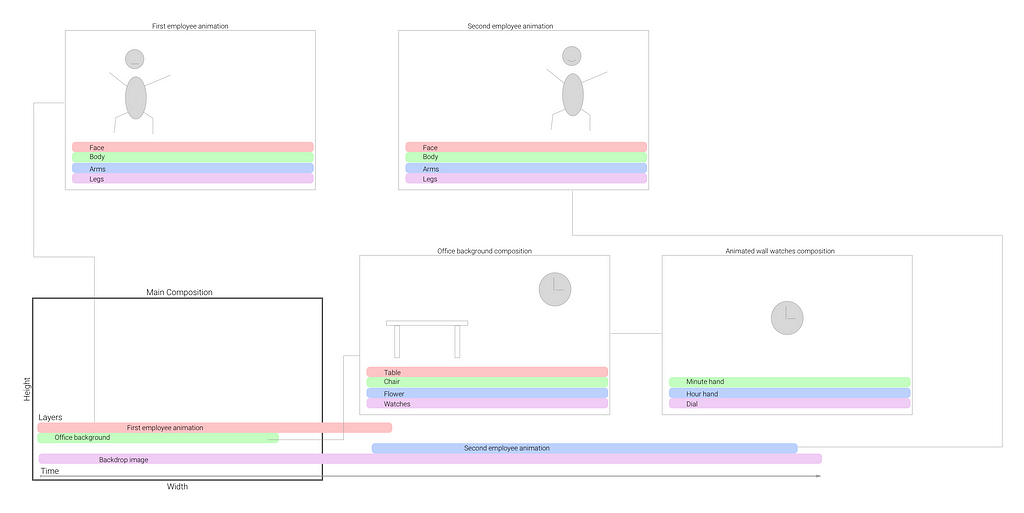
- Every object on a layer has a bunch of numerical (primarily) parameters, such as position, scale, opacity, color, FX parameters (if effects were applied), etc.
- You can mark any set of frames on a timeline as keyframes and on every frame set different values for some of those parameters.

- Based on a keyframe type, AE will calculate all the intermediate values for the parameters for every frame in between keyframes.
- This is the basis of all the animations you can make in After Effects. For example, you can keyframe position, opacity, and scale to animate object appearance or, maybe, make a flying, pulsating and blinking thing.
It does not make sense to read much about After Effects; it’s much easier to watch short tutorials for every little thing you need. Thankfully, there are thousands of them on YouTube. One thing I would recommend to do from a very beginning is to learn a few shortcuts. You will be doing a lot of these repetitive actions, and keyboard shortcuts will save you a ton of time.
The rest of the first day I spent on figuring out the internals of my explainer kit and creating a very first scene of the video, where my characters just walk into the scene and greet the viewer. All these packs (or toolkits) come in the form of AE projects, along with documentation on where to find what. Every project contains one or many compositions, which you can drag onto any layer, and then tweak the appearance and add animations to your preference. Human animations may be quite complex, as there are a lot of moving parts (hands, arms, body, legs, mouth, eyes, eyebrows, etc.), so my pack came with a nice AE plugin which can automatically add all necessary keyframes for a few dozens of pre-made animations.
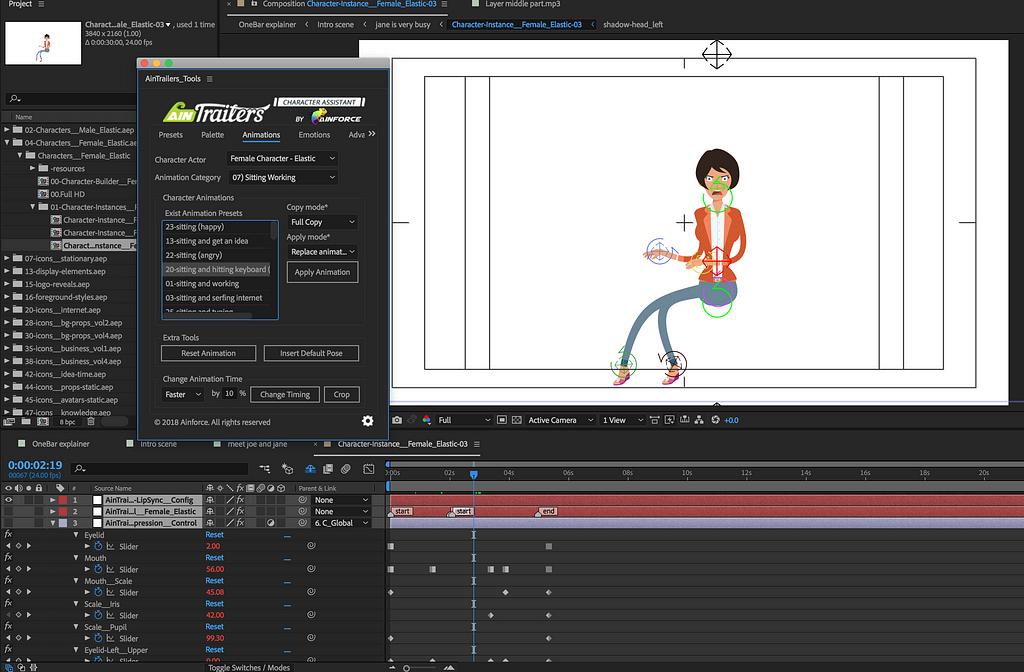
The biggest downside of working with these toolkits is very poor performance: because of all the configurability they provide, they have to use a lot of small moving elements and pre-compositions, and because of that, any scene that involves moving characters renders extremely slowly. AE needs to re-calculate the whole scene even on the slightest element change (like when you’ve moved a flower 1 pixel to the left). Because of that, the whole process of creating a video becomes veeeery slow.
What you should know about AE performance
- AE will take all your RAM, all your CPU and a few dozen gigabytes of your disk. So you better have a good computer.
- Stop other memory hogs (like Docker in my case) before using AE.
- AE will crash. So, save frequently.
- There’s also auto-save feature, and you’d better not turn it off. It once saved me a whole day of work.
- Saving my project takes about 30 seconds on an i7/16Gb/1Tb SSD laptop. Even more to open.
- Rendering a 2-minute video may take up to 20 minutes.
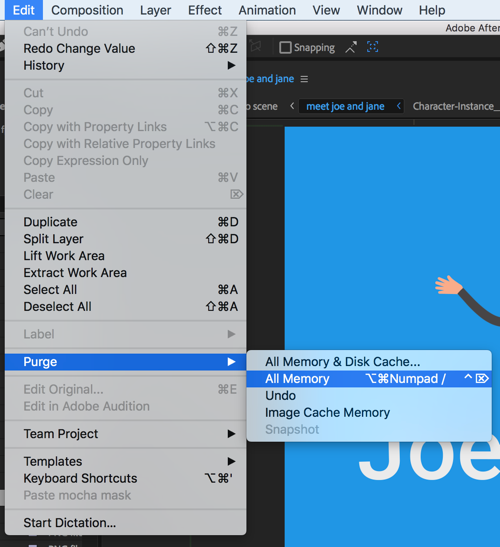
- Sometimes AE stops functioning properly. Before restarting it, try the magical “Purge RAM” button:
Let’s get back to the video creation. Before you even jump into AE, you should record a draft version of a voiceover. I used a free software called Audacity for that, but any audio recorder will do. Drag the audio onto the bottom layer of your main composition, split (Cmd+Shift+D) into phrases and arrange them on a timeline to evenly fill out your desired video length. This will guide you in creating animated scenes and aligning them with the story timeline. You may also realize that you have to throw away some scenes early on. That is how I realized that there was no time for jokes and a few more scenes in my video.
I did all that and then spent the next two days building the user story part of my explainer video. Here is what took that much time:
- Learning the AE. Here and there I had to jump back to YouTube to watch another tutorial on a specific feature.
- The creative process itself. It takes quite a lot of time to come up with visual ideas for your scenes, that would illustrate the story and yet be simple enough so that you can make them using elements from the toolkit.
- A good 20% was of time was eaten by AE slowness. This could be solved with a more powerful computer, though I am not sure.
- Animating something is just a slow process in nature. It consists of many little steps and takes a lot of time.
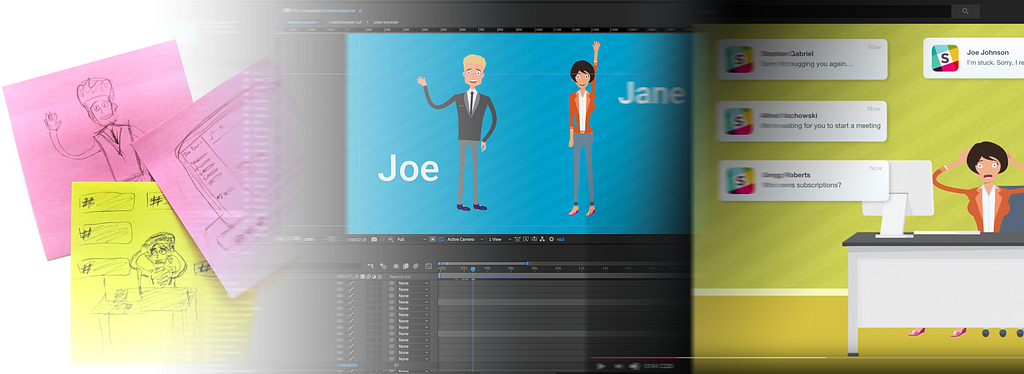
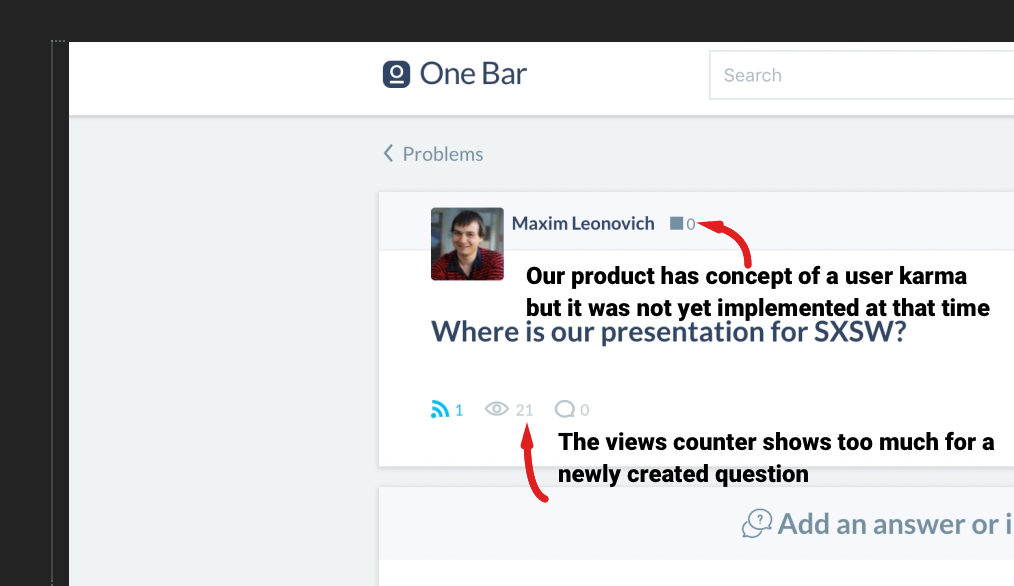
After the story part was complete, I moved on to the product demo part. According to the plan, the product part should have been made out of a few screencasts, demoing core product features. The first challenge with recording screencasts was the fact that the product was not 100% ready, so I was running into bugs every time I tried to go through a complete workflow. Some of them were easily fixable, but some would take time or were just outside of my competence. This is how I found out that After Effects is actually a perfect tool for fixing bugs. Here is an example:Our product has a concept of a user-karma, but we have not implemented it yet. So, karma values are always at zero, and there is also no good icon for it.
Not a problem! Let’s throw a shape layer on top of it with two rectangles, which would hide unnecessary information:
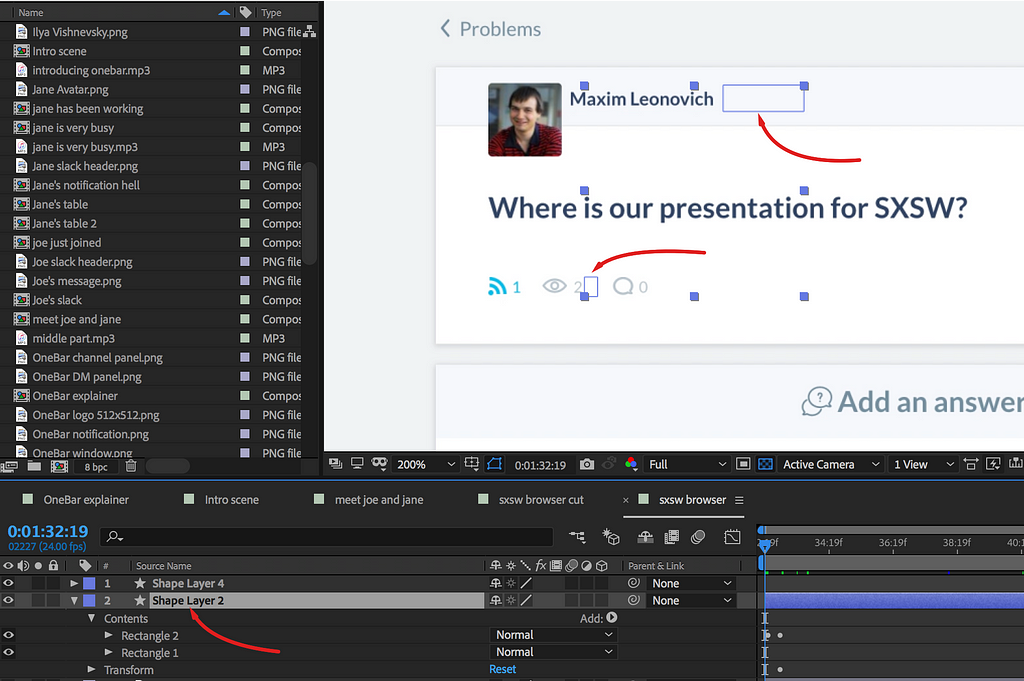
And Voi la! Nobody will even notice that something was wrong. You can animate a layer with rectangles to move along with the underlying video so that it covers “bugs” at all the times. Similarly, I could have changed my avatar or even a name, to become a generic “John Doe” but I decided not to do that.
Other things, like incoming notifications, were hard to stage for the screencast, as someone would need to remotely control when the notification comes. So, for a video, it was easier just to fake the whole part.
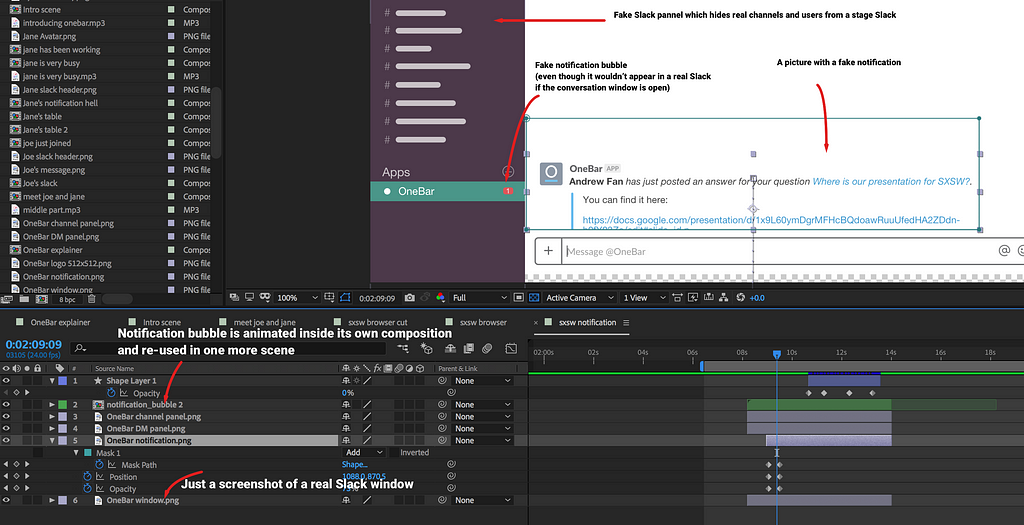
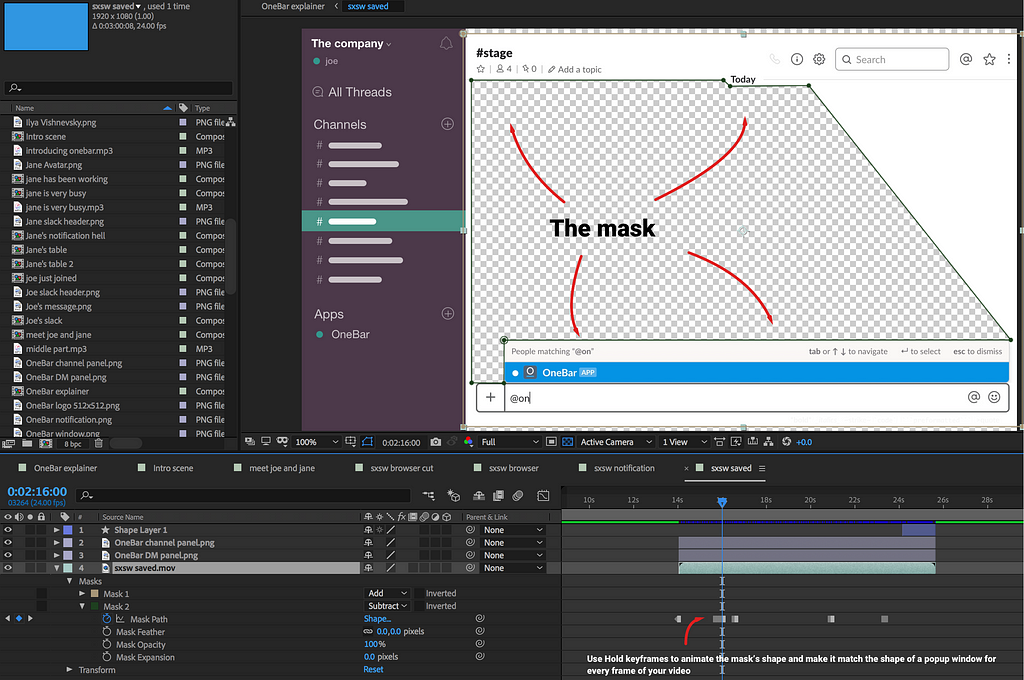
Another common problem when recording Slack applications is that you never get a clean Slack window, there is always some garbage in the history, which would distract the watcher and just look unprofessional. In After Effects, you can easily hide that with a white shape, but you will have to play with masks a little bit to make the autocomplete window show properly through your overlay.
Even with a chat history masked out, a chat window may still contain too much information for the viewer to comprehend. I tried to come up with a few simple video effects, that would further highlight what is important on the scene. For example, this one tries to focus the attention on the bot’s response, saying that it could not find anything in the knowledge base and asking whether you would like to post a new question.

As you can see, there is quite a vast space for creativity, so I spent another two days slicing and dicing the original screencast, masking out bugs, creating transitions and other small visual effects. I was quite exhausted by the time I reached the final part where we wanted to show a few real use cases, so I just threw together some icons from an explainer kit in a presentation style, hoping, I will eventually replace these scenes with something more interesting.
After completing the video part, I went to a popular audio stock, purchased a simple background track, downloaded a few free sounds of a keyboard and mouse clicks, and ordered a professional voiceover on UpWork. Here is the final result, after putting everything together:
It took me:
- Roughly six full days of work
- $30 (monthly) for a Creative Suite (I share it with my wife, she’s a photographer and needs it anyway). You can also use a free seven day trial for one-time use.
- $15 for a soundtrack
- $60 for the voiceover
- $65 for an explainer video toolkit
- Total: $170 + my time.
Now, “my time” is a big undefined variable here. I could have spent it on something else (maybe fixing the actual bugs?). So, was it worth it?
A similar job on UpWork would have cost me anywhere from $500 to $1000. Someone would have used a similar toolkit, but because he or she does it every day, the end result would probably look more professional. Six days of my time is probably worth more than $1000.
On the other hand, I am sure I would have spent at least one full day on communication with a remote freelancer. Most probably, I would still need to record a screencast by myself, that is another day. I would not have acquired a new skill, nor written this post. Whenever I would need to make changes to the video (like adding better calls to action, replacing screencast fragments or simply extracting specific scenes out of it), I would need the help of someone, who knows After Effects. Now I can do all that by myself. Also, I can now produce our on-boarding video, an ad video for social networks, or any other kind of a video that we may need in the future. So, in my opinion, it was well worth the time spent, but someone may disagree.
Finally, was it a promotional post for OneBar? Well, in a way. If you have reached the end of this article, you probably have a fairly good idea of what we are doing. If you liked it — please visit our upcoming page on Product Hunt and feel free to subscribe or contact us.

If you have any tips for the future video makers — feel free to post them in the comments. I will add best ones to the article. I would also appreciate any criticism and suggestions for my own work. It has not been released yet, and there is still time to fix stuff ;)
DIY explainer video, what it takes when you have no skill was originally published in Hacker Noon on Medium, where people are continuing the conversation by highlighting and responding to this story.
Publication date
Disclaimer
The views and opinions expressed in this article are solely those of the authors and do not reflect the views of Bitcoin Insider. Every investment and trading move involves risk - this is especially true for cryptocurrencies given their volatility. We strongly advise our readers to conduct their own research when making a decision.