Latest news about Bitcoin and all cryptocurrencies. Your daily crypto news habit.
Voice assistants like Amazon Alexa, Google Home has changed how people interact with the new digital world. Voices are more realistic and natural in communication rather than simple text or sometimes even visual elements! Amazon Alexa and it’s enabled devices made a huge impact on the technical success of the voice assistants.
Developing the Alexa Skill
Alexa capabilities are known as skills. We can add additional capabilities (ie, skills) to Alexa by developing a skill. The Alexa Skills Kit is a collection of self-service APIs, tools, documentation, and code samples that makes it fast and easy for you to add skills to Alexa.
Here we are going to show you how we developed a skill named Everyday Quiz
“Everyday Quiz” will asks you 10 multiple choice questions every day. For each correct answer the user gets 1 point. We need to define a voice user interface (called Interaction Model) where we define what requests the skill can handle and how users are going to request them.
Go to Alexa Skills Console and create a new skill. Select the Custom model while creating the skill. Choose an invocation name — in our case, it was “everyday quiz”. The invocation name is used to invoke the skill by the Alexa users.
Now let’s define our interaction model. Select the “JSON Editor” from the left menu. You can copy paste the interaction model given in here to the JSON editor.
QuizIntent
The QuizIntent defines how will the users start the quiz. It does not require any more information to start the questions other than just the command (any one of the sample strings). Thus the slot field has no entries in QuizIntent.
The slots are the “entities” which provide any additional information for the intent to process the user request.
{ "name":"QuizIntent", "slots":[ ], "samples":[ "start quiz", "start a quiz game", "for a quiz", "a quiz", "start the quiz", "start my quiz", "start" ]}AnswerIntent
This is the intent that defines how the users will say the answer to the question Alexa asked. The possible utterances are the samples that we used. We need to define a custom slot type to capture the answer from the user’s response.
Alexa has some inbuilt slot types which can be used if it can provide the additional information for the intent. For example, AMAZON.TIME, AMAZON.PhoneNumber etc. Since the answer to a quiz cannot be placed into a particular category, we need a custom slot type.
{ "name":"AnswerIntent", "slots":[ { "name":"Answer", "type":"ANSWER" } ], "samples":[ "the answer is {Answer}", "my answer is {Answer}", "answer is {Answer}", "I don't know" ]}The sample values for the custom slot are to be provided for Alexa to refer. We need to provide these sample values for the custom slot that we defined outside of the intents array.
"types": [ { "name":"ANSWER", "values":[ { "name":{ "value":"option 1" } }, { "name":{ "value":"Oncologist" } }, { "name":{ "value":"option 2" } }, { "name":{ "value":"option 3" } } ] }]We should also add few inbuilt intents that Alexa provides, such as AMAZON.CancelIntent, AMAZON.StopIntent etc.
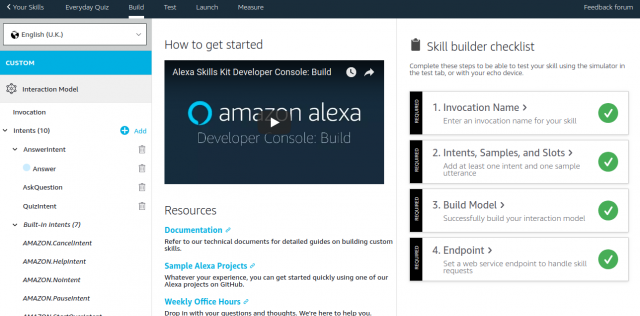
Please see the JSON file here for a complete list of “Intents” and “Samples” (example phrases) used in the skill. After placing the JSON contents in the interaction model JSON editor click on the buttons “Save Model” then “Build Model”.
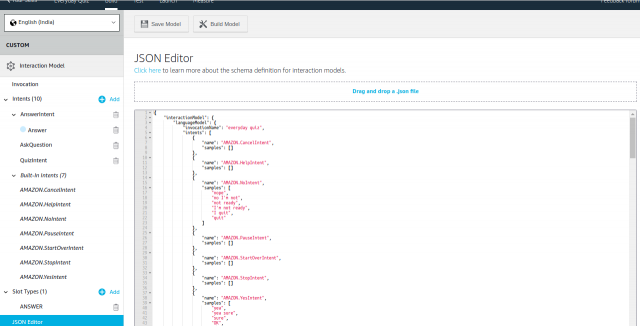
This step builds our interaction model for the Alexa skill. Now we have defined our voice user interface. We can also define intents, custom slots and samples in the respective menu items in the left panel. The JSON Editor gives you an overall view of the interaction model.
The next step is to define how to process the intent request and build responses according to what the user responded. This is where we use Lambda function. Lambda function holds the logic which processes the user response and sends the result back to the Alexa devices.
Process requests and send responses back to the users
Now we are defining how to respond to the user requests. This is where we define the logic of our skill. We are using AWS Lambda function to define the logic. All we need to do is to upload the code to the AWS Lambda function, and then the Lambda function executes the code and do necessary resource management in response to Alexa voice interactions.
Define the Alexa Skill logic
We have used a Node JS library called “string-similarity” for comparing the user’s answers for a question to the correct answer for that question. If the similarity value is greater than 0.6 (out of one) we take it as the answer that given by the user is correct. This gives some flexibility to the user to give responses to a quiz question.
For example, if the answer word is Adolf Hitler, the user can say it as just Hitler. Lambda function needs to define handlers, which will decide how to process the incoming requests. These handlers need to be registered as Alexa’s handler object. Thus the basic setup of an Alexa handler is like:
exports.handler = (event, context) => { const alexa = Alexa.handler(event, context) alexa.appId = APP_ID alexa.registerHandlers(handlers, startHandlers, quizHandlers) alexa.execute()}Here we have registered 3 handlers using the ‘registerHandlers’ function. Also we will define two session level states; START and QUIZ. Our first handler would look like this:
const handlers = { 'LaunchRequest': function() { this.handler.state = states.START this.emitWithState('Start') }, 'QuizIntent': function() { this.handler.state = states.QUIZ this.emitWithState('Quiz') }, 'AMAZON.HelpIntent': function() { this.response.speak(HELP_MESSAGE).listen(HELP_MESSAGE) this.emit(':responseReady') }, 'Unhandled': function() { this.handler.state = states.START this.emitWithState('Start') }}When the user launches the skill, it is in the START state. Then in the ‘startHandlers’ we define the state “Start” as
'Start': function() { this.response.speak(“Welcome to Quiz Game!Are you ready to take the quiz ? ”).listen(“Are you ready to take the quiz ? ”) this.emit(':responseReady')}Thus Alexa will give a welcome message and wait for the user response to a prompt that asks them if they are ready to proceed. We have defined another intent AMAZON.YesIntent in startHandlers which will catch the positive responses if the user makes a positive reply on behalf of the Start intent.
'AMAZON.YesIntent': function() { this.handler.state = states.QUIZ this.emitWithState('Quiz')}Now we have to start the quiz. So in the YesIntent we changed the state to QUIZ and switch to the intent Quiz in the ‘quizHandlers’ state. In the Quiz intent, we initialize the data (ie, the multiple choice questions) and set some session attributes.
'Quiz': function() { var data = < QUESTION LIST > this.attributes['data'] = data this.attributes['response'] = '' this.attributes['counter'] = 0 this.attributes['quizscore'] = 0 this.emitWithState('AskQuestion')}The ‘AskQuestion’ intent is where we ask a question from the data that we have. The data has 10 questions as a list. We use the attribute ‘counter’ to keep track of the question number.
let question = data[this.attributes['counter']]
The question is asked to the user and we keep the session as open. If the user does not respond we prompt the same question once again before ending the session and exiting the skill. When the user says the answer it will be caught by the ‘AnswerIntent’ in the ‘quizHandlers’. We extract the slot value for ANSWER slot type and compare it with the actual answer to the question.
function compareSlots(slots, item) { var value = item.Answer var requestSlotvalue = slots.Answer.value var similarity = stringSimilarity.compareTwoStrings(requestSlotvalue.toString().toLowerCase(), value.toString().toLowerCase()) if (similarity1 >= 0.6) { return true } else { return false }}If the comparison result is true, we increment the ‘score’ attribute and ‘counter’ attribute. If the result is false, ‘score’ remains unchanged and only ‘counter’ is incremented. At the end of the question, the total score that the user scored will be given and end the session.
It is not necessary to have states defined in the code because a simple skill works fine without them. But it is very useful to use states since we can easily switch between different handlers.
For example, here we used AMAZON.YesIntent in ‘startHandlers’ and ‘quizHandlers’. On ‘startHandlers’ it set the state to Quiz and direct to the Quiz intent. The Quiz intent initializes necessary session attributes. But in ‘quizHandlers’ the AMAZON.YesIntent directs to the ‘AskQuestion intent and keeps the flow of asking next question one after another. Thus the same intent causes two different behaviors according to the state. Thus it is a good practice to use states and state management particularly if you plan on adding more features to your skill in future.
You can find the complete code on the GitHub
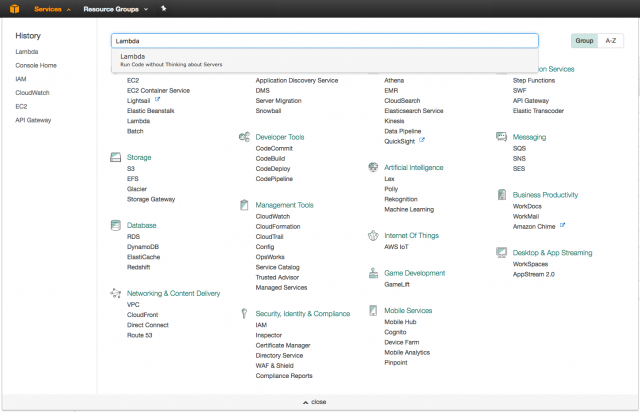
Create Lambda function and upload your files Go to https://aws.amazon.com/ and sign in using your account. You need to set up your account if you don’t have one and provide the billing details. After you sign in, select Lambda from services.
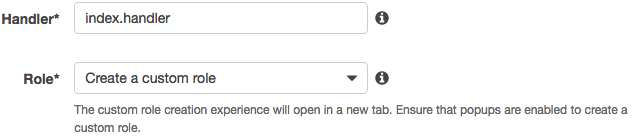
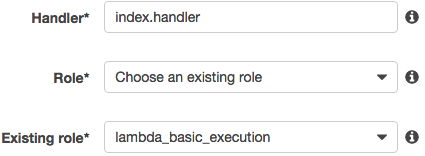
Now you have to make sure that your selected region is either US East (N. Virginia) or EU (Ireland). AWS Lambda currently works with these two regions only. Now click on the button ‘Create Function’. This will prompt you to provide some info about the function. Enter the name of your Lambda function and select “Create a custom role” from Role drop-down. This will launch a new tab in your browser for configuring custom role.
Configure the details as above and click on the ‘Allow’ button. Now you have redirected back to the configuration setup page.
Click on the ‘Create function button and you have created the Lambda function for our skill.
Now click on “Add triggers” from the left menu and select Alexa Skills Kit from the list. Scroll down and under Configure triggers, select Enable for Skill ID verification. A skill ID Edit box should appear. Go to your Amazon developer portal and copy your Skill ID and paste it into Skill ID box. Click on the “Add” button and then the “Save” button from top.
Click the box that has the Lambda icon followed by the name of your function and under the “Function code” section select Code entry type as “Upload a .zip file”. Now click on the Upload button that just appeared when you opted for zip upload and chooses the zip file from the provided codebase (it includes node modules and all other files) and save the changes. Now copy the ARN value for this Lambda function from the top right corner of the page.

Go back to Amazon developer portal and select the Endpoint tab on the left side navigation panel. Select the “AWS Lambda ARN” option for your endpoint and paste the ARN value to the field “Default Region”. Now click on the Save Endpoints button at the top of the main panel. Now you have successfully connected your code to the skill.
Test and Submit for Certification
After you set up the endpoint click on “Save and Continue” and you can now test your skill. Test it to see it’s working all as expected. You can also configure test events in the AWS Lambda by using the contents in the “request” box in the Service Simulator in developer portal when you test the skill. To apply for the certification, select the Launch option from the top menu.
Fill out the necessary fields like name, description etc. You need to provide some example phrases that can be used to interact with our skill. Use phrases that are in “Sample phrases” that you added for each intent while defining the interaction model.
Give a good icon for your skill in proper size mentioned on the page. After you done with all necessary fields click the button “Submit for Review”. The certification process may take a few days. If you pass the process you will be notified by email and your skill will be live after the successful completion of certification.
Originally published at botartisanz.com.
Hopefully, we have covered everything that will help you in building an Alexa Skill. In case if you have any questions or suggestion, you can let us know via comment or contact us via our website (http://botartisanz.com/contact)
At Botartisanz, We build chatbots and voice app for businesses requirements. Have a look at some of the chatbot our team have developed (http://botartisanz.com/projects)
Build an Alexa Quiz Game Skill Using Alexa Skills Kit was originally published in Hacker Noon on Medium, where people are continuing the conversation by highlighting and responding to this story.
Publication date
Disclaimer
The views and opinions expressed in this article are solely those of the authors and do not reflect the views of Bitcoin Insider. Every investment and trading move involves risk - this is especially true for cryptocurrencies given their volatility. We strongly advise our readers to conduct their own research when making a decision.