Latest news about Bitcoin and all cryptocurrencies. Your daily crypto news habit.
Learn how to use the Router component properly https://clean-swift.com/clean-swift-ios-architecture/
https://clean-swift.com/clean-swift-ios-architecture/
Please make sure that you have read Introducing Clean Swift (VIP) Architecture before proceeding with this tutorial.
The Router component is responsible for passing data and handling transitions between view controllers. This is a very useful component if we utilize it properly.
For the purposes of this tutorial, I have created an example project with 2 scenes called Login and Register. There would be 2 scenarios presented below.
- Transitioning from Login to Register
- Passing data from Login to Register
Transitioning
I will start by showing you how to transition to the next view controller. The Router component already contains example methods that we can adapt for our needs.
LoginRouter
We will edit the routeToSomewhere() method and name it routeToRegister() because we want to present the Register scene on a button click. I have commented the lines that are responsible for the passing of data which I will cover later in this tutorial.
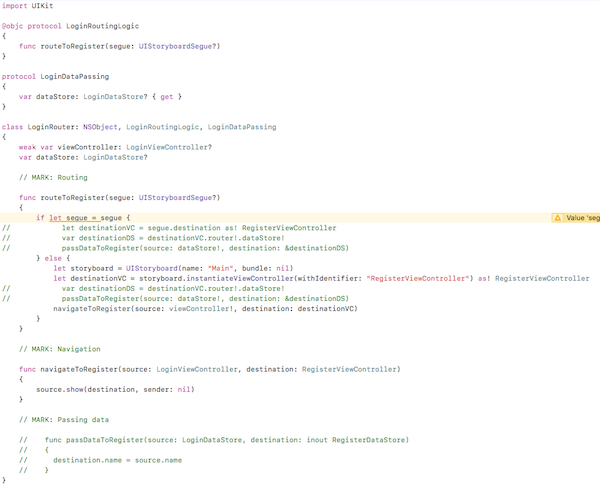
Routing Logic ProtocolAt the top of the file, there is a protocol called RoutingLogic.This protocol will contain all the methods that are responsible for the transitioning. Everything that is declared here can be accessed from the ViewController (in our case the LoginViewController).
routeToRegister()CleanSwift provides us with two solutions for handling the transition between view controllers. (1) by using a segue, (2) programmatically.
#1 Using a Segue
Under LoginViewController the CleanSwift template generates for us an override of the prepare(for segue:) method. This method will be triggered each time a view controller is pushed/presented with a segue.
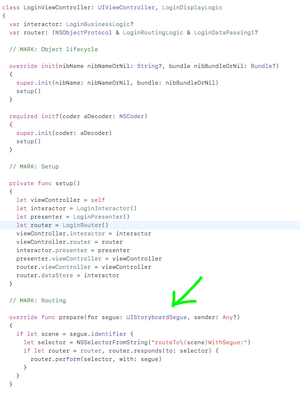 IMPORTANT: When you are using segues, you have to set the segue identifier to match the naming of the method.
For example, if the method of the segue identifier is set to Register then there should be a method declared under Router that should be named routeToRegister(segue: UIStoryboardSegue?).
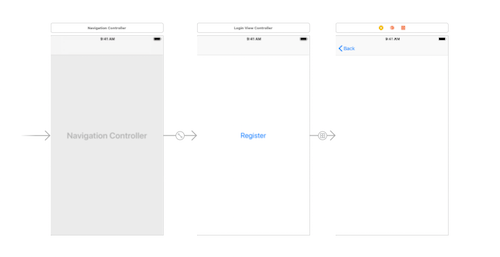
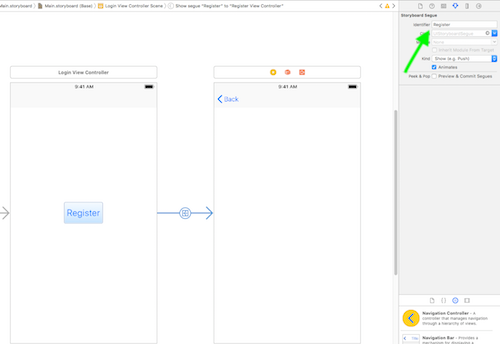 An example Segue created from a Storyboard#2 Programmatically
In order to navigate to the Register scene, you will need to connect an IBAction to the button and call routeToRegister(nil).
Passing Data
Passing data is also done via the routeToRegister() method. All we have to do is uncomment a few lines that were commented before due to our focus on the transition logic.
Data Passing & Data Store ProtocolsEach Router component contains a protocol that handles the data passing logic. In our case, it's called LoginDataPassing. This protocol implements a DataStore protocol that is declared under Interactor.
The DataStore protocol basically stores variables that we need to pass to the next scene. The Interactor does all the logic for populating those variables. The Router just inherits the values.
passDataToRegister()This method is responsible for assigning values to the destination DataStore protocol. It contains 2 attributes:
- Source DataSource protocol - represents the data source of the current view controller.
- Destination DataSource protocol - represents the data source of the destination view controller.
Assuming that we need to pass data from the Login to the Register controller, we will assign the LoginDataSource as the source, and the RegisterDataSource as the destination.
In the current example, I am passing a variable called name. In order to pass that variable, we must declare it to the both Login and Register data sources. After declaring both variables, you can assign some random string directly to the name variable in LoginInteractor (for testing purposes). Go back to the LoginRouter and inside passDataToRegister() assign the value to the destination data store.
destination.name = source.name
If you navigate now from Login to Register, the routeToRegister() method will be called and the RegisterDataSource protocol will contain the correct name that was assigned from the LoginDataSource protocol.
That’s it from this tutorial and if it helped you please 👏 or share this story so others like you can find it. Thank you for your attention! 🚀 Check out my latest project:
VIP Sports Bet Tips & Scores on the App Store
Read more of my writing on Medium:
- Installing the Clean Swift Template in Xcode
- Your ultimate guide to the Google Maps SDK on iOS, using Swift 4
- SWIFT — Custom UIView with XIB file
- How to add Spotlight support to your iOS app - Hacker Noon
- Core Data Relationships
- Understanding Auto Layout in Xcode 9
Subscribe to my Newsletter:
Routing in Clean Swift (VIP) Architecture was originally published in Hacker Noon on Medium, where people are continuing the conversation by highlighting and responding to this story.
Publication date
Disclaimer
The views and opinions expressed in this article are solely those of the authors and do not reflect the views of Bitcoin Insider. Every investment and trading move involves risk - this is especially true for cryptocurrencies given their volatility. We strongly advise our readers to conduct their own research when making a decision.