Latest news about Bitcoin and all cryptocurrencies. Your daily crypto news habit.

Ledger support for VeChain hit the market this afternoon in my time zone, and I just went through the entire process. There’s been tons of questions thrown around about how it’s done exactly — that, in combination with the time-sensitivity of X Node binding, has lead to more than a few panics from VeChain fans that want to preserve their well-earned X Nodes as loyal, early enthusiasts.
I feel like I’m now trained enough to diffuse a bomb. Anyway, here’s a detailed guide on how to set up an X Node with the Nano Ledger app!
- Install the VEN application onto your Ledger
- Access Your Wallet Via Desktop App
- Add Your Address To Your Mobile App
- Bind the X Node
- (Optional) Swap VEN for VET and Transfer To Your X Node
What you’ll need:
- A Ledger Nano S
- A mobile device with the official VeChain mobile app installed
- A computer
- Optional: an L Bank account (affiliate link).
1. Install the VEN Application
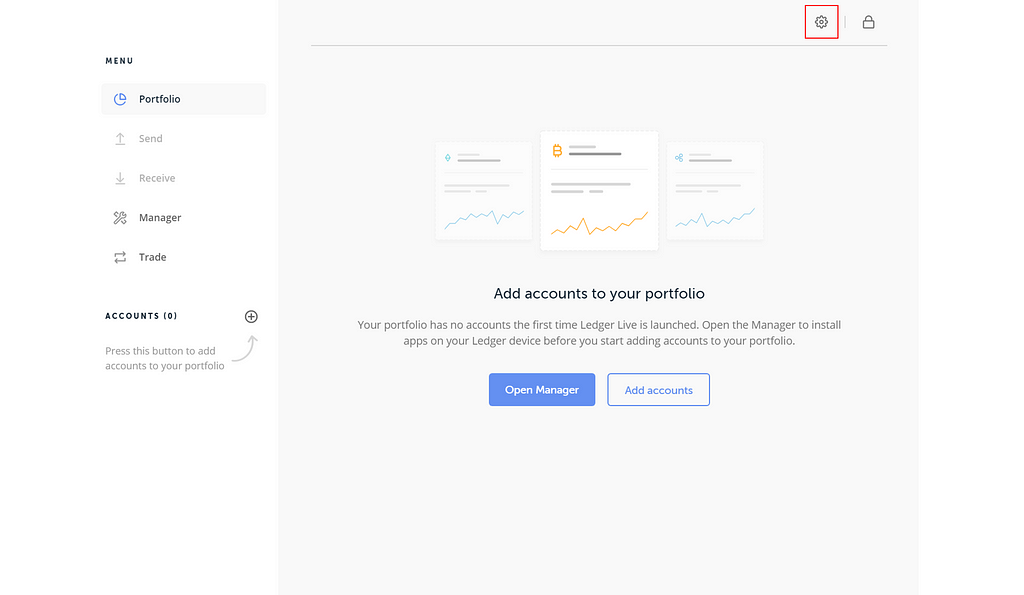
To do this, first you’ll need to install Ledger Live if you haven’t already. Once you open it, you’ll first need to make sure that both your Ledger and your Ledger Live are up-to-date. In order to do that, click on the Settings icon in the top right side of the program.
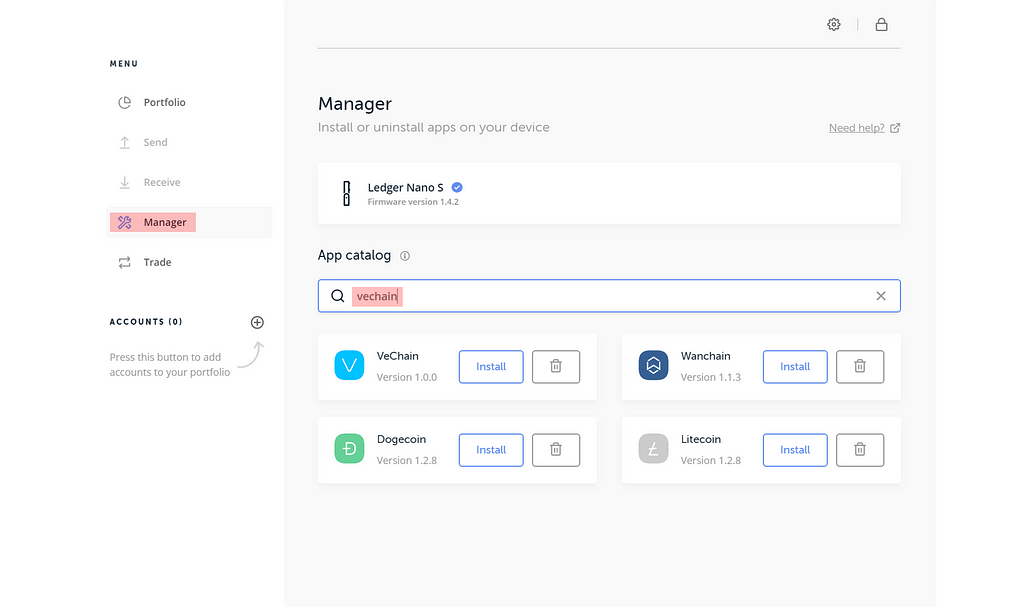
Within Settings, go to About. It should have your Version info. If it isn’t at least Version 1.1.4, then you’ll need to update your Ledger Live software because Version 1.1.4 has VET wallet support. Similarly, you’ll have to update your Ledger firmware as well — should be 1.4.2 or above.
NOTE: If your Ledger is giving you an error about lack of space while it tries to install the firmware, you can delete your other blockchain apps on the ledger to make room for the firmware update. Deleting the apps will not delete you wallet, you can always restore it and get your wallet back. For example, if you have 1 BTC in your existing Ledger wallet and you delete the BTC app on your device, once you reinstall it, you will see the 1 BTC again on your device and will be able to access/move it. So don’t worry about deleting the apps.
Once that’s up-to-date, open up your Ledger Live again if it had to restart. After you open it again, go into the Manager tab and search for VeChain. The VeChain wallet should appear; click Install.
2. Accessing Your Wallet
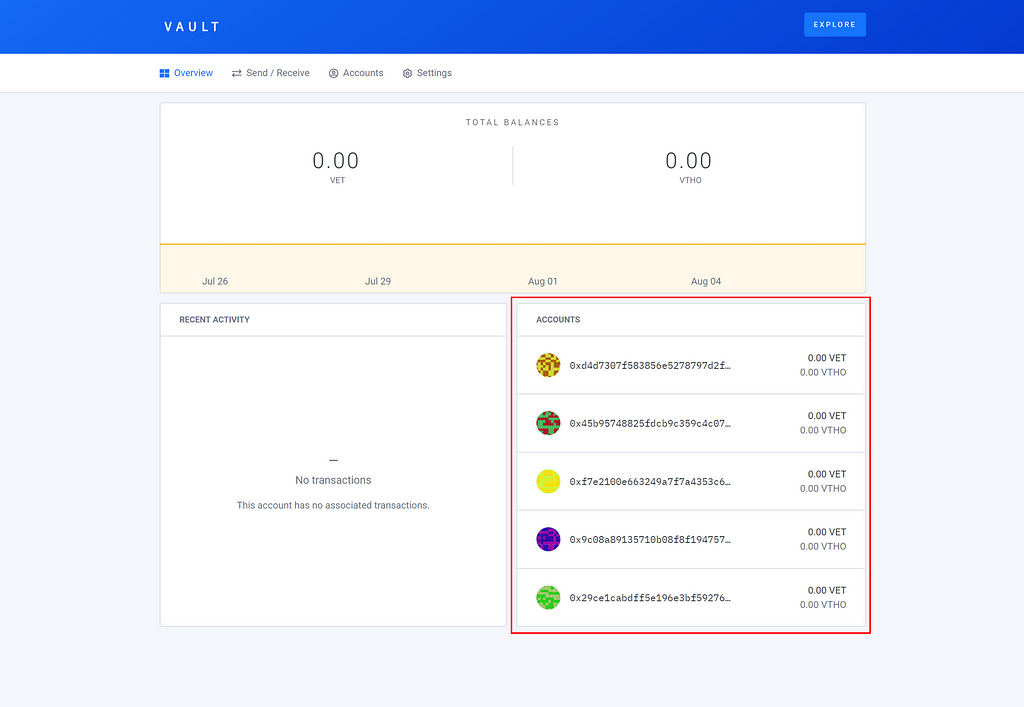
After you’ve installed it, open up the VeChain app on your Ledger device, and head over to https://vault.veforge.com/ and you should see the following screen:
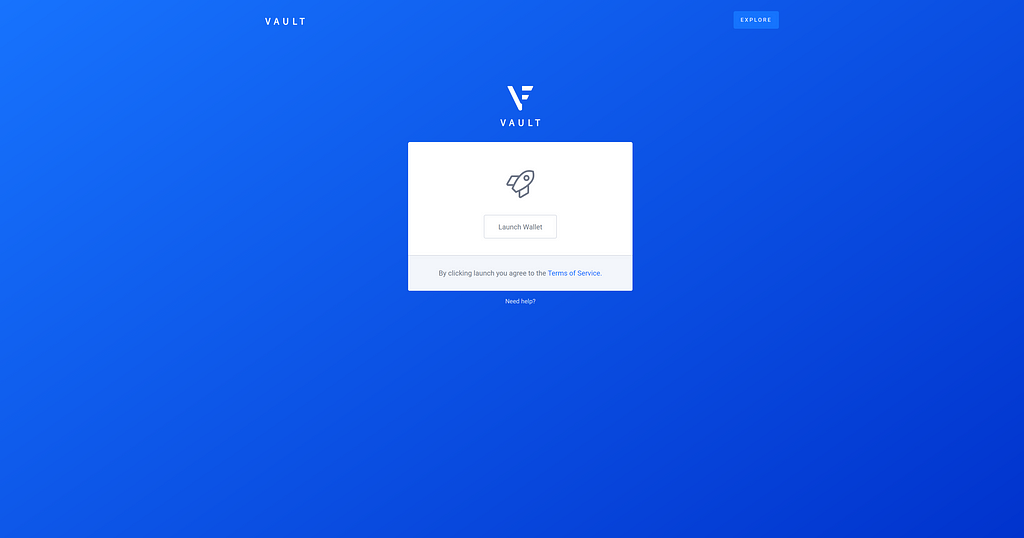
Bookmark this website, it is where you’ll go to be able to access your VET wallets.
NOTE: If you go on the website and it gives you the text “ Unlock your Ledger and Open the VeChain App to get started” then you have to first open up the VeChain app on your ledger. You do this by clicking both buttons on your Ledger when you see the VeChain app centered on the display.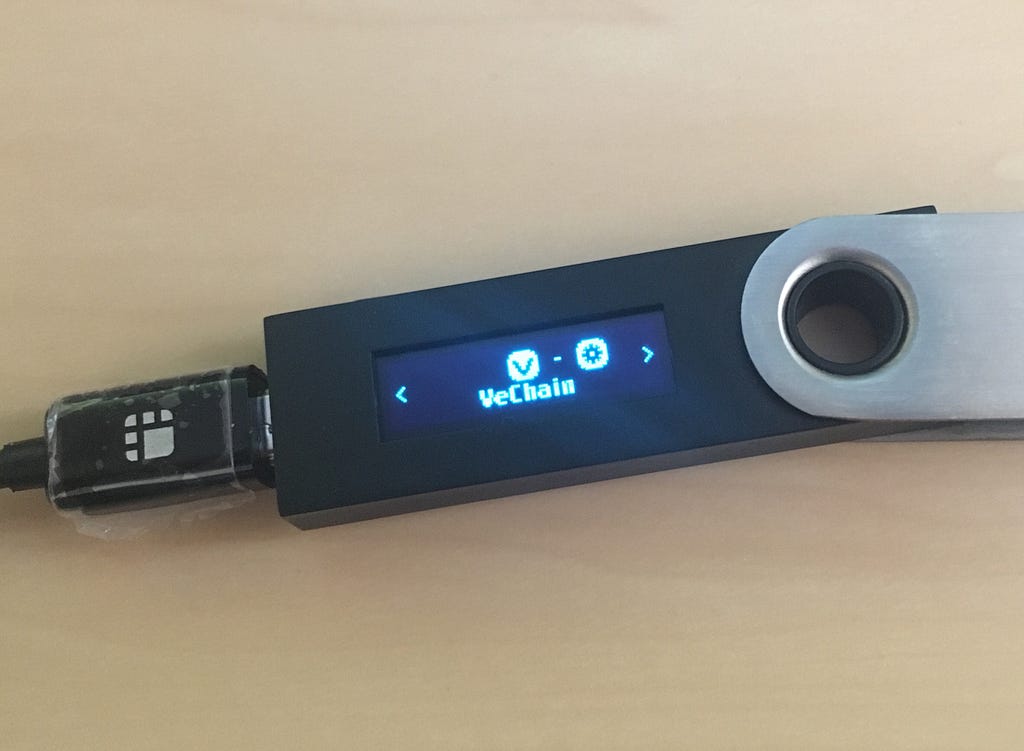
Once you click Launch Wallet, it’ll say Getting Addresses. This part may take a few minutes, unsure why. Once it’s open, you’ll see a page with five addresses on the bottom right, under Accounts.
Now it’s time to connect your address to your mobile wallet, so that you can bind the X Node. Make sure that you have downloaded the Mobile Wallet for iOS or Android.
3. Add Your Address To Your Mobile App
After you have downloaded the Mobile Wallet for iOS or Android, keep your laptop/desktop and mobile device closeby. After you go through the whole account creation on the VeChain Mobile Wallet (you don’t have to create a wallet during the setup process because you’ll be using one that you import from your Ledger wallet), you’ll be able to either import or create a wallet. To do so, click on “Me” at the bottom right of the app (maybe it’s different on Android, I’m doing this on iOS), and then click on Manage Wallets.
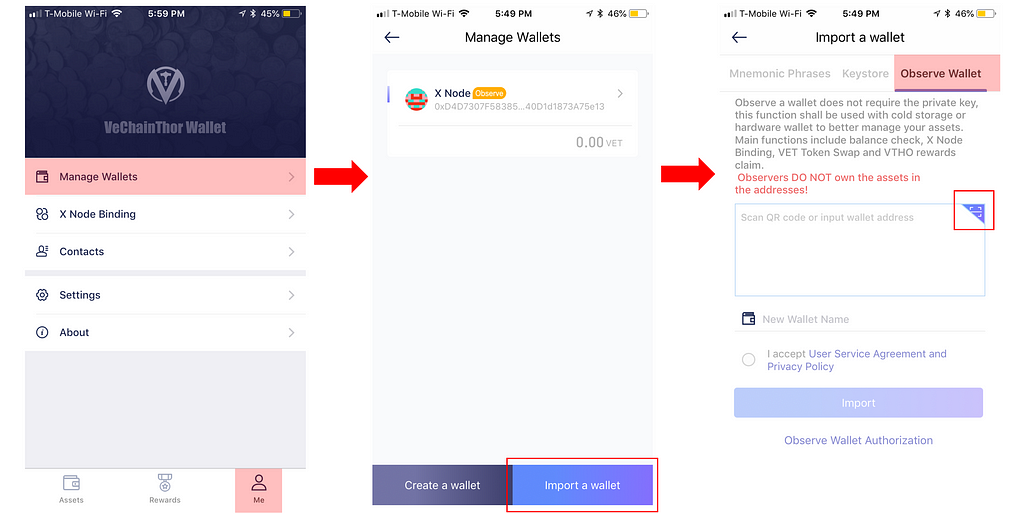 Click Me -> Manage Wallets -> Import a wallet -> Observe Wallet
On the next screen, you’ll see two options at the bottom: Create a wallet and Import a wallet. Click on Import a wallet. On the next screen, at the top right, click on Observe Wallet.
Now go back to your Desktop and click on the address you want to use. It’ll open up a new page with details. On the right-hand side, for the address you want to use, click on Receive. A QR Code will appear.
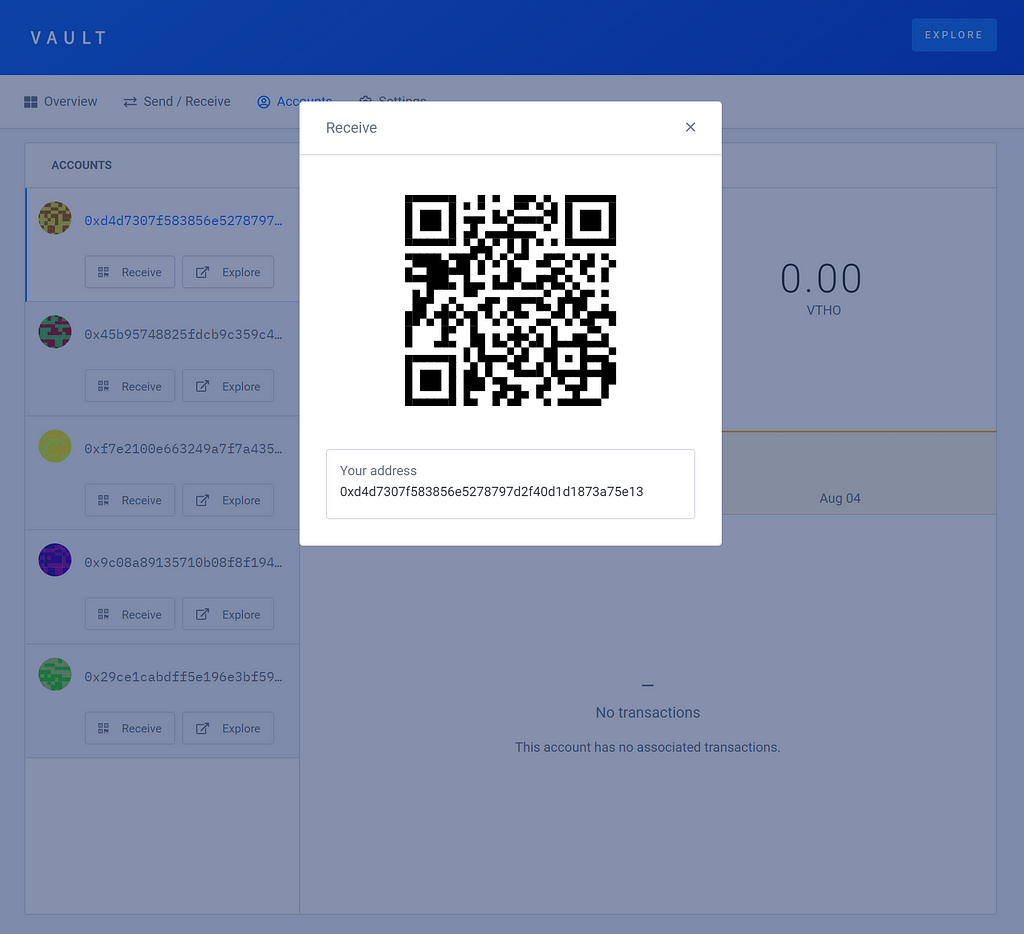
Scan the QR Code with your mobile device by clicking on the purple scanning icon at the right side of the text box that says “Scan QR code or input wallet address.” The scan should automatically enter the wallet address into the box.
Underneath that, just enter a New Wallet Name, click “I accept” and click Import afterwards. Now, on your mobile device, you’ll be greeted with a new page that is a bit confusing.
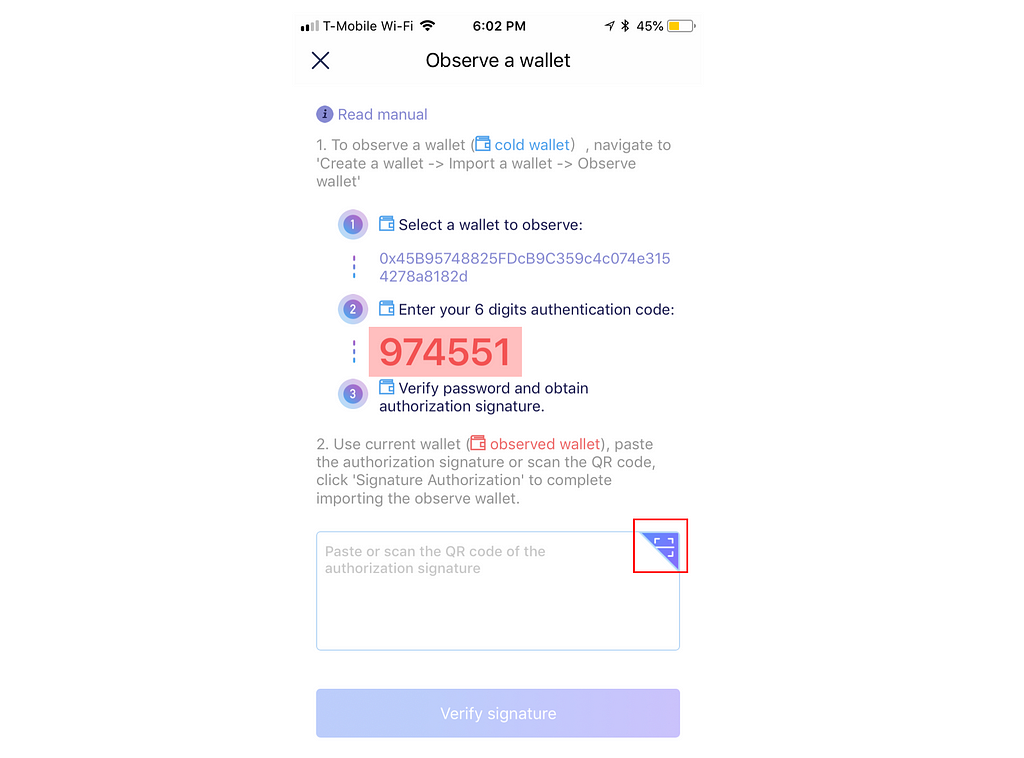
All you have to worry abut right now is that big red six-digit code, which you’ll type into your desktop in just a minute. Don’t worry about the QR code scanner for now, we’ll get to it in just a minute as well. Keep the screen open on your Mobile app, but now check out your Desktop app. On your Desktop app, click on Settings, and under settings click on Observe Wallet Authorization.
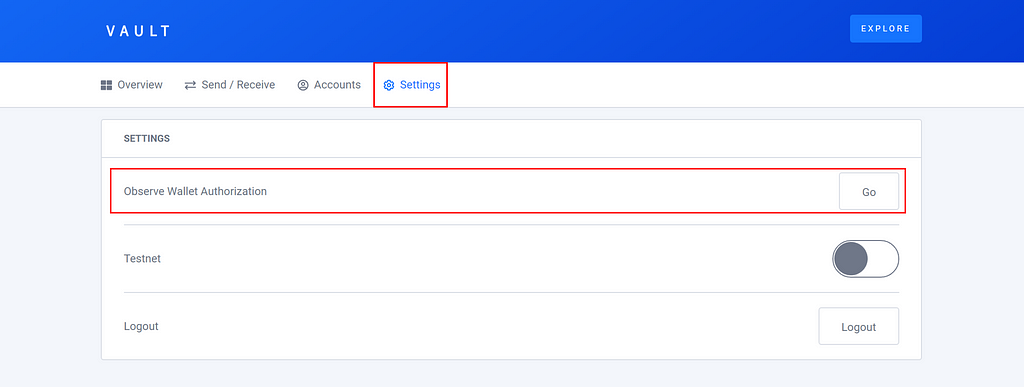
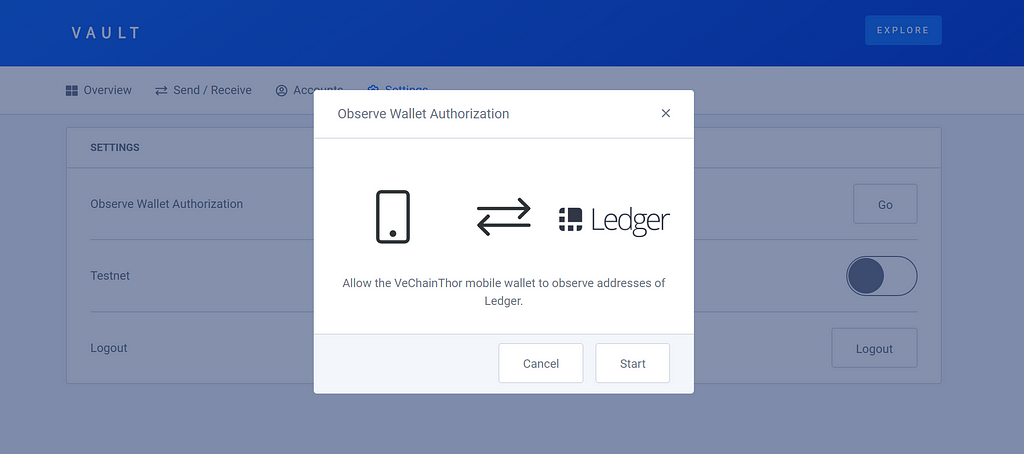
A popup labeled “Observe Wallet Authorization” will appear. Just click Start.
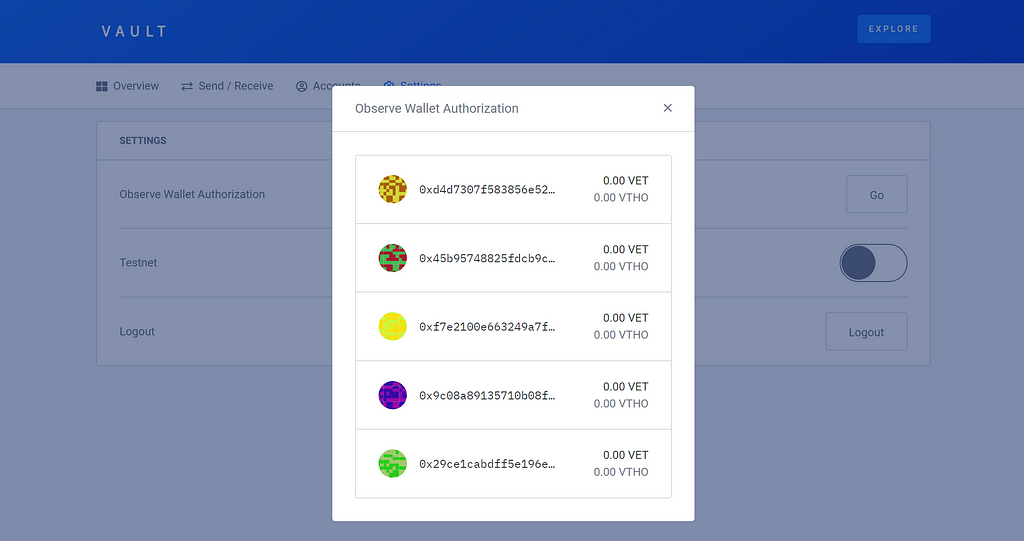
On the next screen, select the address you are trying to bind. A QR Code will pop up. IGNORE IT. Click next.
Finally, the Desktop app will ask you to enter the 6-digit authentication code, which is the big red six-digits. Click next, and go to your Ledger device and click “Sign the Message.” Click next.
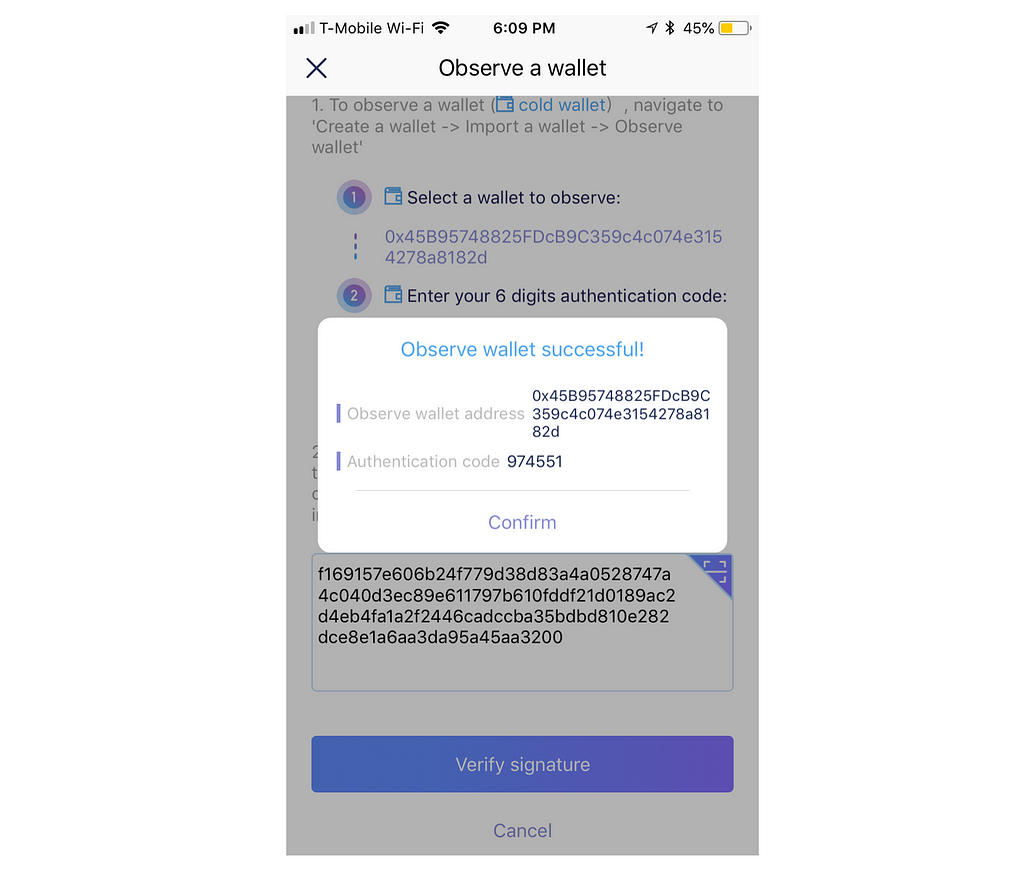
A new QR code will appear. Use this one, and scan it like you did previously through your mobile app. Then on your Mobile App, click Verify Signature. A message will appear saying “Observe wallet successful!”
4. Bind the X Node
This part is all done on the mobile app, so you don’t need your Ledger device or your VeForge account anymore (i.e., your Desktop app). You can close those.
Now, revisit your mobile app and click on Assets on the bottom left. You should see the wallet you just set up, and a button that says X Node Binding. Click it. It will take you to the next screen, which is Step 1 of the binding. Click on your wallet, then click confirm. It’ll take you to Step 2.
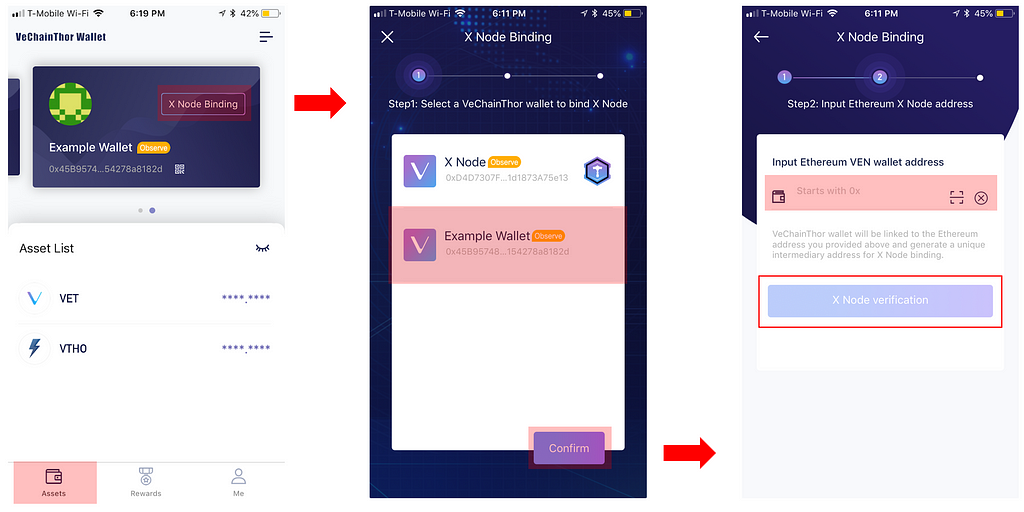
Step 2 is where the app verifies that you have an X Node from the ERC-20 wallet. So just enter the Ethereum address that you have your ERC-20 VEN on, or scan the QR code to automatically have it entered, and then click X Node verification. If it qualifies, then congratulations, you’ll reach Step 3. Otherwise, you can’t bind your X Node.
Remember, on Step 2, you need to enter the ETHEREUM address that has your ERC-20 VEN stored, so that VeChain can check if it is X Node qualified. DO NOT enter your new VeChain wallet address into that space, because it will not qualify.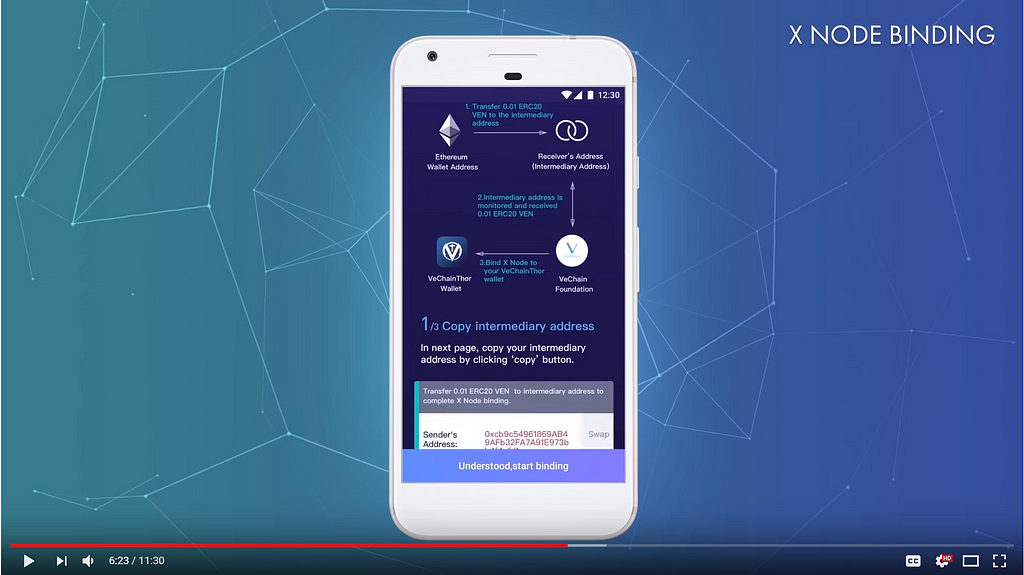
Step 3 should look like this. I screenshot this from the actual video because I didn’t take one before, and now I have no other X Node to bind so I can’t get to step three again on my own phone. Anyway, just click “Understood, start binding.”
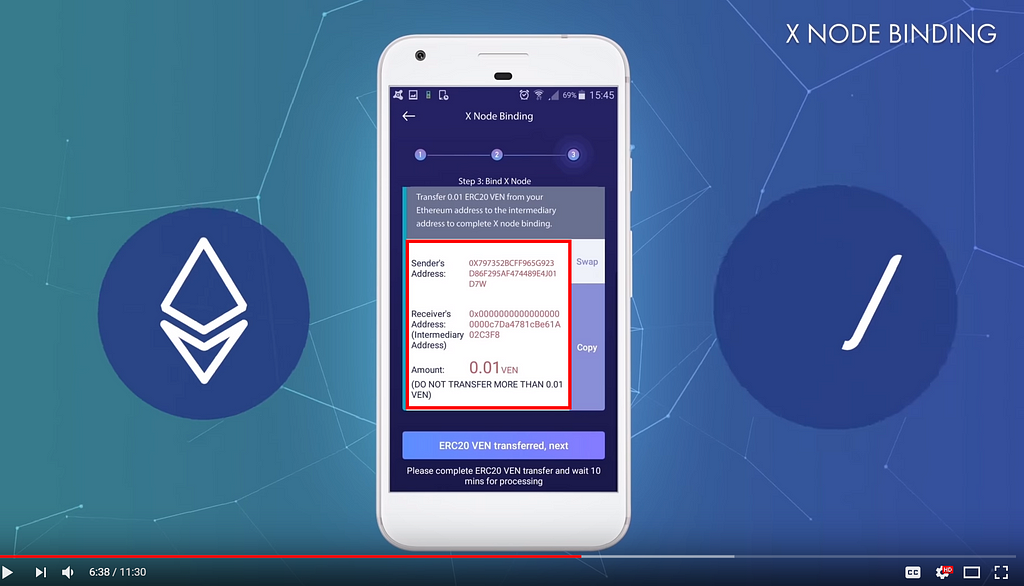
On the final screen, you’ll see three things:
- Sender’s Address: this is the Ethereum address that you MUST send from, because this is the address that is X-node qualified and you said you owned it; now VeChain is asking you to prove that you own it. Don’t send ERC-20 VEN from any other wallet.
- Receiver’s Address: this is the address you are sending a 0.01 VEN to. You can click COPY on the right to make it easier for oyu.
- Amount: should be 0.01
To send the 0.01 VEN (ERC-20 token, not VET), you’ll need to make sure you have enough Ethereum in your wallet to pay for the gas. So if you don’t, do that first. Now you just wait. I know the app says wait ten minutes but I had to wait 30. Unsure of how many confirmations that VeChain needs before they accept the transaction. You don’t have to have your app open, once the transaction is verified, your X Node will automatically be bound, you don’t even have to click next.
You’ve successfully bound your X Node to your Ledger Wallet Address, congratulations!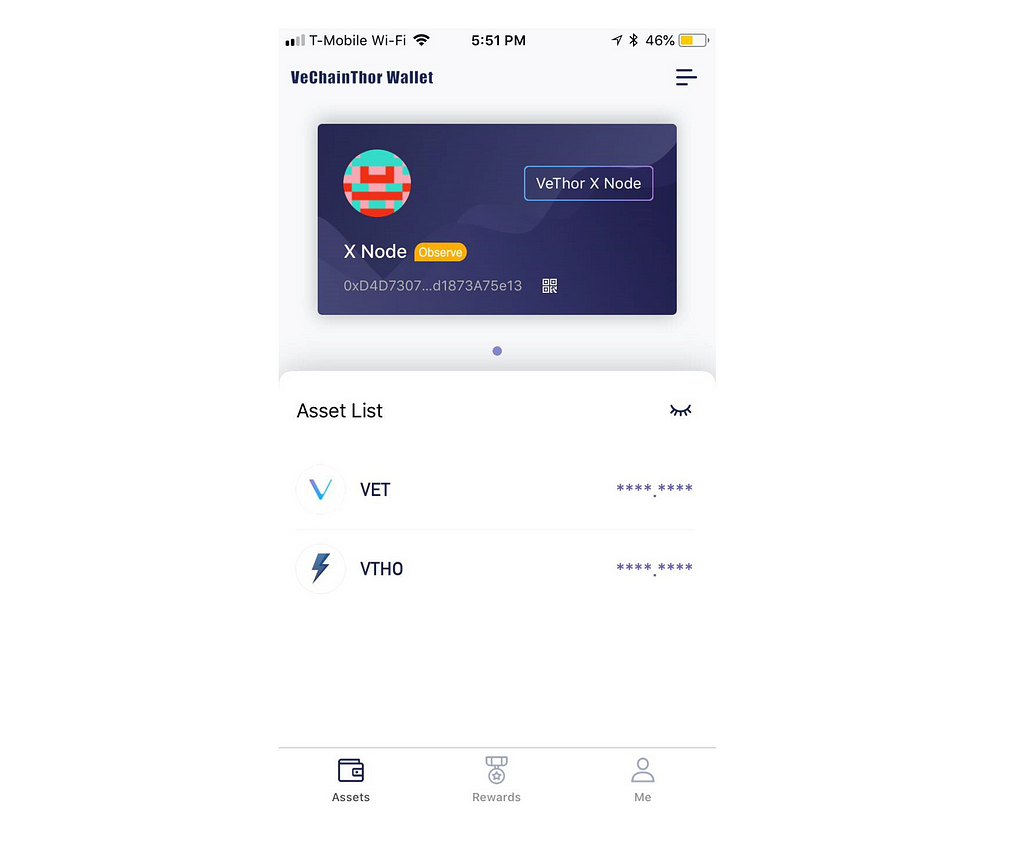
Now, where the button that said X Node Binding once was, you should now see VeThor X Node. Next, you’ll want to transfer over all your VET, but before you can do that, you need to swap your Ethereum-based VEN for VeChain’s main-net VET.
5. (Optional) Swap VEN for VET
If you want to swap immediately, the only way to swap is through L Bank right now (Binance swap is over, and so are most other exchanges). So you can sign up for an account here (note: affiliate link). If you don’t want to swap immediately, you can wait for the VeChain Mobile Wallet Swap support, which will come out on August 11th, 2018. You will have until September 1, 2018, to 1) swap your VEN to VET, and 2) transfer your VET over to your X Node wallet.
After you sign up, the first thing you need to do is set up Google 2-factor authentication. Without setting it up, you won’t be able to withdraw anything. After you do, you can withdraw up to 20 BTC per day.
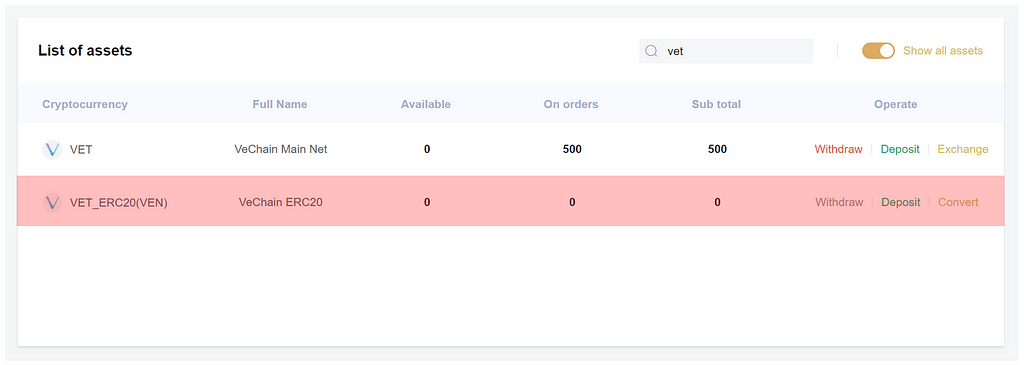
After you do that, it’s time to deposit your VEN, which LBank will convert into VET. Search for “VET” under the “List of Asset, which can be accessed by clicking “My Account” on the top right of the portal and then clicking “My Account” again in the dropdown menu that appears.
Once you find the VET_ERC20(VEN) Cryptocurrency (NOT the VET cryptocurrency), click on Deposit on the right-hand side. It will take you to the deposit page, where it will show you a warning first. Click Agree, and a deposit address will appear.
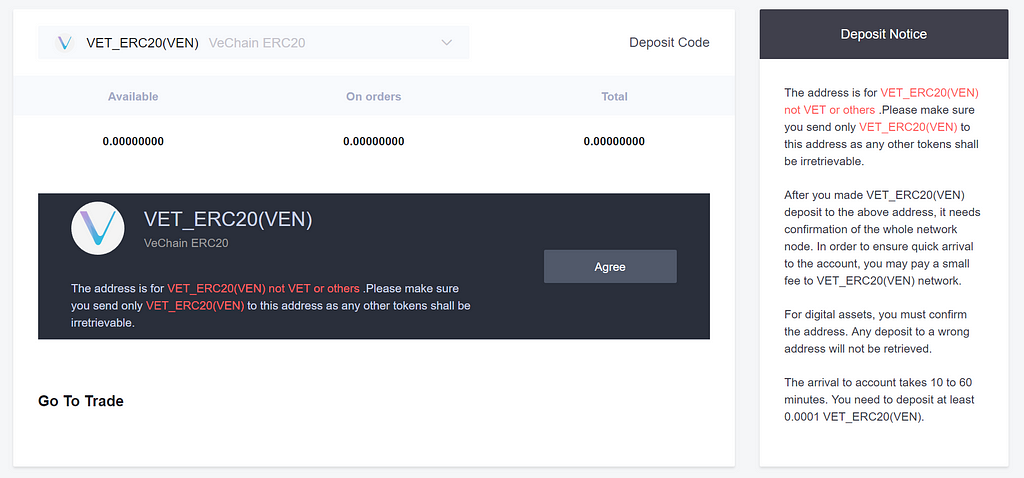
You can deposit your ERC-20 VEN into that address, and LBank should automatically swap it for you. If it doesn’t happen, you can always just click Convert under List of assets next to “VET_ERC20(VEN)” cryptocurrency once the deposit happens.
Recommendation: send just a small amount to the deposit address first to test and see if you have received it. Once that’s confirmed, you can send the rest over. Furthermore, you need to make sure that you have enough Ethereum in your Ethereum wallet that has your VEN in order to make the transfer!
After your VEN tokens are sent over and swapped to VET (it happens instantly), you can withdraw out your VET. The transfer fee is 200 VET (2 VEN). Transfer it to the new wallet address that is X-node bound. Now you’re all set, and your X Node on the VeChain main net is good to go! Just sit back and watch the VeTHOR pile up.
If you want to leave me a donation you can send me some
- VET: 0x45b95748825fdcb9c359c4c074e3154278a8182d
- BTC: 3HSmZTYtQiACZyvVwS5VTPoitUJS4r5f5k
Got Questions?
- If you want me to guide you through all of this in person, we can set up a call: https://clarity.fm/kennymuli
- If you have one-off questions, you can message me about it on my Worthyt profile: https://worth.yt/kenny
- Twitter (please don’t DM me on there because I get too much spam, if you want to ask me something please use Worthyt): https://twitter.com/kennymuli
VEN to VET: X Node Ledger Bind Tutorial was originally published in Hacker Noon on Medium, where people are continuing the conversation by highlighting and responding to this story.
Publication date
Disclaimer
The views and opinions expressed in this article are solely those of the authors and do not reflect the views of Bitcoin Insider. Every investment and trading move involves risk - this is especially true for cryptocurrencies given their volatility. We strongly advise our readers to conduct their own research when making a decision.