Latest news about Bitcoin and all cryptocurrencies. Your daily crypto news habit.
“Data! Data! Data!” he cried impatiently. “I can’t make bricks without clay.”
Machine Learning is the hottest thing of this world. Everybody start deploying machine learning models in their businesses. At the heart of this intricate process is data. Your machine learning tools are as good as the quality of your data. Sophisticated algorithms will not make up for poor data. Just like how precious stones found while digging go through several steps of cleaning process, data needs to also go through a few before it is ready for further use.
I learn this and use it for my #100DaysOfMLCode Challenge.
 Step 1: Importing the required Libraries
These Two are essential libraries which we will import every time. NumPy is a Library which contains Mathematical functions.Pandas is the library used to import and manage the data sets.This is a list for most popular Python libraries for Data Science. Here’s a snippet of me importing the pandas library and NumPy library and assigning a shortcut “pd”, “np”.
import numpy as npimport pandas as pd
Step 2: Importing the Dataset
Data sets are generally available in .csv format. A CSV file e stores tabular data in plain text. Each line of the file is a data record.We use the read_csv method of the pandas library to read a local CSV file as a dataframe. Then we make separate Matrix and Vector of independent and dependent variables from the dataframe.
dataset = pd.read_csv('ShopSellData.csv')After inspecting our dataset carefully, we are going to create a matrix of features in our dataset (X) and create a dependent vector (Y) with their respective observations. To read the columns, we will use iloc of pandas (used to fix the indexes for selection) which takes two parameters — [row selection, column selection].
X = dataset.iloc[ : , :-1].valuesY = dataset.iloc[ : , 3].values
: as a parameter selects all. So the above piece of code selects all the rows. For columns we have :-1, which means all the columns except the last one. You can read more about the usage of iloc here.
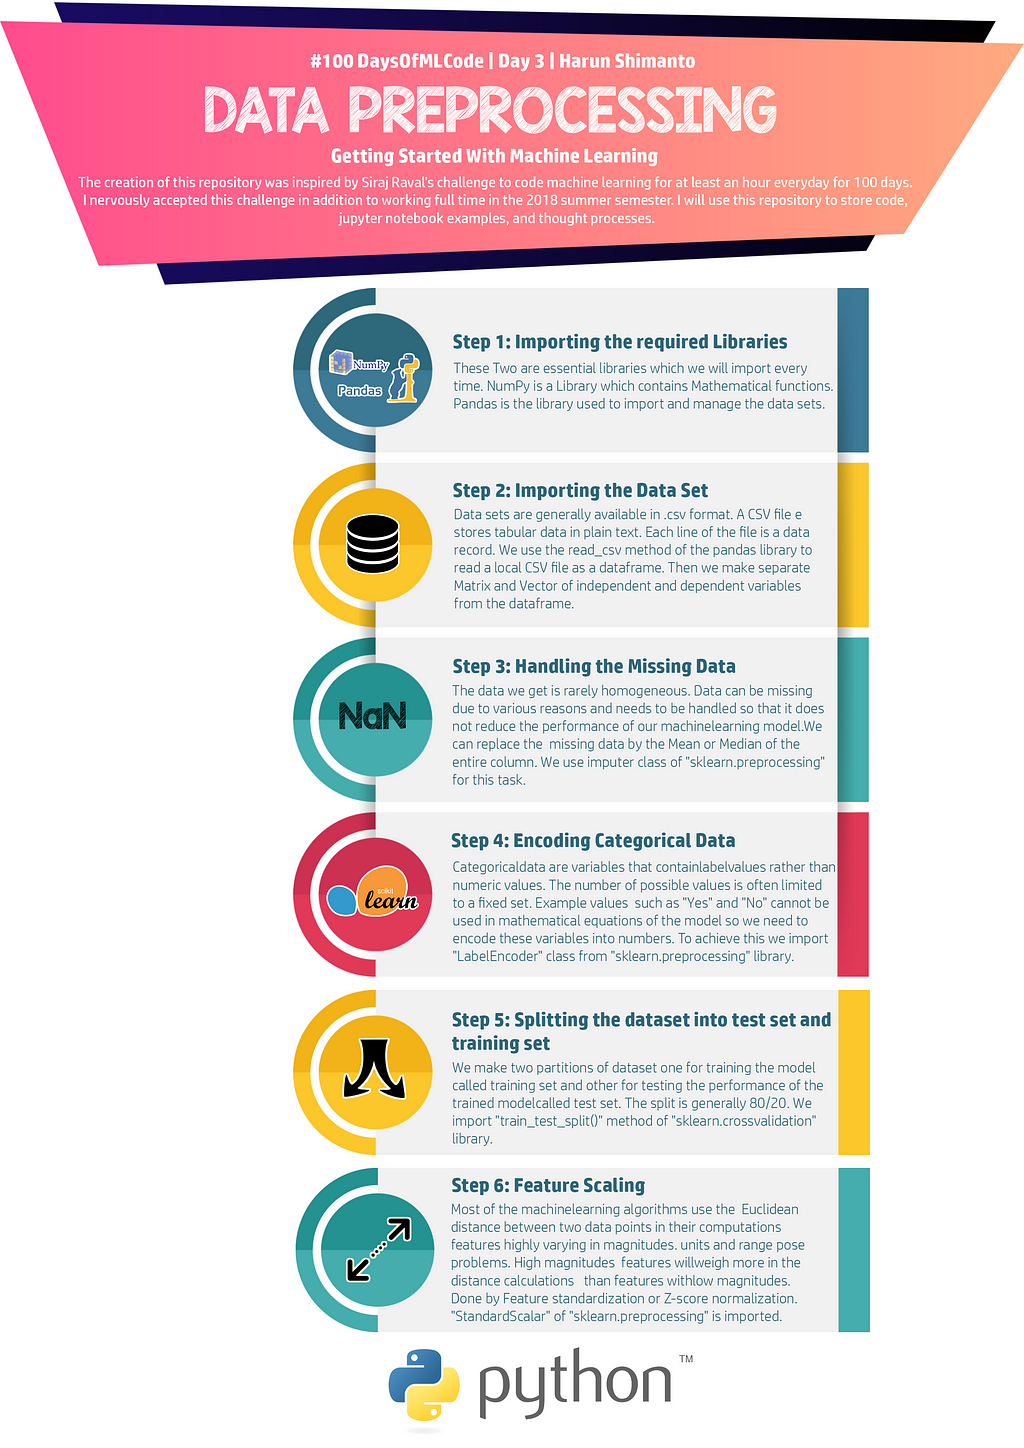 Step 3: Handling the Missing Data
The data we get is rarely homogeneous. Data can be missing due to various reasons and needs to be handled so that it does not reduce the performance of our machine learning model. We can replace the missing data by the Mean or Median of the entire column. We use imputer class of “sklearn.preprocessing” for this task.
The library that we are going to use for the task is called Scikit Learn preprocessing. It contains a class called Imputer which will help us take care of the missing data.
from sklearn.preprocessing import Imputer
A lot of the times the next step, as you will also see later on in the article, is to create an object of the same class to call the functions that are in that class. We will call our object imputer. The Imputer class can take a few parameters — i. missing_values — We can either give it an integer or “NaN” for it to find the missing values. ii. strategy — we will find the average so we will set it to mean. We can also set it to median or most_frequent (for mode) as necessary. iii. axis — we can either assign it 0 or 1, 0 to impute along columns and 1 to impute along rows.
imputer = Imputer(missing_values = "NaN", strategy = "mean", axis = 0)
Now we will fit the imputer object to our data. Fit is basically training, or in other words, imposing the model to our data.
imputer = imputer.fit(X[ : , 1:3])
The code above will fit the imputer object to our matrix of features X. Since we used :, it will select all rows and 1:3 will select the second and the third column (why? because in python index starts from 0 so 1 would mean the second column and the upper-bound is excluded. If we wanted to include the third column instead, we would have written 1:4).
Now we will just replace the missing values with the mean of the column by the method transform.
X[ : , 1:3] = imputer.transform(X[ : , 1:3])
Step 4: Encoding categorical data
Categoricaldata are variables that containlabelvalues rather than numeric values. The number of possible values is often limited to a fixed set. Example values such as “Yes” and “No” cannot be used in mathematical equations of the model so we need to encode these variables into numbers.To achieve this we import “LabelEncoder” class from “sklearn.preprocessing” library.
So the way we do it, we will import the scikit library that we previously used. There’s a class in the library called LabelEncoder which we will use for the task.
from sklearn.preprocessing import LabelEncoder
As I have mentioned before, the next step is usually to create an object of that class. We will call our object labelencoder_X.
labelencoder_X = LabelEncoder()
To do our task, there’s a method in the LabelEncoder class called fit_transformwhich is what we will use. Once again, just like how we did it before, we will pass two parameters of X — row selection and column selection.
X[ : , 0] = labelencoder_X.fit_transform(X[ : , 0])
To accomplish the task, we will import yet another library called OneHotEncoder.
from sklearn.preprocessing import LabelEncoder, OneHotEncoder
Next we will create an object of that class, as usual, and assign it to onehotencoder. OneHotEncoder takes an important parameter called categorical_features which takes the value of the index of the column of categories.
onehotencoder = OneHotEncoder(categorical_features = [0])
The code above will select the first column to OneHotEncode the categories.
Just as we used fit_transform for LabelEncoder, we will use it for OneHotEncoder as well but also have to additionally include toarray().
X = onehotencoder.fit_transform(X).toarray()labelencoder_Y = LabelEncoder()Y = labelencoder_Y.fit_transform(Y)
If you check your dataset now, all your categories will have been encoded to 0s and 1s.
Step 5: Splitting the Dataset into Training set and Test Set
We make two partitions of dataset one for training the model called training set and other for testing the performance of the trained modelcalled test set.The split is generally 80/20.We import “train_test_split()” method of “sklearn.crossvalidation” library.
from sklearn.cross_validation import train_test_split
Now to build our training and test sets, we will create 4 sets — X_train (training part of the matrix of features), X_test (test part of the matrix of features), Y_train (training part of the dependent variables associated with the X train sets, and therefore also the same indices) , Y_test (test part of the dependent variables associated with the X test sets, and therefore also the same indices). We will assign to them the test_train_split, which takes the parameters — arrays (X and Y), test_size (if we give it the value 0.5, meaning 50%, it would split the dataset into half. Since an ideal choice is to allocate 20% of the dataset to test set, it is usually assigned as 0.2. 0.25 would mean 25%, just saying).
X_train, X_test, Y_train, Y_test = train_test_split( X , Y , test_size = 0.2, random_state = 0)
Step 6: Feature Scaling
Most of the machinelearning algorithms use the Euclidean distance between two data points in their computations features highly varying in magnitudes. units and range pose problems. High magnitudes features will weigh more in the distance calculations than features with low magnitudes.Done by Feature standardization or Z-score normalization.”StandardScalar” of “sklearn.preprocessing” is imported.
To accomplish the job, we will import the class StandardScaler from the sckit preprocessing library and as usual create an object of that class.
from sklearn.preprocessing import StandardScalersc_X = StandardScaler()
Now we will fit and transform our X_train set (It is important to note that when applying the Standard Scalar object on our training and test sets, we can simply transform our test set but for our training set we have to at first fit it and then transform the set). That will transform all the data to a same standardized scale.
X_train = sc_X.fit_transform(X_train)X_test = sc_X.fit_transform(X_test)
These are the general 6 steps of Data preprocessing the date before using it for machine learning. Depending on the condition of your dataset, you may or may not have to go through all these steps.
Connect on LinkedIn and, check out Github (below) for the complete notebook.
harunshimanto/100-Days-Of-ML-Code
You can tell me what you think about this, if you enjoy writing, click on the clap 👏 button.
Thanks to everyone.

Data Preprocessing With Python was originally published in Hacker Noon on Medium, where people are continuing the conversation by highlighting and responding to this story.
Publication date
Disclaimer
The views and opinions expressed in this article are solely those of the authors and do not reflect the views of Bitcoin Insider. Every investment and trading move involves risk - this is especially true for cryptocurrencies given their volatility. We strongly advise our readers to conduct their own research when making a decision.