Latest news about Bitcoin and all cryptocurrencies. Your daily crypto news habit.
In the article below, you are going to learn how to setup Babel in a Node project with bare-minimum configuration. “handheld tool lot” by Cesar Carlevarino Aragon on Unsplash
“handheld tool lot” by Cesar Carlevarino Aragon on Unsplash
I do not always like to try different versions of setting up a Nodejs application. Don’t get me wrong here. I do believe in experimenting with one’s set up as it does lead to new learnings but there is a limit to that. Recently, I find myself more often going to set up a Nodejs server to develop a RESTful API. Further, the server has to work with the client in a way that the client can consume the API easily. For the client-side development, I am using ReactJS.
The context switching between the client and the server I often find myself making human errors during the process. One of the most common is using import statements in Nodejs files. This leads to a syntax error called Unexpected identifier. Even after switching to Nodejs v10 LTS on my local machine, I find the lack of using ES6 modules a bit disappointing.
To overcome this problem, and reduce the number of errors I cause during development, I read a few tutorials but decided to mesh a setup of my own. These tutorials, though awesomely written, most of them use a method is that almost completely opposite to one another. I want consistency when working on full-stack applications for my day job.
As a result, I am going to showcase you a streamlined, less time-consuming version of using import statements in a Nodejs server-side application. To continue to read this article, please make sure you have following installed on your local machine:
Getting Started with a Mock Project
I call it a mock because I am going to start from scratch to build this setup. At the end of this tutorial, I am going to leave a link to a Github repository that can serve as a starter kit to many of your Nodejs plus Express projects. You can totally skip to the link part and DIY. There is no complexity here. If you are still curious, continue to read this short article.
To start, create a new directory, traverse inside it and initialize it with npm.
You can check out the package.json file after initializing your project as an npm project. It will be filled with details that you have used to configure npm.
Next, create a new file with the following command from your terminal.

That’s all we need to setup a bare minimum project directory. In the next section, we take a look at what dependencies we have to install and why do we need those dependencies.
Creating the Node server
To create a server I am going to use Express. To include Express in our project as a dependency, run the following command from your terminal.
Next, append the index.js file with the following code.
You can run the server by running the command node index.js. Visit URL http://localhost:3000/ and you will see a message being displayed in the browser window: Hello from Nodejs!.
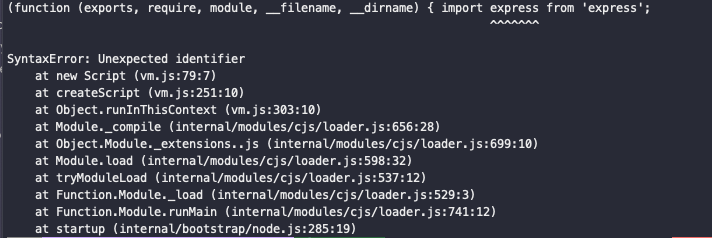
This indicates that the code for the server is fine. Now modify the first line of index.js to:
Run the same command node index.js and stay at the terminal window. This time the server does not start as there is an error in the process. It is the same error that I told you about at the start of this article. Nodejs cannot execute import statements by default.
Using Babel
All we need is a transpiler which allows us to write JavaScript using ES6 features such as import statements in our Nodejs project. What is a transpiler?
Transpilers are also known as source-to-source compilers that read code from source written in one programming language and produce an equivalent code in another language.
In our case, we are not switching programming languages, rather we need to use new language features that are not supported by the LTS version of Node yet. I am going to setup Babel compiler and enable it in our project by going through the following configuration process.
First, you will have to install few dependencies and do mind -D flag as we only need these dependencies for our development environment.
Once you have installed them, add a .babelrc file to the root of the project and add the following config:
The last step in the configuration process is to add a dev script in package.json. You can name this script anything you like. This will take care of running the babel compiler on its own (automate) once there is a change. This done by babel-watch that also takes care of re-starting Nodejs web server.
To see it action make sure the following code to your index.js uses import statement like below.
From terminal write nr dev. If there are no errors, you will get the following:

Where nr is shorthand for npm run. You can also visit http://localhost3000/ in a browser window to verify the result and see if the server is working or not.
Conclusion
This article has shown you how to create a bare minimum Node server from scratch, and how you can introduce upcoming JavaScript features in your Node.js environment using Babel. I am sure now you are not going to make the same silly human errors like me in Nodejs + insert a frontend framework/library of your choice as I did. 😁
The complete code for this article is available in Github Repository 👇
amandeepmittal/node-babel-setup

How to use Import statements in Nodejs? was originally published in Hacker Noon on Medium, where people are continuing the conversation by highlighting and responding to this story.
Publication date
Disclaimer
The views and opinions expressed in this article are solely those of the authors and do not reflect the views of Bitcoin Insider. Every investment and trading move involves risk - this is especially true for cryptocurrencies given their volatility. We strongly advise our readers to conduct their own research when making a decision.